Epson WF-M1560 Users Guide - Page 124
Entering Fax Header Information, it sets the clock back one hour.
 |
View all Epson WF-M1560 manuals
Add to My Manuals
Save this manual to your list of manuals |
Page 124 highlights
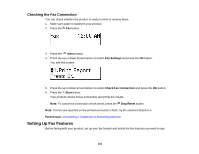
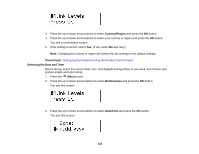
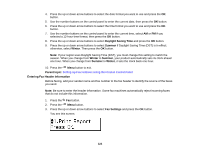
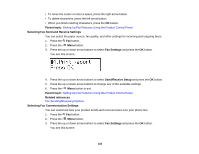
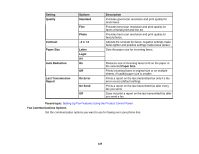
4. Press the up or down arrow buttons to select the date format you want to use and press the OK button. 5. Use the number buttons on the control panel to enter the current date, then press the OK button. 6. Press the up or down arrow buttons to select the time format you want to use and press the OK button. 7. Use the number buttons on the control panel to enter the current time, select AM or PM if you selected a 12-hour time format, then press the OK button. 8. Press the up or down arrow buttons to select Daylight Saving Time and press the OK button. 9. Press the up or down arrow buttons to select Summer if Daylight Saving Time (DST) is in effect; otherwise, select Winter. Then press the OK button. Note: If your region uses Daylight Saving Time (DST), you must change this setting to match the season. When you change from Winter to Summer, your product automatically sets its clock ahead one hour. When you change from Summer to Winter, it sets the clock back one hour. 10. Press the Menu button to exit. Parent topic: Setting Up Fax Features Using the Product Control Panel Entering Fax Header Information Before faxing, add your sender name and fax number to the fax header to identify the source of the faxes you send. Note: Be sure to enter the header information. Some fax machines automatically reject incoming faxes that do not include this information. 1. Press the Fax button. 2. Press the Menu button. 3. Press the up or down arrow buttons to select Fax Settings and press the OK button. You see this screen: 124
-
 1
1 -
2
-
3
-
4
-
5
-
6
-
7
-
8
-
9
-
10
-
11
-
12
-
13
-
14
-
15
-
16
-
17
-
18
-
19
-
20
-
21
-
22
-
23
-
24
-
25
-
26
-
27
-
28
-
29
-
30
-
31
-
32
-
33
-
34
-
35
-
36
-
37
-
38
-
39
-
40
-
41
-
42
-
43
-
44
-
45
-
46
-
47
-
48
-
49
-
50
-
51
-
52
-
53
-
54
-
55
-
56
-
57
-
58
-
59
-
60
-
61
-
62
-
63
-
64
-
65
-
66
-
67
-
68
-
69
-
70
-
71
-
72
-
73
-
74
-
75
-
76
-
77
-
78
-
79
-
80
-
81
-
82
-
83
-
84
-
85
-
86
-
87
-
88
-
89
-
90
-
91
-
92
-
93
-
94
-
95
-
96
-
97
-
98
-
99
-
100
-
101
-
102
-
103
-
104
-
105
-
106
-
107
-
108
-
109
-
110
-
111
-
112
-
113
-
114
-
115
-
116
-
117
-
118
-
 119
119 -
 120
120 -
 121
121 -
 122
122 -
 123
123 -
 124
124 -
 125
125 -
 126
126 -
 127
127 -
 128
128 -
 129
129 -
130
-
131
-
132
-
133
-
134
-
135
-
136
-
137
-
138
-
139
-
140
-
141
-
142
-
143
-
144
-
145
-
146
-
147
-
148
-
149
-
150
-
151
-
152
-
153
-
154
-
155
-
156
-
157
-
158
-
159
-
160
-
161
-
162
-
163
-
164
-
165
-
166
-
167
-
168
-
169
-
170
-
171
-
172
-
173
-
174
-
175
-
176
-
177
-
178
-
179
-
180
-
181
-
182
-
183
-
184
-
185
-
186
-
187
-
188
-
189
-
190
-
191
-
192
-
193
-
194
-
195
-
196
-
197
-
198
-
199
-
200
-
201
-
202
-
203
-
204
-
205
-
206
-
207
-
208
-
209
-
210
-
211
-
212
-
213
-
214
-
215
-
216
-
217
-
218
-
219
-
220
-
221
-
222
-
223
-
224
-
225
-
226
-
227
-
228
-
229
-
230
-
231
-
232
-
233
-
234
-
235
-
236
-
237
-
238
-
239
-
240
-
241
-
242
-
243
-
244
-
245
-
246
-
247
 |
 |