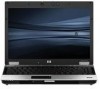
HP 6930p HP EliteBook 6930p Notebook PC - Maintenance and Service Guide - Page 143
Backing up individual files or folders, Scheduling an automatic backup
 |
UPC - 884962659670
View all HP 6930p manuals
Add to My Manuals
Save this manual to your list of manuals |
Page 143 highlights
Backing up individual files or folders When you perform a backup of the entire hard drive, you are saving the full factory image, including the Windows operating system, software programs, all personal files and folders, and configuration settings. You can back up a copy of the entire hard drive to either of the following locations: ● Optional external hard drive ● Optical discs (CDs or DVDs) NOTE: This process may take over an hour, depending on your computer speed and the amount of data being stored. To back up your hard drive: 1. Select Start > All Programs > Maintenance > Backup and Restore Center. 2. Click Back up computer. You will be prompted to select a destination for the backup files. 3. Follow the on-screen instructions. NOTE: Windows includes the User Account Control feature to improve the security of your computer. You may be prompted for your permission or password for tasks such as installing software, running utilities, or changing Windows settings. Refer to Help and Support for more information. Scheduling an automatic backup You can schedule automatic backups for the entire system, for recovery points, or for specific files and folders. Backups can be scheduled at specific intervals (daily, weekly, or monthly). To schedule an automatic backup: 1. Select Start > All Programs > Maintenance > Backup and Restore Center. 2. Click Change settings. The Backup Status and Configuration Window opens. 3. Click Change backup settings. You will be prompted to select a destination for the backup files. 4. Follow the on-screen instructions. NOTE: Windows includes the User Account Control feature to improve the security of your computer. You may be prompted for your permission or password for tasks such as installing software, running utilities, or changing Windows settings. Refer to Help and Support for more information. Backing up your information 133
-
 1
1 -
2
-
3
-
4
-
5
-
6
-
7
-
8
-
9
-
10
-
11
-
12
-
13
-
14
-
15
-
16
-
17
-
18
-
19
-
20
-
21
-
22
-
23
-
24
-
25
-
26
-
27
-
28
-
29
-
30
-
31
-
32
-
33
-
34
-
35
-
36
-
37
-
38
-
39
-
40
-
41
-
42
-
43
-
44
-
45
-
46
-
47
-
48
-
49
-
50
-
51
-
52
-
53
-
54
-
55
-
56
-
57
-
58
-
59
-
60
-
61
-
62
-
63
-
64
-
65
-
66
-
67
-
68
-
69
-
70
-
71
-
72
-
73
-
74
-
75
-
76
-
77
-
78
-
79
-
80
-
81
-
82
-
83
-
84
-
85
-
86
-
87
-
88
-
89
-
90
-
91
-
92
-
93
-
94
-
95
-
96
-
97
-
98
-
99
-
100
-
101
-
102
-
103
-
104
-
105
-
106
-
107
-
108
-
109
-
110
-
111
-
112
-
113
-
114
-
115
-
116
-
117
-
118
-
119
-
120
-
121
-
122
-
123
-
124
-
125
-
126
-
127
-
128
-
129
-
130
-
131
-
132
-
133
-
134
-
135
-
136
-
137
-
 138
138 -
 139
139 -
 140
140 -
 141
141 -
 142
142 -
 143
143 -
 144
144 -
 145
145 -
 146
146 -
 147
147 -
 148
148 -
149
-
150
-
151
-
152
-
153
-
154
-
155
-
156
-
157
-
158
-
159
-
160
-
161
-
162
-
163
-
164
-
165
-
166
-
167
-
168
-
169
-
170
-
171
-
172
 |
 |