HP 6930p HP EliteBook 6930p Notebook PC - Maintenance and Service Guide - Page 57
and the backlight cable, Disconnect the display panel cable
 |
UPC - 884962659670
View all HP 6930p manuals
Add to My Manuals
Save this manual to your list of manuals |
Page 57 highlights
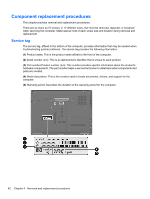
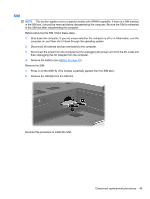
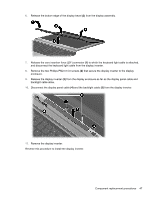
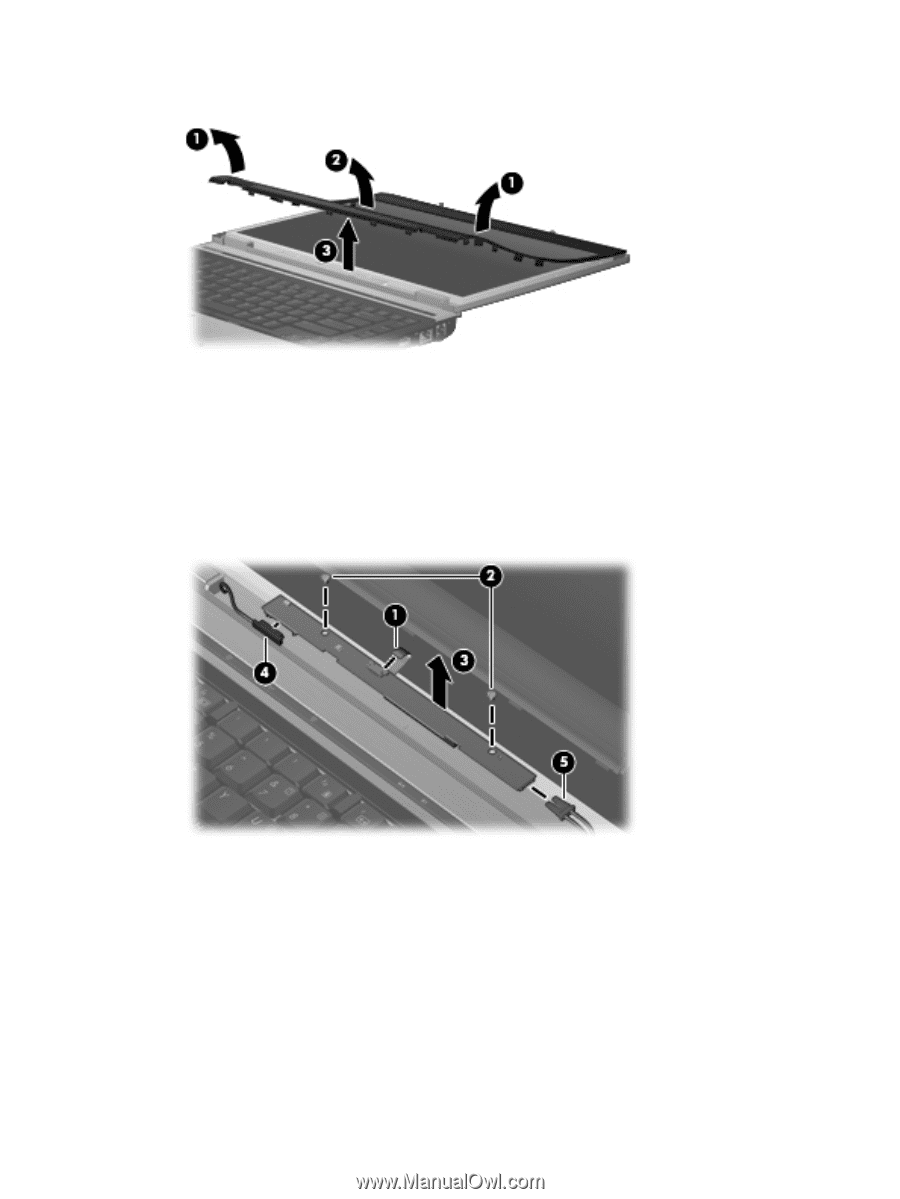
6. Release the bottom edge of the display bezel (3) from the display assembly. 7. Release the zero insertion force (ZIF) connector (1) to which the keyboard light cable is attached, and disconnect the keyboard light cable from the display inverter. 8. Remove the two Phillips PM2.5×4.0 screws (2) that secure the display inverter to the display enclosure. 9. Release the display inverter (3) from the display enclosure as far as the display panel cable and backlight cable allow. 10. Disconnect the display panel cable (4) and the backlight cable (5) from the display inverter. 11. Remove the display inverter. Reverse this procedure to install the display inverter. Component replacement procedures 47
-
 1
1 -
2
-
3
-
4
-
5
-
6
-
7
-
8
-
9
-
10
-
11
-
12
-
13
-
14
-
15
-
16
-
17
-
18
-
19
-
20
-
21
-
22
-
23
-
24
-
25
-
26
-
27
-
28
-
29
-
30
-
31
-
32
-
33
-
34
-
35
-
36
-
37
-
38
-
39
-
40
-
41
-
42
-
43
-
44
-
45
-
46
-
47
-
48
-
49
-
50
-
51
-
 52
52 -
 53
53 -
 54
54 -
 55
55 -
 56
56 -
 57
57 -
 58
58 -
 59
59 -
 60
60 -
 61
61 -
 62
62 -
63
-
64
-
65
-
66
-
67
-
68
-
69
-
70
-
71
-
72
-
73
-
74
-
75
-
76
-
77
-
78
-
79
-
80
-
81
-
82
-
83
-
84
-
85
-
86
-
87
-
88
-
89
-
90
-
91
-
92
-
93
-
94
-
95
-
96
-
97
-
98
-
99
-
100
-
101
-
102
-
103
-
104
-
105
-
106
-
107
-
108
-
109
-
110
-
111
-
112
-
113
-
114
-
115
-
116
-
117
-
118
-
119
-
120
-
121
-
122
-
123
-
124
-
125
-
126
-
127
-
128
-
129
-
130
-
131
-
132
-
133
-
134
-
135
-
136
-
137
-
138
-
139
-
140
-
141
-
142
-
143
-
144
-
145
-
146
-
147
-
148
-
149
-
150
-
151
-
152
-
153
-
154
-
155
-
156
-
157
-
158
-
159
-
160
-
161
-
162
-
163
-
164
-
165
-
166
-
167
-
168
-
169
-
170
-
171
-
172
 |
 |
6.
Release the bottom edge of the display bezel
(3)
from the display assembly.
7.
Release the zero insertion force (ZIF) connector
(1)
to which the keyboard light cable is attached,
and disconnect the keyboard light cable from the display inverter.
8.
Remove the two Phillips PM2.5×4.0 screws
(2)
that secure the display inverter to the display
enclosure.
9.
Release the display inverter
(3)
from the display enclosure as far as the display panel cable and
backlight cable allow.
10.
Disconnect the display panel cable
(4)
and the backlight cable
(5)
from the display inverter.
11.
Remove the display inverter.
Reverse this procedure to install the display inverter.
Component replacement procedures
47