HP CM3530 HP Color LaserJet CM3530 MFP Series - User Guide - Page 57
E-mail Setup, Send Setup menu, Administration, Initial Setup, Embedded Web server, on Send Setup - scan to email
 |
UPC - 884420196501
View all HP CM3530 manuals
Add to My Manuals
Save this manual to your list of manuals |
Page 57 highlights
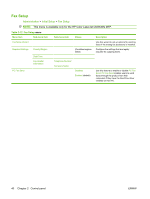
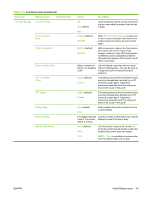
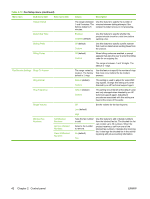
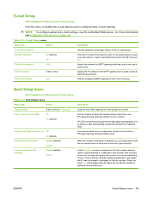
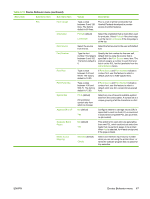
E-mail Setup Administration > Initial Setup > E-mail Setup Use this menu to enable the e-mail feature and to configure basic e-mail settings. NOTE: To configure advanced e-mail settings, use the embedded Web server. For more information, see Embedded Web server on page 169. Table 2-13 E-mail Setup menu Menu item Values Description E-mail Setup Wizard Use this wizard to set up basic options for the e-mail feature. Address Validation On (default) Off This option enables the product to check e-mail syntax when you type an e-mail address. Valid e-mail addresses require the "@" sign and a ".". Find Send Gateways Find Search the network for SMTP gateways that the product can use to send e-mail. SMTP Gateway Enter a value. Specify the IP address of the SMTP gateway that is used to send email from the product. Test Send Gateway Test Test the configured SMTP gateway to see if it is functional. Send Setup menu Administration > Initial Setup > Send Setup Table 2-14 Send Setup menu Menu item Values Description Replicate MFP Enter a value (IP Address). Copy the local Send settings from one product to another. Allow Transfer to New DSS Off On (default) Use this feature to allow the transfer of the product from one HP Digital Sending Software (DSS) server to another. HP DSS is a software package that handles digital sending tasks such as faxing, e-mail, and sending a scanned document to a network folder. Allow Use of Digital Send Service Off On (default) This feature allows you to configure the product for use with an HP Digital Sending Software (DSS) server. Fax Number Confirmation Disable (default) Enable When fax number confirmation is enabled, you are prompted to enter the fax number twice to verify that it has been typed correctly. Fax Number Speed Dial Matching Disable (default) Enable If set to Enable, a screen is displayed if the fax numbers entered match a speed dial that is configured to that number. The numbers do not have to match as a group; the number must match individually. That is, if one of the fax numbers matches speed dial 2 and speed dial 6, then the screen is displayed for that fax number. When you touch Yes on the dialog, then the fax is sent or the fax number is added to the distribution list. ENWW Initial Setup menu 43
-
 1
1 -
2
-
3
-
4
-
5
-
6
-
7
-
8
-
9
-
10
-
11
-
12
-
13
-
14
-
15
-
16
-
17
-
18
-
19
-
20
-
21
-
22
-
23
-
24
-
25
-
26
-
27
-
28
-
29
-
30
-
31
-
32
-
33
-
34
-
35
-
36
-
37
-
38
-
39
-
40
-
41
-
42
-
43
-
44
-
45
-
46
-
47
-
48
-
49
-
50
-
51
-
 52
52 -
 53
53 -
 54
54 -
 55
55 -
 56
56 -
 57
57 -
 58
58 -
 59
59 -
 60
60 -
 61
61 -
 62
62 -
63
-
64
-
65
-
66
-
67
-
68
-
69
-
70
-
71
-
72
-
73
-
74
-
75
-
76
-
77
-
78
-
79
-
80
-
81
-
82
-
83
-
84
-
85
-
86
-
87
-
88
-
89
-
90
-
91
-
92
-
93
-
94
-
95
-
96
-
97
-
98
-
99
-
100
-
101
-
102
-
103
-
104
-
105
-
106
-
107
-
108
-
109
-
110
-
111
-
112
-
113
-
114
-
115
-
116
-
117
-
118
-
119
-
120
-
121
-
122
-
123
-
124
-
125
-
126
-
127
-
128
-
129
-
130
-
131
-
132
-
133
-
134
-
135
-
136
-
137
-
138
-
139
-
140
-
141
-
142
-
143
-
144
-
145
-
146
-
147
-
148
-
149
-
150
-
151
-
152
-
153
-
154
-
155
-
156
-
157
-
158
-
159
-
160
-
161
-
162
-
163
-
164
-
165
-
166
-
167
-
168
-
169
-
170
-
171
-
172
-
173
-
174
-
175
-
176
-
177
-
178
-
179
-
180
-
181
-
182
-
183
-
184
-
185
-
186
-
187
-
188
-
189
-
190
-
191
-
192
-
193
-
194
-
195
-
196
-
197
-
198
-
199
-
200
-
201
-
202
-
203
-
204
-
205
-
206
-
207
-
208
-
209
-
210
-
211
-
212
-
213
-
214
-
215
-
216
-
217
-
218
-
219
-
220
-
221
-
222
-
223
-
224
-
225
-
226
-
227
-
228
-
229
-
230
-
231
-
232
-
233
-
234
-
235
-
236
-
237
-
238
-
239
-
240
-
241
-
242
-
243
-
244
-
245
-
246
-
247
-
248
-
249
-
250
-
251
-
252
-
253
-
254
-
255
-
256
-
257
-
258
-
259
-
260
-
261
-
262
-
263
-
264
-
265
-
266
-
267
-
268
-
269
-
270
-
271
-
272
-
273
-
274
-
275
-
276
-
277
-
278
-
279
-
280
-
281
-
282
-
283
-
284
-
285
-
286
-
287
-
288
-
289
-
290
-
291
-
292
-
293
-
294
-
295
-
296
-
297
-
298
-
299
-
300
-
301
-
302
 |
 |