HP Designjet Z6200 HP Designjet Z6200 Photo Printer series - User's Guide: Eng - Page 77
Clean the printhead drop detector, Reseat, Replace
 |
View all HP Designjet Z6200 manuals
Add to My Manuals
Save this manual to your list of manuals |
Page 77 highlights
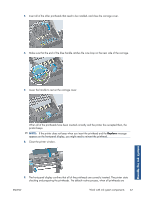
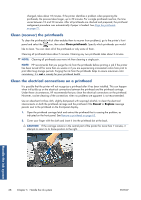
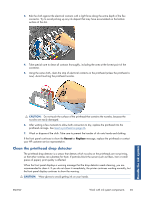
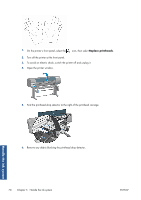
3. Rub the cloth against the electrical contacts with a light force along the entire depth of the flex connector. Try to avoid picking up any ink deposit that may have accumulated on the bottom surface of the slot. 4. Take special care to clean all contacts thoroughly, including the ones at the lowest point of the connector. 5. Using the same cloth, clean the strip of electrical contacts on the printhead (unless the printhead is new). Avoid touching the printhead nozzles. CAUTION: Do not touch the surface of the printhead that contains the nozzles, because the nozzles are easily damaged. 6. After waiting a few moments to allow both connectors to dry, replace the printhead into the printhead carriage. See Insert a printhead on page 66. 7. Wash or dispose of the cloth. Take care to prevent the transfer of ink onto hands and clothing. If the front panel continues to show the Reseat or Replace message, replace the printhead or contact your HP customer service representative. Clean the printhead drop detector The printhead drop detector is a sensor that detects which nozzles on the printheads are not printing, so that other nozzles can substitute for them. If particles block the sensor (such as fibers, hair or small pieces of paper), print quality is affected. When the front panel displays a warning message that the drop detector needs cleaning, you are recommended to clean it. If you do not clean it immediately, the printer continues working normally, but the front panel display continues to show the warning. CAUTION: Wear gloves to avoid getting ink on your hands. ENWW Work with ink system components 69 Handle the ink system
-
 1
1 -
2
-
3
-
4
-
5
-
6
-
7
-
8
-
9
-
10
-
11
-
12
-
13
-
14
-
15
-
16
-
17
-
18
-
19
-
20
-
21
-
22
-
23
-
24
-
25
-
26
-
27
-
28
-
29
-
30
-
31
-
32
-
33
-
34
-
35
-
36
-
37
-
38
-
39
-
40
-
41
-
42
-
43
-
44
-
45
-
46
-
47
-
48
-
49
-
50
-
51
-
52
-
53
-
54
-
55
-
56
-
57
-
58
-
59
-
60
-
61
-
62
-
63
-
64
-
65
-
66
-
67
-
68
-
69
-
70
-
71
-
 72
72 -
 73
73 -
 74
74 -
 75
75 -
 76
76 -
 77
77 -
 78
78 -
 79
79 -
 80
80 -
 81
81 -
 82
82 -
83
-
84
-
85
-
86
-
87
-
88
-
89
-
90
-
91
-
92
-
93
-
94
-
95
-
96
-
97
-
98
-
99
-
100
-
101
-
102
-
103
-
104
-
105
-
106
-
107
-
108
-
109
-
110
-
111
-
112
-
113
-
114
-
115
-
116
-
117
-
118
-
119
-
120
-
121
-
122
-
123
-
124
-
125
-
126
-
127
-
128
-
129
-
130
-
131
-
132
-
133
-
134
-
135
-
136
-
137
-
138
-
139
-
140
-
141
-
142
-
143
-
144
-
145
-
146
-
147
-
148
-
149
-
150
-
151
-
152
-
153
-
154
-
155
-
156
-
157
-
158
-
159
-
160
-
161
-
162
-
163
-
164
-
165
-
166
-
167
-
168
-
169
-
170
-
171
-
172
-
173
-
174
-
175
-
176
-
177
-
178
-
179
-
180
-
181
-
182
-
183
-
184
-
185
-
186
-
187
-
188
-
189
-
190
-
191
-
192
-
193
-
194
-
195
-
196
-
197
-
198
-
199
-
200
-
201
-
202
-
203
-
204
-
205
-
206
-
207
-
208
-
209
-
210
-
211
-
212
-
213
-
214
-
215
-
216
-
217
-
218
-
219
-
220
 |
 |
