HP Deskjet 450 HP Deskjet 450 mobile printer - (English) User Guide - Page 36
Printing on transparencies, For best results, use HP Premium Plus Inkjet Transparency Film, which is - windows 7 driver
 |
UPC - 844844844303
View all HP Deskjet 450 manuals
Add to My Manuals
Save this manual to your list of manuals |
Page 36 highlights
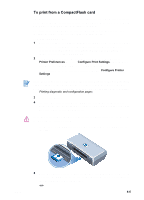
Press the CANCEL BUTTON if you do not want to print directly from the CF card. If your computer is connected to the printer via USB or parallel, the CF card appears as a drive in Windows Explorer. You can then open and print your photographs with the software application of your choice. Do not remove the CF card until the print job is completed. Otherwise the print job will be canceled. Selecting Typical Installation when you install the printer driver (see Installing Software) lets your computer read the CF card as a physical disk drive. You can then access your photo files and print them with the software of your choice. Please see the readme.txt file on the Starter CD for more details. Printing on transparencies For best results, use HP Premium Plus Inkjet Transparency Film, which is specifically designed to work with the printer, or other transparency film that is designed for inkjet printers. 1 Remove all media from the input tray. 2 Insert the transparencies with the print (rough) side up and the adhesive strip pointing forward into the input tray. Due to the printer's unique paper path, please load transparencies with the print side up. The print side of the transparencies is the rougher side. 3 Slide the paper guide until it stops at the edge of the transparencies. 1 Back of adhesive 2 Print (rough) side up For PDA printing instructions, refer to the documentation that comes with your PDA printing software. 4-7 ENWW
-
 1
1 -
2
-
3
-
4
-
5
-
6
-
7
-
8
-
9
-
10
-
11
-
12
-
13
-
14
-
15
-
16
-
17
-
18
-
19
-
20
-
21
-
22
-
23
-
24
-
25
-
26
-
27
-
28
-
29
-
30
-
 31
31 -
 32
32 -
 33
33 -
 34
34 -
 35
35 -
 36
36 -
 37
37 -
 38
38 -
 39
39 -
 40
40 -
 41
41 -
42
-
43
-
44
-
45
-
46
-
47
-
48
-
49
-
50
-
51
-
52
-
53
-
54
-
55
-
56
-
57
-
58
-
59
-
60
-
61
-
62
-
63
-
64
-
65
-
66
-
67
-
68
-
69
-
70
-
71
-
72
-
73
-
74
-
75
-
76
-
77
-
78
-
79
-
80
-
81
-
82
-
83
-
84
-
85
-
86
 |
 |
