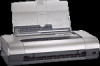
HP Deskjet 450 HP Deskjet 450 mobile printer - (English) User Guide - Page 44
Aligning the print cartridges, To align from the printer driver in Windows - driver windows xp
 |
UPC - 844844844303
View all HP Deskjet 450 manuals
Add to My Manuals
Save this manual to your list of manuals |
Page 44 highlights
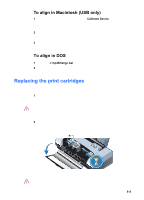
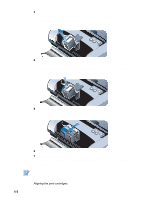
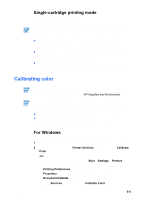
To perform a level 3 cleaning 1 Press and hold down the POWER BUTTON. 2 While holding down the POWER BUTTON, press the CANCEL BUTTON twice and then press the RESUME BUTTON twice. 3 Release the POWER BUTTON. The printer begins the print cartridge cleaning process. Aligning the print cartridges Whenever you replace a print cartridge, you should align the print cartridges for the best possible print quality. If your printout is grainy, has stray dots, jagged edges, or the ink is bleeding into another color on the page, you can re-align them through the Toolbox or the printer driver. If you are using a PDA, please connect to a Windows or Macintosh operating system and align the print cartridges according to the instructions below. To align from the printer driver in Windows 1 Load plain paper into the input tray. 2 Click Start > Settings > Printers. 3 Right-click the printer icon, and then click: • Printing Preferences (Windows 2000 and Windows XP) • Properties (Windows 98 and Windows Me) • Document Defaults (Windows NT 4.0) 4 Click the Services tab, and click Align Print Cartridges. 5 Click Align from the Align Print Cartridges dialog box. You are prompted to specify the combination of print cartridges you are using. 6 Specify the combination of print cartridges you are using. An alignment page prints. 7 Follow the instructions on the screen to select the best-aligned patterns from the alignment page. 8 Click OK to close the Align Print Cartridges dialog box when the alignment procedure is complete. If you have the Toolbox installed, you can also align the print cartridges from the Printer Services tab in the Toolbox. 6-3 ENWW
-
 1
1 -
2
-
3
-
4
-
5
-
6
-
7
-
8
-
9
-
10
-
11
-
12
-
13
-
14
-
15
-
16
-
17
-
18
-
19
-
20
-
21
-
22
-
23
-
24
-
25
-
26
-
27
-
28
-
29
-
30
-
31
-
32
-
33
-
34
-
35
-
36
-
37
-
38
-
 39
39 -
 40
40 -
 41
41 -
 42
42 -
 43
43 -
 44
44 -
 45
45 -
 46
46 -
 47
47 -
 48
48 -
 49
49 -
50
-
51
-
52
-
53
-
54
-
55
-
56
-
57
-
58
-
59
-
60
-
61
-
62
-
63
-
64
-
65
-
66
-
67
-
68
-
69
-
70
-
71
-
72
-
73
-
74
-
75
-
76
-
77
-
78
-
79
-
80
-
81
-
82
-
83
-
84
-
85
-
86
 |
 |