HP Integrity rx2620 Installation (Smart Setup) Guide, Windows Server 2003, v5. - Page 46
Reinstalling from a GUI console, Load the system image, on the HP Recovery Console.
 |
View all HP Integrity rx2620 manuals
Add to My Manuals
Save this manual to your list of manuals |
Page 46 highlights
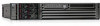
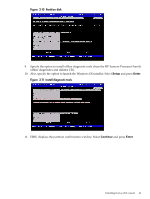
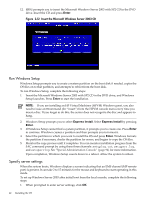
NOTE: If you select No, you should inspect the system and proceed to update the drivers and install the utilities before bringing the system online. 11. At the system reboot prompt, click Yes to reboot the system and implement your changes. After the reboot, your system is ready to go online. Reinstalling from a GUI console HP Integrity servers that are factory-installed with Windows Server 2003 are shipped with the HP Reinstallation media, which enables you to restore the system to its factory settings, if necessary. Reinstalling the operating system involves loading the image from the Reinstallation media on to the boot disk and, after Windows Server 2003 is loaded, specifying the server settings. CAUTION: Reinstallation overwrites all files on the boot disk. The boot disk is determined by bus search order and might not be the disk you expect it to be. HP recommends disconnecting or unplugging all drives from the server except the boot disk. This includes all SAN storage, too. Load the system image To install the Windows Server 2003 with SP2 operating system on the server from the local console, complete the following steps: 1. Boot the server to EFI. 2. Because Windows Server 2003 cannot create a boot entry if one already exists, you must delete the existing boot entry. To delete the boot entry: a. Do one of the following: • If you are using the Enhanced EFI Boot Manager Menu (grey background), select EFI Boot Manager Menu > Boot Configuration > Remove Boot Entry. • If you are using the Legacy EFI Boot Manager Menu (black background), select EFI Boot Manager Menu > Boot Option Maintenance Menu > Delete Boot Option(s). b. Arrow down to select the Windows Server 2003 boot entry to delete and press Enter. NOTE: The next step applies to factory-installed systems that require the use of the HP Reinstallation media only. If the Windows boot entries are not all deleted, the boot file bootxxx.efi is not created. 3. Insert the HP Reinstallation media in the DVD drive. IMPORTANT: If you are installing an HP Virtual Machines (HPVM) Windows guest, you also need to issue anINcommand (for "insert") from the HPVM console menu every time you insert a disc. If you forget to do this, the server does not recognize the disc and appears to hang. 4. From the EFI Boot Manager, select Internal Bootable DVD, if the entry is present. If this entry is absent, do the following: a. Select EFI Shell. b. In the EFI Shell, select the DVD file system. For example, if the DVD file system is fs1, enter fs1: c. Start the boot loader by entering setupldr. 5. Click Re-Install on the HP Recovery Console. 6. Enter Y to continue with the reinstallation. 46 Installing the OS
-
 1
1 -
2
-
3
-
4
-
5
-
6
-
7
-
8
-
9
-
10
-
11
-
12
-
13
-
14
-
15
-
16
-
17
-
18
-
19
-
20
-
21
-
22
-
23
-
24
-
25
-
26
-
27
-
28
-
29
-
30
-
31
-
32
-
33
-
34
-
35
-
36
-
37
-
38
-
39
-
40
-
 41
41 -
 42
42 -
 43
43 -
 44
44 -
 45
45 -
 46
46 -
 47
47 -
 48
48 -
 49
49 -
 50
50 -
 51
51 -
52
-
53
-
54
-
55
-
56
-
57
-
58
-
59
-
60
-
61
-
62
-
63
-
64
-
65
-
66
-
67
-
68
-
69
-
70
-
71
-
72
-
73
-
74
-
75
-
76
-
77
-
78
-
79
-
80
-
81
-
82
-
83
-
84
-
85
-
86
-
87
-
88
-
89
-
90
-
91
-
92
-
93
-
94
-
95
-
96
 |
 |