HP Integrity rx2620 Installation (Smart Setup) Guide, Windows Server 2003, v5. - Page 47
Specify server settings, Applying OS updates
 |
View all HP Integrity rx2620 manuals
Add to My Manuals
Save this manual to your list of manuals |
Page 47 highlights
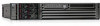
7. Select the desired partition size (33 GB is recommended). The maximum partition size is limited to the size of the drive. Click OK to continue. NOTE: The installation process copies files to the hard disk. The progress bar may increase or decrease throughout this process. Do not power off the server during the installation. 8. When the installation process displays a dialog box, click OK to continue. 9. Click Exit. The server reboots to the Windows Server 2003 operating system. Set up the system according the instructions in the following section. Specify server settings To set up Windows Server 2003 after initial boot from the local console, complete the following steps: 1. Start the server. Windows displays a pop-up screen indicating that an EMS channel (headless server MP port) is present. It can take 2 to 15 minutes for the mouse and keyboard to start operating in this mode. 2. When prompted to enter setup information at the local console, click OK. 3. From the Windows Setup Wizard, enter the following setup information: a. In the License Agreement window, click Accept and then Next. b. In the Regional and Language Options window, click Next. c. In the Your Product Key window, enter the product key. The product key is located on the label attached to the server. d. In the Licensing Modes window, select the license you purchased. e. In the Administrator Password window, enter the server name and a password. f. In the Date and Time window, select the appropriate timezone, and click Next. The server reboots to the EFI Boot Manager and then boots up Windows Server 2003. You can now log in to the server using the administrator password you selected. After logging in as the system administrator, complete the following steps: 1. At the prompt, Please mount HP Smart Setup media on the Server's DVD drive to install utilities, do one of the following: • If you want to update the drivers and install the online utilities, mount the HP Smart Setup media shipped with your system and click Yes to continue. • If you do not want to update the drivers and install the online utilities at this time, click No to continue. NOTE: If you select No, you should inspect the system and proceed to update the drivers and install the utilities before bringing the system online. 2. At the system reboot prompt, click Yes to reboot the system and implement your changes. After the reboot, your system is ready to go online. Applying OS updates Install all the OS updates and security updates from the HP Smart Update DVD. You can find the Smart Update DVD in the Integrity Essentials Foundation Pack kit along with the Smart Setup CD. To apply the OS updates using the HP Smart Update DVD, complete the following steps: 1. Insert the HP Smart Update DVD. The Smart Update screen appears. Click the QFEs for SP1 or QFEs for SP2 tab (whichever applies). 2. Use the links on the left navigation bar to go directly to Operating System Updates, Security Updates, Clustering Updates, or Documents. Applying OS updates 47
-
 1
1 -
2
-
3
-
4
-
5
-
6
-
7
-
8
-
9
-
10
-
11
-
12
-
13
-
14
-
15
-
16
-
17
-
18
-
19
-
20
-
21
-
22
-
23
-
24
-
25
-
26
-
27
-
28
-
29
-
30
-
31
-
32
-
33
-
34
-
35
-
36
-
37
-
38
-
39
-
40
-
41
-
 42
42 -
 43
43 -
 44
44 -
 45
45 -
 46
46 -
 47
47 -
 48
48 -
 49
49 -
 50
50 -
 51
51 -
 52
52 -
53
-
54
-
55
-
56
-
57
-
58
-
59
-
60
-
61
-
62
-
63
-
64
-
65
-
66
-
67
-
68
-
69
-
70
-
71
-
72
-
73
-
74
-
75
-
76
-
77
-
78
-
79
-
80
-
81
-
82
-
83
-
84
-
85
-
86
-
87
-
88
-
89
-
90
-
91
-
92
-
93
-
94
-
95
-
96
 |
 |