HP Integrity rx2620 Installation (Smart Setup) Guide, Windows Server 2003, v5. - Page 59
Initializing SMH, Installing the management agents, IP Binding, IP Restricted Logins, Include
 |
View all HP Integrity rx2620 manuals
Add to My Manuals
Save this manual to your list of manuals |
Page 59 highlights
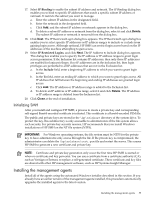
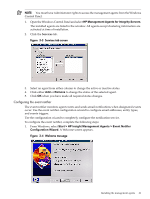
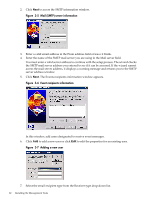
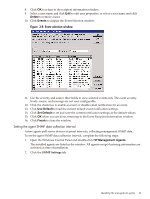
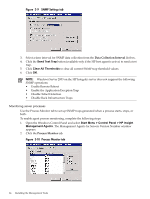
17. Select IP Binding to enable the subnet IP address and netmask. The IP Binding dialog box enables you to bind to specific IP addresses that match a specific subnet IP address or netmask. It restricts the subnet you want to manage. a. Enter the subnet IP address in the designated field. b. Enter the netmask in the designated field. c. Click Add, and the subnet IP address or netmask appears in the dialog box. d. To delete a subnet IP address or netmask from the dialog box, select it and click Delete. The subnet IP address or netmask is removed from the dialog box. 18. Click Next. The IP Restricted Login dialog box appears. The IP Restricted Login dialog box enables you to select specific IP addresses or IP address ranges to include or exclude from gaining login access. Although optional, HP SMH can restrict login access based on the IP addresses of the machine attempting to gain access. 19. Select IP Restricted Logins, and click Next. The IP Address to Include dialog box appears. This dialog box enables you to specify the IP address or IP address ranges to grant login access permission. If the Inclusion list contains IP addresses, then only those IP addresses are enabled for login privileges. If no IP addresses are in the Inclusion list, then login privileges are permitted to all IP addresses that are not in the Exclusion list. a. In the Include field, enter a beginning IP address to which you want to grant login access. b. In the To field, enter an ending IP address to which you want to grant login access. All IP address that fall between the beginning and ending IP addresses are granted login access. c. Click Add. The IP address or IP address range is added to the Inclusion list. d. To delete an IP address or IP address range, select it and click Delete. The IP address or IP address range is deleted from the Inclusion list. 20. Click Close at the end of installation. Initializing SMH After you install and configure HP SMH, a process to create a private key and corresponding self-signed Base64-encoded certificate is initiated. This certificate is a Base64-encoded PEM file. The public and private keys are stored in the \hp\sslshare directory of the system drive. To protect the key, this subdirectory is only accessible to administrators if the file system allows such security. For private key security reasons, HP recommends that you install Windows installations of HP SMH on the NT file system (NTFS). IMPORTANT: For Windows operating systems, the file system must be NTFS for the private key to have administrator-only access through the file. If the private key is compromised, the administrator can delete the \hp\sslshare\cert.pem file and restart the server. This causes HP SMH to generate a new certificate and private key. NOTE: Certificate and private key generation only occur the first time HP SMH is started or when no certificate and key pair exist. You can use a certificate from a certificate authority (CA), such as Verisign or Entrust, to replace a self-generated certificate. These certificate and key files are shared with other HP management software, such as HP Systems Insight Manager. Installing the management agents Install all of the agents using the automated Windows installer described in this section. If you already have an earlier version of the management agents installed, this procedure automatically upgrades the installed agents to the latest version. Installing the management agents 59
-
 1
1 -
2
-
3
-
4
-
5
-
6
-
7
-
8
-
9
-
10
-
11
-
12
-
13
-
14
-
15
-
16
-
17
-
18
-
19
-
20
-
21
-
22
-
23
-
24
-
25
-
26
-
27
-
28
-
29
-
30
-
31
-
32
-
33
-
34
-
35
-
36
-
37
-
38
-
39
-
40
-
41
-
42
-
43
-
44
-
45
-
46
-
47
-
48
-
49
-
50
-
51
-
52
-
53
-
 54
54 -
 55
55 -
 56
56 -
 57
57 -
 58
58 -
 59
59 -
 60
60 -
 61
61 -
 62
62 -
 63
63 -
 64
64 -
65
-
66
-
67
-
68
-
69
-
70
-
71
-
72
-
73
-
74
-
75
-
76
-
77
-
78
-
79
-
80
-
81
-
82
-
83
-
84
-
85
-
86
-
87
-
88
-
89
-
90
-
91
-
92
-
93
-
94
-
95
-
96
 |
 |