HP Jetdirect 200m HP Jetdirect 200m Print Server (English) User Guide - Page 54
HP Jetdirect 200m and 250m user's guide, Set up the printer hardware., Connect the print server
 |
View all HP Jetdirect 200m manuals
Add to My Manuals
Save this manual to your list of manuals |
Page 54 highlights
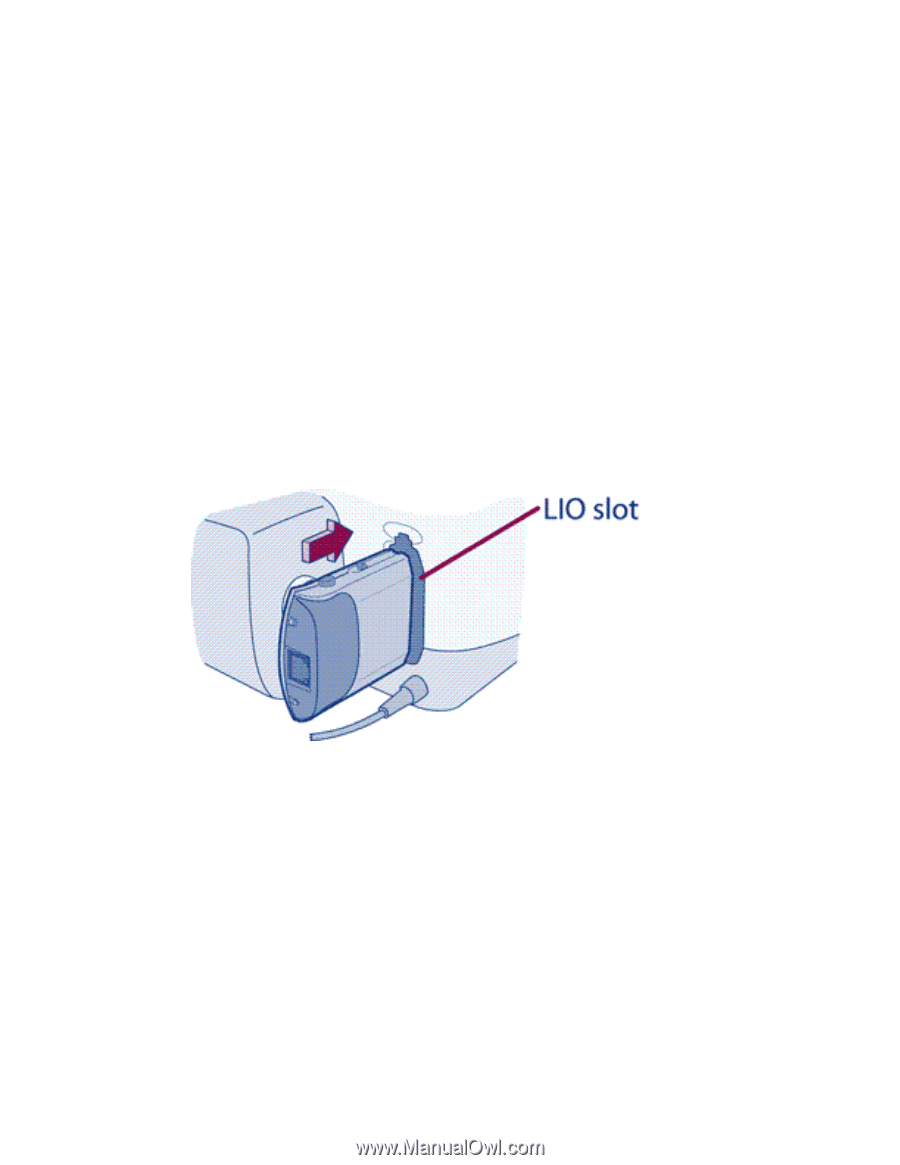
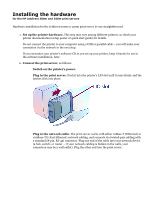
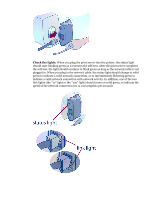
Installing the hardware for the HP Jetdirect 200m and 250m print servers Hardware installation for the Jetdirect 200m or 250m print server is very straightforward: 1. Set up the printer hardware. This step may vary among different printers, so check your printer documentation (setup poster or quick start guide) for details. Do not connect the printer to your computer using a USB or parallel cable -- you will make your connection via the network in the next step. If you encounter your printer's software CD as you set up your printer, keep it handy for use in the software installation, later. 2. Connect the print server, as follows: r Switch on the printer's power. r Plug in the print server. Push it into the printer's LIO slot until it seats firmly and the latches click into place. r Plug in the network cable. The print server works with either 10Base-T (Ethernet) or 100Base-TX (Fast Ethernet) network cabling, and connects via twisted-pair cabling with a standard (8-pin, RJ-45) connector. Plug one end of the cable into your network device (a hub, switch, or router - if your network cabling is hidden in the walls, your connection may be a wall outlet). Plug the other end into the print server.
-
 1
1 -
2
-
3
-
4
-
5
-
6
-
7
-
8
-
9
-
10
-
11
-
12
-
13
-
14
-
15
-
16
-
17
-
18
-
19
-
20
-
21
-
22
-
23
-
24
-
25
-
26
-
27
-
28
-
29
-
30
-
31
-
32
-
33
-
34
-
35
-
36
-
37
-
38
-
39
-
40
-
41
-
42
-
43
-
44
-
45
-
46
-
47
-
48
-
 49
49 -
 50
50 -
 51
51 -
 52
52 -
 53
53 -
 54
54 -
 55
55 -
 56
56 -
 57
57 -
 58
58 -
 59
59 -
60
-
61
-
62
-
63
-
64
-
65
-
66
-
67
-
68
-
69
-
70
-
71
-
72
-
73
-
74
-
75
-
76
-
77
-
78
-
79
-
80
-
81
-
82
-
83
-
84
-
85
-
86
-
87
-
88
-
89
-
90
-
91
-
92
-
93
-
94
-
95
-
96
-
97
-
98
-
99
-
100
-
101
-
102
-
103
-
104
-
105
-
106
-
107
-
108
-
109
-
110
-
111
-
112
-
113
-
114
-
115
-
116
-
117
-
118
-
119
-
120
-
121
-
122
-
123
-
124
-
125
-
126
-
127
-
128
-
129
-
130
-
131
-
132
-
133
-
134
-
135
-
136
-
137
-
138
-
139
-
140
-
141
-
142
-
143
-
144
-
145
-
146
-
147
-
148
-
149
-
150
-
151
-
152
-
153
-
154
-
155
-
156
-
157
-
158
-
159
-
160
-
161
-
162
-
163
-
164
-
165
-
166
-
167
-
168
-
169
-
170
-
171
-
172
-
173
-
174
-
175
-
176
-
177
-
178
-
179
-
180
-
181
 |
 |