HP Kayak XU 03xx HP Kayak XU Series 03xx, User's Guide - Page 51
Completing the Video, Memory Installation, Procedure, Video Adapter, Accessories Available,
 |
View all HP Kayak XU 03xx manuals
Add to My Manuals
Save this manual to your list of manuals |
Page 51 highlights
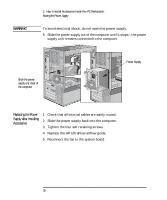
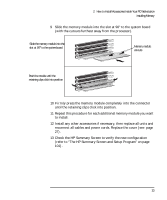
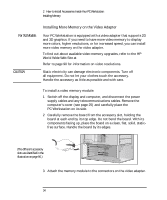
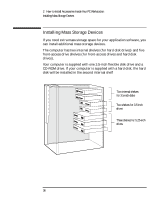
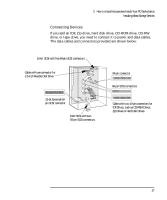
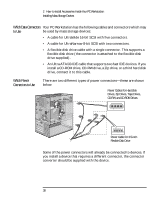
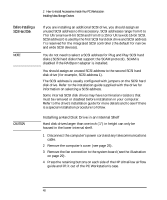
2 How to Install Accessories Inside Your PC Workstation Installing Memory 4 Replace the video adapter in the computer. Carefully slide the board back into its accessory slot. Firmly press the board into the socket. Make sure that the board slides into the socket completely and does not touch components on other boards. Secure the video adapter. 5 Install any other accessories before replacing the cover (see page 27). Reconnect all cables and power cords. Completing the Video Memory Installation Procedure 1 Switch on the PC Workstation. 2 Check the HP Summary Screen to verify the new configuration (refer to "The HP Summary Screen and Setup Program", on page 101). NOTE If you need to use a special video driver for your application, you may be asked to insert the CD-ROM or diskette containing the driver. Video Adapter Accessories Available from Other Sources Additional accessories, including memory upgrades and a video MPEG module, are available for your video adapter. However, these accessories cannot be ordered from HP. Contact your dealer for more details about these accessories. For XW Models with To add a texture module to the HP Visualize FX4, refer to the Texture HP Visualize FX4 Module Accessory User's Guide shipped with this accessory. English 35
-
 1
1 -
2
-
3
-
4
-
5
-
6
-
7
-
8
-
9
-
10
-
11
-
12
-
13
-
14
-
15
-
16
-
17
-
18
-
19
-
20
-
21
-
22
-
23
-
24
-
25
-
26
-
27
-
28
-
29
-
30
-
31
-
32
-
33
-
34
-
35
-
36
-
37
-
38
-
39
-
40
-
41
-
42
-
43
-
44
-
45
-
 46
46 -
 47
47 -
 48
48 -
 49
49 -
 50
50 -
 51
51 -
 52
52 -
 53
53 -
 54
54 -
 55
55 -
 56
56 -
57
-
58
-
59
-
60
-
61
-
62
-
63
-
64
-
65
-
66
-
67
-
68
-
69
-
70
-
71
-
72
-
73
-
74
-
75
-
76
-
77
-
78
-
79
-
80
-
81
-
82
-
83
-
84
-
85
-
86
-
87
-
88
-
89
-
90
-
91
-
92
-
93
-
94
-
95
-
96
-
97
-
98
-
99
-
100
-
101
-
102
-
103
-
104
-
105
-
106
-
107
-
108
-
109
-
110
-
111
-
112
-
113
-
114
-
115
-
116
-
117
-
118
-
119
-
120
-
121
-
122
-
123
-
124
-
125
-
126
-
127
-
128
-
129
-
130
-
131
-
132
-
133
-
134
-
135
-
136
-
137
-
138
-
139
-
140
-
141
-
142
-
143
-
144
-
145
-
146
-
147
-
148
-
149
-
150
-
151
-
152
-
153
-
154
-
155
-
156
-
157
-
158
-
159
-
160
-
161
-
162
-
163
-
164
-
165
-
166
-
167
-
168
-
169
-
170
-
171
-
172
-
173
-
174
-
175
-
176
-
177
-
178
-
179
-
180
-
181
-
182
-
183
-
184
-
185
-
186
-
187
-
188
-
189
-
190
 |
 |