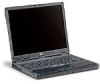
HP OmniBook 6100 HP Omnibook 6100 - Corporate Evaluators Guide - Page 92
To remove a RAM expansion module
 |
View all HP OmniBook 6100 manuals
Add to My Manuals
Save this manual to your list of manuals |
Page 92 highlights
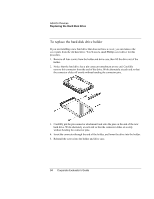
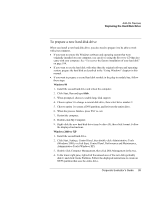
Add-On Devices Installing Additional RAM CAUTION To remove a RAM expansion module You may want to remove a RAM module so you can install a larger one. You'll need a small Phillips screwdriver for these steps. Your computer's chips are extremely sensitive to static electricity, and can be permanently damaged by it. Handle the RAM module only by its edges. Before installing the memory module, discharge your body's static electricity by touching the metal shielding around the connectors on the rear of the computer. 1. Click Start, Shut Down, Shut down (Windows 98 or 2000) or Start, Turn Off Computer, Turn Off (Windows XP). 2. Important: unplug the AC adapter, if present, and remove the battery. Remove the secondary battery if one is installed. 3. Turn the unit bottom-side up, loosen the screws holding the RAM cover, and remove the cover. (The cover retains the screws.) 4. Release the two latches at the sides of the RAM board, so the free edge of the board pops up. 5. Pull the board out of the connector. 6. Replace the cover. 7. Insert the battery. 92 Corporate Evaluator's Guide
-
 1
1 -
2
-
3
-
4
-
5
-
6
-
7
-
8
-
9
-
10
-
11
-
12
-
13
-
14
-
15
-
16
-
17
-
18
-
19
-
20
-
21
-
22
-
23
-
24
-
25
-
26
-
27
-
28
-
29
-
30
-
31
-
32
-
33
-
34
-
35
-
36
-
37
-
38
-
39
-
40
-
41
-
42
-
43
-
44
-
45
-
46
-
47
-
48
-
49
-
50
-
51
-
52
-
53
-
54
-
55
-
56
-
57
-
58
-
59
-
60
-
61
-
62
-
63
-
64
-
65
-
66
-
67
-
68
-
69
-
70
-
71
-
72
-
73
-
74
-
75
-
76
-
77
-
78
-
79
-
80
-
81
-
82
-
83
-
84
-
85
-
86
-
 87
87 -
 88
88 -
 89
89 -
 90
90 -
 91
91 -
 92
92 -
 93
93 -
 94
94 -
 95
95 -
 96
96 -
 97
97 -
98
-
99
-
100
-
101
-
102
-
103
-
104
-
105
-
106
-
107
-
108
-
109
-
110
-
111
-
112
-
113
-
114
-
115
-
116
-
117
-
118
-
119
-
120
-
121
-
122
-
123
-
124
-
125
-
126
-
127
-
128
-
129
-
130
-
131
-
132
-
133
-
134
-
135
-
136
-
137
-
138
-
139
-
140
-
141
-
142
-
143
-
144
-
145
-
146
-
147
-
148
-
149
-
150
-
151
-
152
-
153
-
154
-
155
-
156
-
157
-
158
-
159
-
160
-
161
-
162
-
163
-
164
-
165
-
166
-
167
-
168
-
169
-
170
-
171
-
172
-
173
-
174
-
175
-
176
-
177
-
178
-
179
-
180
-
181
-
182
-
183
-
184
-
185
-
186
-
187
-
188
-
189
-
190
-
191
-
192
-
193
-
194
-
195
-
196
-
197
-
198
-
199
-
200
-
201
-
202
-
203
-
204
-
205
-
206
-
207
-
208
-
209
-
210
-
211
-
212
-
213
-
214
-
215
-
216
-
217
-
218
-
219
-
220
-
221
-
222
-
223
-
224
-
225
 |
 |
