HP OmniBook xe3-gc HP OmniBook XE3 Series - Corporate Evaluator's Guide - Page 61
Connecting PC Cards
 |
View all HP OmniBook xe3-gc manuals
Add to My Manuals
Save this manual to your list of manuals |
Page 61 highlights
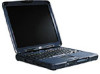
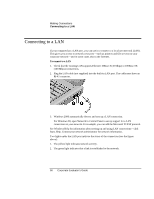
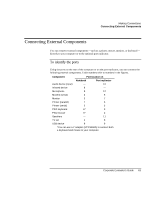
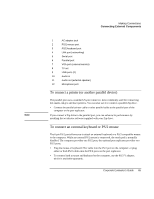
Making Connections Connecting PC Cards Connecting PC Cards CAUTION The two PC card slots are available for storing data and expanding communication capabilities. Your computer supports standard Type I, II, and III PC cards (PCMCIA and CardBus). You can use one slot or both. Do not remove a PC card while the computer is reading or writing data. If you do, you could lose data, or the computer could stop responding. To insert a PC card 1. Hold the card with its face up and its connector holes toward the card slot. 2. Slide the PC card into the upper or lower slot until it is flush with the computer. To remove a PC card 1. Stop the PC card: • Double-click on the PC card icon in the lower right of your screen. • In PC Card Properties, select the PC card you want to stop. • Click Stop. 2. Flip the eject button out, so that it sticks out from the side of the computer. 3. Press the eject button and pull out the PC card. To reestablish network connection after resume When you are using a network PC card, it is possible that you will lose network connection after a resume operation. If this occurs: 1. Stop the network PC card: • Double-click on the PC card icon in the lower right of your screen. Corporate Evaluator's Guide 61
-
 1
1 -
2
-
3
-
4
-
5
-
6
-
7
-
8
-
9
-
10
-
11
-
12
-
13
-
14
-
15
-
16
-
17
-
18
-
19
-
20
-
21
-
22
-
23
-
24
-
25
-
26
-
27
-
28
-
29
-
30
-
31
-
32
-
33
-
34
-
35
-
36
-
37
-
38
-
39
-
40
-
41
-
42
-
43
-
44
-
45
-
46
-
47
-
48
-
49
-
50
-
51
-
52
-
53
-
54
-
55
-
 56
56 -
 57
57 -
 58
58 -
 59
59 -
 60
60 -
 61
61 -
 62
62 -
 63
63 -
 64
64 -
 65
65 -
 66
66 -
67
-
68
-
69
-
70
-
71
-
72
-
73
-
74
-
75
-
76
-
77
-
78
-
79
-
80
-
81
-
82
-
83
-
84
-
85
-
86
-
87
-
88
-
89
-
90
-
91
-
92
-
93
-
94
-
95
-
96
-
97
-
98
-
99
-
100
-
101
-
102
-
103
-
104
-
105
-
106
-
107
-
108
-
109
-
110
-
111
-
112
-
113
-
114
-
115
-
116
-
117
-
118
-
119
-
120
-
121
-
122
-
123
-
124
-
125
-
126
-
127
-
128
-
129
-
130
-
131
-
132
-
133
-
134
-
135
-
136
-
137
-
138
-
139
-
140
-
141
-
142
-
143
-
144
-
145
-
146
-
147
-
148
-
149
-
150
-
151
-
152
-
153
-
154
-
155
-
156
-
157
-
158
-
159
-
160
-
161
-
162
-
163
-
164
-
165
-
166
 |
 |