HP Pavilion 900 HP Pavilion Desktop PCs - DVDRW - (English) Technical Support - Page 37
Installing the Hardware
 |
View all HP Pavilion 900 manuals
Add to My Manuals
Save this manual to your list of manuals |
Page 37 highlights
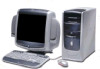
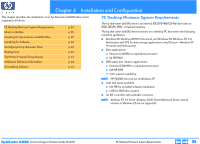
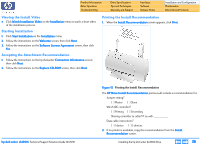
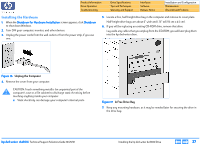
Product Information Drive Operation Troubleshooting Drive Specifications Tips and Techniques Warranty and Support Interfaces Software Release Notes Installation and Configuration Maintenance Discontinued Products Installing the Hardware 1. When the Shutdown for Hardware Installation screen appears, click Shutdown to shut down Windows. 2. Turn OFF your computer, monitor, and other devices. 3. Unplug the power cords from the wall outlet or from the power strip, if you use one. 5. Locate a free, half-height drive bay in the computer and remove its cover plate. Half-height drive bays are about 6" wide and 1.75" tall (15 cm x 4.5 cm). 6. If you will be replacing an existing CD-ROM drive, remove that drive. Lay aside any cables that you unplug from the CD-ROM; you will later plug them into the hp dvd-writer drive. Figure 16 Unplug the Computer 4. Remove the cover from your computer. ! CAUTION: Touch something metallic (an unpainted part of the computer's case or a file cabinet) to discharge static electricity before touching anything inside your computer. I Static electricity can damage your computer's internal parts. Figure 17 A Free Drive Bay 7. Keep any mounting hardware, as it may be needed later for securing the drive in the drive bay. hp dvd-writer dvd100i Technical Support Solutions Guide 10/25/01 Installing the hp dvd-writer dvd100i Drive ⇐ ⇒ 37
-
 1
1 -
2
-
3
-
4
-
5
-
6
-
7
-
8
-
9
-
10
-
11
-
12
-
13
-
14
-
15
-
16
-
17
-
18
-
19
-
20
-
21
-
22
-
23
-
24
-
25
-
26
-
27
-
28
-
29
-
30
-
31
-
 32
32 -
 33
33 -
 34
34 -
 35
35 -
 36
36 -
 37
37 -
 38
38 -
 39
39 -
 40
40 -
 41
41 -
 42
42 -
43
-
44
-
45
-
46
-
47
-
48
-
49
-
50
-
51
-
52
-
53
-
54
-
55
-
56
-
57
-
58
-
59
-
60
-
61
-
62
-
63
-
64
-
65
-
66
-
67
-
68
-
69
-
70
-
71
-
72
-
73
-
74
-
75
-
76
-
77
-
78
-
79
-
80
-
81
-
82
-
83
-
84
-
85
-
86
-
87
-
88
-
89
-
90
-
91
-
92
-
93
-
94
-
95
-
96
-
97
-
98
-
99
-
100
-
101
-
102
-
103
-
104
 |
 |