HP Pavilion 900 HP Pavilion Desktop PCs - DVDRW - (English) Technical Support - Page 55
Making an Exact Copy of a Disc
 |
View all HP Pavilion 900 manuals
Add to My Manuals
Save this manual to your list of manuals |
Page 55 highlights
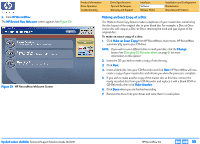
2. Click HP RecordNow. The HP Record Now Welcome screen appears (see Figure 33). Figure 33 HP RecordNow Welcome Screen Product Information Drive Operation Troubleshooting Drive Specifications Tips and Techniques Warranty and Support Interfaces Software Release Notes Installation and Configuration Maintenance Discontinued Products Making an Exact Copy of a Disc The Make an Exact Copy feature makes a duplicate of your master disc, transferring the disc layout of the original disc to your blank disc For example, a Disc-at-Once source disc will copy as a Disc-at-Once, retaining the track and gap layout of the original disc. To make an exact copy of a disc: 1. Click Make an Exact Copy from HP RecordNow's main menu. HP RecordNow automatically opens your CD drive. NOTE: If you wish to use a different drive to read your disc, click the Change button (see Changing CD Recorder drives on page 61 for more information on this option). 2. Insert the CD you wish to make a copy of into the tray. 3. Click Next. 4. Insert a blank disc into your CD-Recorder and click Next. HP RecordNow will now create a copy of your master disc and inform you when the process is complete. 5. If you wish to make another copy of the master disc at this time, remove the newly recorded disc from your CD-Recorder and replace it with a blank CD-R or CD-RW media, then click Make Another. 6. Click Done when you are finished recording. 7. Remove the discs from your drives and store them in a safe place. hp dvd-writer dvd100i Technical Support Solutions Guide 10/25/01 HP RecordNow 3.0 ⇐ ⇒ 55
-
 1
1 -
2
-
3
-
4
-
5
-
6
-
7
-
8
-
9
-
10
-
11
-
12
-
13
-
14
-
15
-
16
-
17
-
18
-
19
-
20
-
21
-
22
-
23
-
24
-
25
-
26
-
27
-
28
-
29
-
30
-
31
-
32
-
33
-
34
-
35
-
36
-
37
-
38
-
39
-
40
-
41
-
42
-
43
-
44
-
45
-
46
-
47
-
48
-
49
-
 50
50 -
 51
51 -
 52
52 -
 53
53 -
 54
54 -
 55
55 -
 56
56 -
 57
57 -
 58
58 -
 59
59 -
 60
60 -
61
-
62
-
63
-
64
-
65
-
66
-
67
-
68
-
69
-
70
-
71
-
72
-
73
-
74
-
75
-
76
-
77
-
78
-
79
-
80
-
81
-
82
-
83
-
84
-
85
-
86
-
87
-
88
-
89
-
90
-
91
-
92
-
93
-
94
-
95
-
96
-
97
-
98
-
99
-
100
-
101
-
102
-
103
-
104
 |
 |