HP Pavilion 900 HP Pavilion Desktop PCs - DVDRW - (English) Technical Support - Page 70
Preferences, Eject Button, Properties Button, Explore Button, The Taskbar Icon, Drag and Drop Files
 |
View all HP Pavilion 900 manuals
Add to My Manuals
Save this manual to your list of manuals |
Page 70 highlights
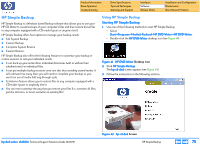
Product Information Drive Operation Troubleshooting Drive Specifications Tips and Techniques Warranty and Support Interfaces Software Release Notes Installation and Configuration Maintenance Discontinued Products Preferences The Preferences feature allows you to customize settings that control how HP DLA works. To customize your settings 1. Open HP DLA and click the Preferences button. 2. Set all appropriate option boxes: Add Media Icon to the Taskbar G Placing a check mark in the option box will place an icon in the Windows taskbar when you start up your computer. G Removing the check mark will remove the icon from the taskbar. Eject Button Once a disc is inserted into the optical recorder, clicking the Eject button will open the tray so you can remove the disc. NOTE: G The Eject button does not open the tray when there is no disc in the drive. Manually open the recorder to insert the disc. G HP DLA is enabled for one optical recorder at a time. Use the Change button to switch between drives, if you have more than one. Properties Button The Properties feature shows you the following information about your optical disc: I Label: The name given to the disc. I Type: The type of optical device being used to read the disc. I Compression: The type of compression used to create the disc (i.e., None or Software). I Used Space: The amount of information stored on your disc. I Free Space: The amount of unused space still available on your disc. NOTE: Information about Used Space and Free Space is displayed both numerically (in KB or MB) and visually (blue shows used space, magenta shows free space). ! Caution Use care when writing compressed files to write-once media such as CD-R and DVD-R. HP DLA is not able to determine in advance if a compressed file will fit on your disc. If the disc fills up before HP DLA finishes writing the file, you'll have to start over with a new disc. Explore Button Clicking the Explore button allows you to view the contents of your optical disc via the typical Windows Explorer screen. From there you can open, move, rename, and delete files just as you would from any other drive. HP DLA will automatically write the new information to your disc. NOTE: For users of Windows NT 4.0, 2000 Professional and XP: If you change the drive letter of your optical disc recorder after installing HP DLA, you will need to restart your computer before HP DLA will be able to recognize discs in your optical drive. Tips The Taskbar Icon If you right click on the media icon displayed in the taskbar, HP DLA will display a menu that lets you select a drive to access the following shortcuts: Explore -- Open a Windows Explorer screen displaying the contents of the disc (see Explore Button) Format -- Format the disc (see Format on page 68) Eject -- Eject the disc (see Eject Button on page 70) Make Compatible -- Open the Make Compatible feature (see Make Compatible on page 69) Properties -- View disc Properties (see Properties Button on page 70) Preferences -- Open the Preferences feature (see Preferences on page 70) Drag and Drop Files You can drag files and folders directly from Windows Explorer to your disc. 1. Open Windows Explorer. hp dvd-writer dvd100i Technical Support Solutions Guide 10/25/01 HP DLA 2.5 ⇐ ⇒ 70
-
 1
1 -
2
-
3
-
4
-
5
-
6
-
7
-
8
-
9
-
10
-
11
-
12
-
13
-
14
-
15
-
16
-
17
-
18
-
19
-
20
-
21
-
22
-
23
-
24
-
25
-
26
-
27
-
28
-
29
-
30
-
31
-
32
-
33
-
34
-
35
-
36
-
37
-
38
-
39
-
40
-
41
-
42
-
43
-
44
-
45
-
46
-
47
-
48
-
49
-
50
-
51
-
52
-
53
-
54
-
55
-
56
-
57
-
58
-
59
-
60
-
61
-
62
-
63
-
64
-
 65
65 -
 66
66 -
 67
67 -
 68
68 -
 69
69 -
 70
70 -
 71
71 -
 72
72 -
 73
73 -
 74
74 -
 75
75 -
76
-
77
-
78
-
79
-
80
-
81
-
82
-
83
-
84
-
85
-
86
-
87
-
88
-
89
-
90
-
91
-
92
-
93
-
94
-
95
-
96
-
97
-
98
-
99
-
100
-
101
-
102
-
103
-
104
 |
 |