HP Pavilion 900 HP Pavilion Desktop PCs - DVDRW - (English) Technical Support - Page 41
Power Connector on Drive Back, Securing the Drive in the Bay
 |
View all HP Pavilion 900 manuals
Add to My Manuals
Save this manual to your list of manuals |
Page 41 highlights
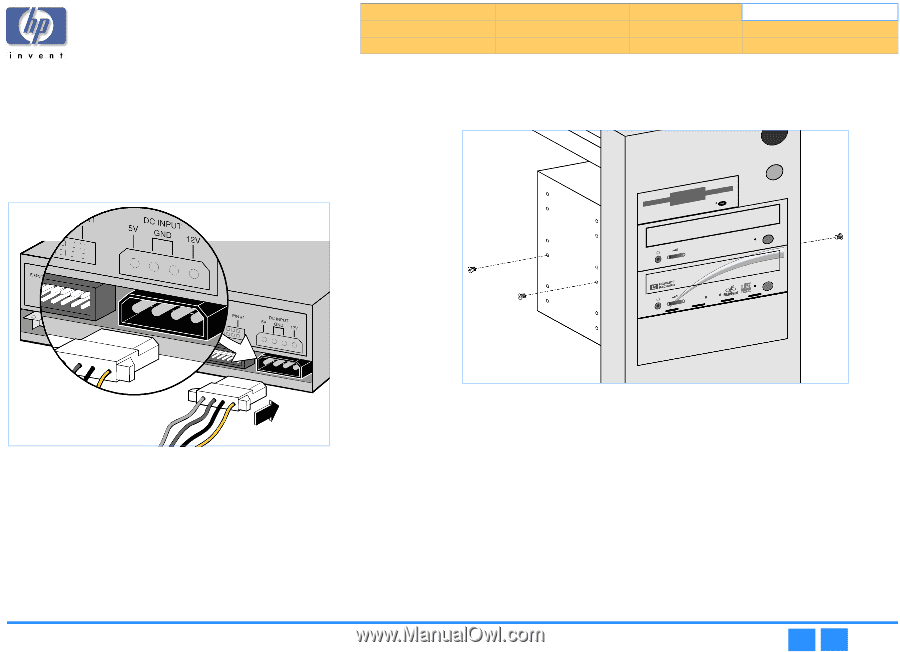
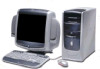
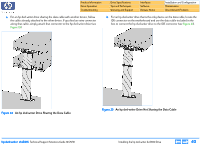
Product Information Drive Operation Troubleshooting Drive Specifications Tips and Techniques Warranty and Support Interfaces Software Release Notes Installation and Configuration Maintenance Discontinued Products 14. Locate an available power cable connector in the computer. Power cable connectors usually have yellow, red, and black wires. If you do not have an available connector, you need to purchase a Y power connector from your computer dealer. 15. Plug the power cable into the back of the HP drive. The connector only fits one way. (See Figure 24.) NOTE: Improper connection of the power cable will damage the drive. 16. Slide the HP drive completely into the drive bay. 17. Secure the HP drive into the drive bay with the screws (or rails, if your computer uses rails). (See Figure 25.) Figure 24 Power Connector on Drive Back Figure 25 Securing the Drive in the Bay hp dvd-writer dvd100i Technical Support Solutions Guide 10/25/01 Installing the hp dvd-writer dvd100i Drive ⇐ ⇒ 41
-
 1
1 -
2
-
3
-
4
-
5
-
6
-
7
-
8
-
9
-
10
-
11
-
12
-
13
-
14
-
15
-
16
-
17
-
18
-
19
-
20
-
21
-
22
-
23
-
24
-
25
-
26
-
27
-
28
-
29
-
30
-
31
-
32
-
33
-
34
-
35
-
 36
36 -
 37
37 -
 38
38 -
 39
39 -
 40
40 -
 41
41 -
 42
42 -
 43
43 -
 44
44 -
 45
45 -
 46
46 -
47
-
48
-
49
-
50
-
51
-
52
-
53
-
54
-
55
-
56
-
57
-
58
-
59
-
60
-
61
-
62
-
63
-
64
-
65
-
66
-
67
-
68
-
69
-
70
-
71
-
72
-
73
-
74
-
75
-
76
-
77
-
78
-
79
-
80
-
81
-
82
-
83
-
84
-
85
-
86
-
87
-
88
-
89
-
90
-
91
-
92
-
93
-
94
-
95
-
96
-
97
-
98
-
99
-
100
-
101
-
102
-
103
-
104
 |
 |