HP Pavilion a400 HP Pavilion Destkop PCs - (English) Users Guide PAV NA/CTO 59 - Page 142
replacing the optical drive
 |
View all HP Pavilion a400 manuals
Add to My Manuals
Save this manual to your list of manuals |
Page 142 highlights
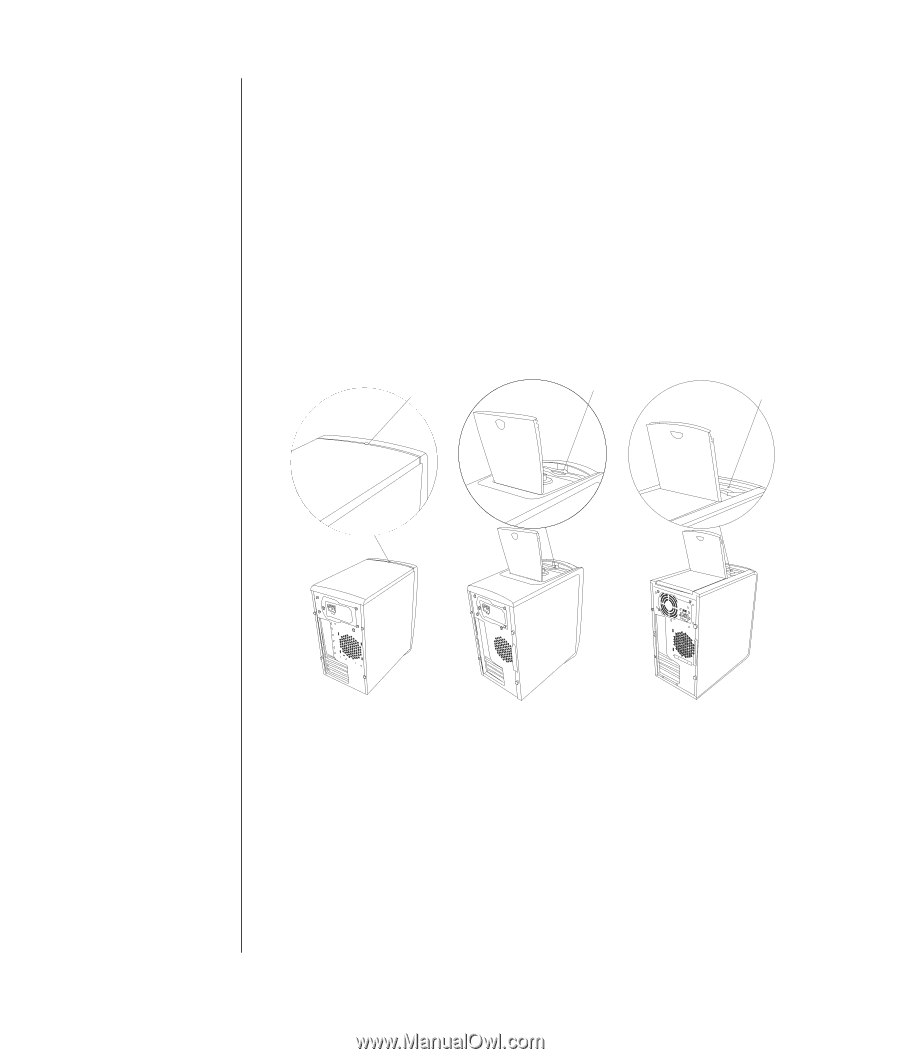
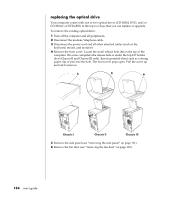
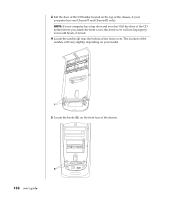
replacing the optical drive Your computer comes with one or two optical drives (CD-ROM, DVD, and/or CD-Writer or DVD+RW) in the top two bays that you can replace or upgrade. To remove the existing optical drive: 1 Turn off the computer and all peripherals. 2 Disconnect the modem/telephone cable. 3 Disconnect the power cord and all other attached cables (such as the keyboard, mouse, and monitor). 4 Remove the front cover: Locate the small release hole (A) on the top of the computer. On some computers the release hole is under the top CD holder door (Chassis II and Chassis III only). Insert a pointed object such as a strong paper clip or pen into the hole. The front cover pops open. Pull the cover up and out to remove. A A A Chassis I Chassis II Chassis III 5 Remove the side panel (see "removing the side panel" on page 121). 6 Remove the fan duct (see "removing the fan duct" on page 122). 134 user's guide
-
 1
1 -
2
-
3
-
4
-
5
-
6
-
7
-
8
-
9
-
10
-
11
-
12
-
13
-
14
-
15
-
16
-
17
-
18
-
19
-
20
-
21
-
22
-
23
-
24
-
25
-
26
-
27
-
28
-
29
-
30
-
31
-
32
-
33
-
34
-
35
-
36
-
37
-
38
-
39
-
40
-
41
-
42
-
43
-
44
-
45
-
46
-
47
-
48
-
49
-
50
-
51
-
52
-
53
-
54
-
55
-
56
-
57
-
58
-
59
-
60
-
61
-
62
-
63
-
64
-
65
-
66
-
67
-
68
-
69
-
70
-
71
-
72
-
73
-
74
-
75
-
76
-
77
-
78
-
79
-
80
-
81
-
82
-
83
-
84
-
85
-
86
-
87
-
88
-
89
-
90
-
91
-
92
-
93
-
94
-
95
-
96
-
97
-
98
-
99
-
100
-
101
-
102
-
103
-
104
-
105
-
106
-
107
-
108
-
109
-
110
-
111
-
112
-
113
-
114
-
115
-
116
-
117
-
118
-
119
-
120
-
121
-
122
-
123
-
124
-
125
-
126
-
127
-
128
-
129
-
130
-
131
-
132
-
133
-
134
-
135
-
136
-
 137
137 -
 138
138 -
 139
139 -
 140
140 -
 141
141 -
 142
142 -
 143
143 -
 144
144 -
 145
145 -
 146
146 -
 147
147 -
148
-
149
-
150
-
151
-
152
-
153
-
154
-
155
-
156
-
157
-
158
 |
 |