HP ProLiant DL185 HP Insight Server Migration Software for ProLiant User Guide - Page 75
Browse, Assign Disks and Resize NTFS Volumes, Auto Boot - Let SMP create the VM
 |
View all HP ProLiant DL185 manuals
Add to My Manuals
Save this manual to your list of manuals |
Page 75 highlights
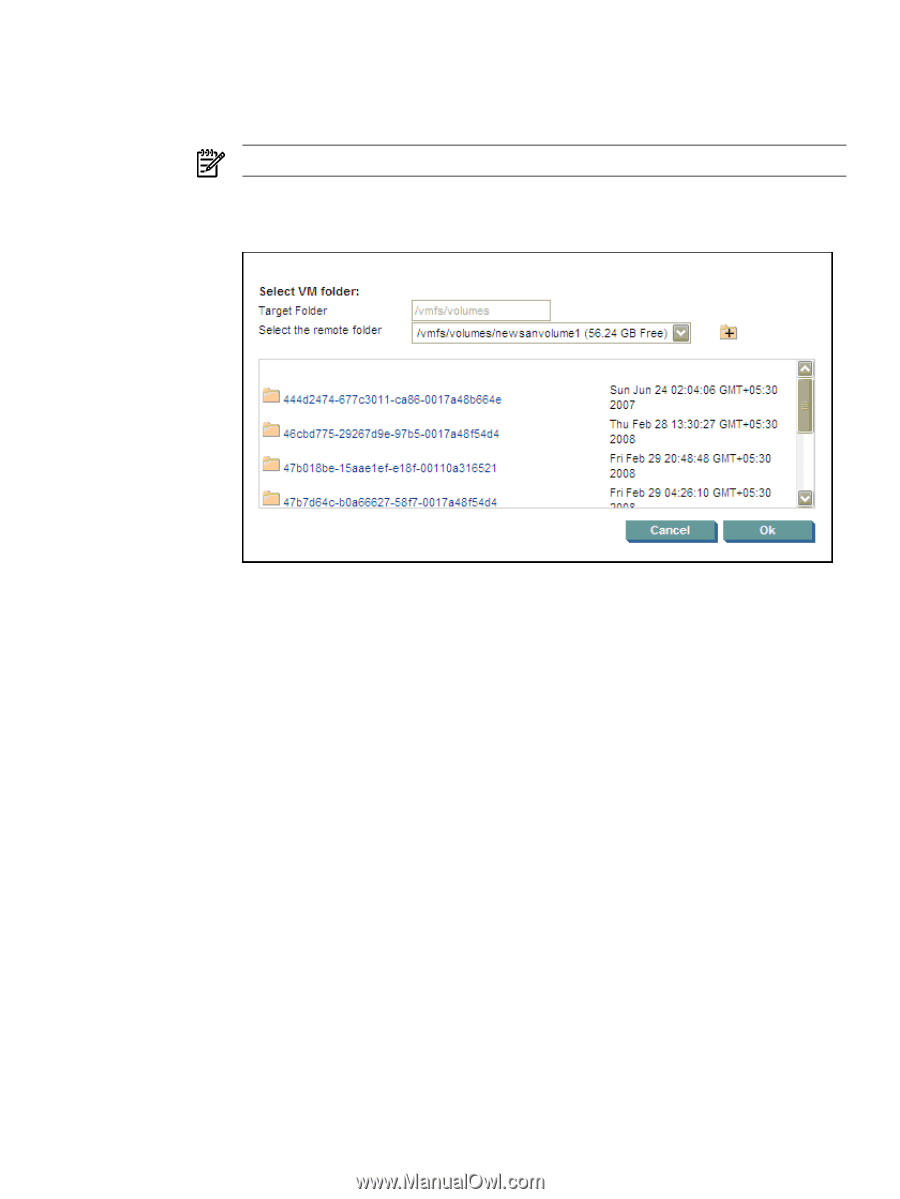
b. Select the storage location (if applicable). • If you are migrating to an agent-based virtual machine, to browse for guest storage location information, click Browse. A selection window appears where you can enter the destination folder information or select a remote folder. Click OK. NOTE: If the destination virtual machine host is ESX 3.x, you must create a new folder. • If migrating to an agent-less virtual machine, select the guest storage location from the list. Click Next. If the destination virtual machine is manually booted with the SMP Virtual Boot CD, select the destination disk, and then click Next. c. Some of the columns and rows from the Assign Disks and Resize NTFS Volumes table include: • Minimum Destination Size-This column displays the minimum size to which a partition or disk can be resized for the destination disk. • Destination Size-This column displays the desired partition resize or disk resize on the destination disk. • Migration Overhead-This row displays the additional space that must be reserved on the destination disk to accommodate disk geometry differences. • Unallocated-This row displays the available space remaining on the destination disk after the migration is complete. To proceed to the Next wizard page, the value of Unallocated must either be 0 (zero) or a positive number. For migrations to agent-less virtual hosts and Auto Boot - Let SMP create the VM selected in step 3, when you click Next, SMP connects to the destination virtual machine host to create the virtual machine with the required configurations. The virtual machine is then booted with the SMP Virtual Boot CD, which can take a few minutes. After the virtual machine is booted, the application station connects to the Agent and progresses to the next screen. 7. Test the network connections and latency between the source-to-destination server and the application-station-to-destination server. The results of a 2-second test initially appear. 8. To perform additional tests, select a test time in the Test network connections section, and then click Test. The following test times are available: • 2 seconds • 5 seconds • 10 seconds Physical-to-virtual (P2V) migrations 75
-
 1
1 -
2
-
3
-
4
-
5
-
6
-
7
-
8
-
9
-
10
-
11
-
12
-
13
-
14
-
15
-
16
-
17
-
18
-
19
-
20
-
21
-
22
-
23
-
24
-
25
-
26
-
27
-
28
-
29
-
30
-
31
-
32
-
33
-
34
-
35
-
36
-
37
-
38
-
39
-
40
-
41
-
42
-
43
-
44
-
45
-
46
-
47
-
48
-
49
-
50
-
51
-
52
-
53
-
54
-
55
-
56
-
57
-
58
-
59
-
60
-
61
-
62
-
63
-
64
-
65
-
66
-
67
-
68
-
69
-
 70
70 -
 71
71 -
 72
72 -
 73
73 -
 74
74 -
 75
75 -
 76
76 -
 77
77 -
 78
78 -
 79
79 -
 80
80 -
81
-
82
-
83
-
84
-
85
-
86
-
87
-
88
-
89
-
90
-
91
-
92
-
93
-
94
-
95
-
96
-
97
-
98
-
99
-
100
-
101
-
102
-
103
-
104
-
105
-
106
-
107
-
108
-
109
-
110
-
111
-
112
-
113
-
114
-
115
-
116
-
117
-
118
-
119
-
120
-
121
-
122
-
123
-
124
-
125
-
126
-
127
-
128
-
129
-
130
-
131
-
132
-
133
-
134
-
135
-
136
-
137
-
138
-
139
-
140
-
141
-
142
-
143
-
144
-
145
-
146
-
147
 |
 |