HP Surestore Tape Library Model 6/140 HP SureStore E Tape Library Model 6/140 - Page 170
Using a Firmware Upgrade Tape, drive firmware only
 |
View all HP Surestore Tape Library Model 6/140 manuals
Add to My Manuals
Save this manual to your list of manuals |
Page 170 highlights
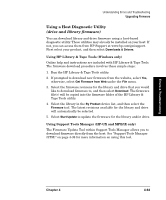
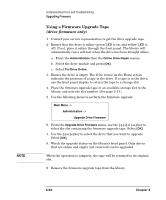
NOTE Understanding Errors and Troubleshooting Upgrading Firmware Using a Firmware Upgrade Tape (drive firmware only) 1. Contact your service representative to get the drive upgrade tape. 2. Ensure that the drive is online (green LED is on, and yellow LED is off). If not, place it online through the front panel. The library will automatically run a self-test when the drive has been brought online. a. Enter the Administration then the Online Drive Repair menus. b. Select the drive module and press [OK]. c. Select Put Drive Online. 3. Ensure the drive is empty. The drive icon(s) on the Home screen indicates the presence of a tape in the drive. If a tape is in the drive, use the front panel display to return the tape to a storage slot. 4. Place the firmware upgrade tape in an available storage slot in the library, and note the slot number. (See page 2-11.) 5. Use the following menu to perform the firmware upgrade: Main Menu -> Administration -> Upgrade Drive Firmware 6. From the Upgrade Drive Firmware menu, use the [-], [+] or [++] key to select the slot containing the firmware upgrade tape. Select [OK]. 7. Use the [-] or [+] key to select the drive that you want to upgrade. Select [OK]. 8. Watch the upgrade status on the library's front panel. Only drives that are online and empty (not reserved) can be upgraded. When the operation is complete, the tape will be returned to its original slot. 9. Remove the firmware upgrade tape from the library. 4-64 Chapter 4
-
 1
1 -
2
-
3
-
4
-
5
-
6
-
7
-
8
-
9
-
10
-
11
-
12
-
13
-
14
-
15
-
16
-
17
-
18
-
19
-
20
-
21
-
22
-
23
-
24
-
25
-
26
-
27
-
28
-
29
-
30
-
31
-
32
-
33
-
34
-
35
-
36
-
37
-
38
-
39
-
40
-
41
-
42
-
43
-
44
-
45
-
46
-
47
-
48
-
49
-
50
-
51
-
52
-
53
-
54
-
55
-
56
-
57
-
58
-
59
-
60
-
61
-
62
-
63
-
64
-
65
-
66
-
67
-
68
-
69
-
70
-
71
-
72
-
73
-
74
-
75
-
76
-
77
-
78
-
79
-
80
-
81
-
82
-
83
-
84
-
85
-
86
-
87
-
88
-
89
-
90
-
91
-
92
-
93
-
94
-
95
-
96
-
97
-
98
-
99
-
100
-
101
-
102
-
103
-
104
-
105
-
106
-
107
-
108
-
109
-
110
-
111
-
112
-
113
-
114
-
115
-
116
-
117
-
118
-
119
-
120
-
121
-
122
-
123
-
124
-
125
-
126
-
127
-
128
-
129
-
130
-
131
-
132
-
133
-
134
-
135
-
136
-
137
-
138
-
139
-
140
-
141
-
142
-
143
-
144
-
145
-
146
-
147
-
148
-
149
-
150
-
151
-
152
-
153
-
154
-
155
-
156
-
157
-
158
-
159
-
160
-
161
-
162
-
163
-
164
-
 165
165 -
 166
166 -
 167
167 -
 168
168 -
 169
169 -
 170
170 -
 171
171 -
 172
172 -
 173
173 -
 174
174 -
 175
175 -
176
-
177
-
178
-
179
-
180
-
181
-
182
-
183
-
184
-
185
-
186
-
187
-
188
-
189
-
190
-
191
-
192
-
193
-
194
-
195
-
196
-
197
-
198
-
199
-
200
-
201
-
202
-
203
-
204
-
205
-
206
-
207
-
208
-
209
-
210
-
211
-
212
-
213
-
214
-
215
-
216
-
217
-
218
-
219
-
220
-
221
-
222
-
223
-
224
-
225
-
226
-
227
-
228
-
229
-
230
-
231
-
232
-
233
-
234
-
235
-
236
-
237
-
238
-
239
-
240
 |
 |
