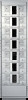
HP Surestore Tape Library Model 6/140 HP SureStore E Tape Library Model 6/140 - Page 35
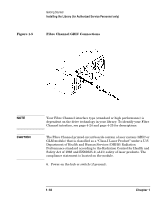
WARNING, Configuring the Library for Fibre Channel
 |
View all HP Surestore Tape Library Model 6/140 manuals
Add to My Manuals
Save this manual to your list of manuals |
Page 35 highlights
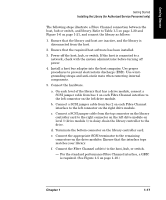
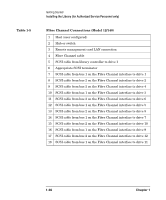
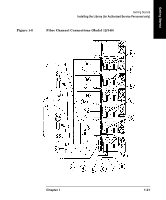
Getting Started Getting Started Installing the Library (for Authorized Service Personnel only) WARNING Note the high leakage label on the back of the library before connecting power to the library. NOTE The AC power cord is the library's main AC disconnect device and must be easily accessible at all times. 7. Connect the power cord from the power distribution unit to a grounded power receptacle, and power on the library. The power (standby) switch is recessed and on the lowest level on the front of the library. After the power-up test is complete (after several minutes), you will see the Home Screen on the library's front panel. The Home Screen displays the status of the drives and library. See "Front Panel Status Information (Home Screen)" on page 2-5. 8. From the front panel, configure the library for Fibre Channel. See "Configuring the Library for Fibre Channel" on page 3-15 for more information. 9. Connect the remote management card (see "Using the Remote Management Card" on page 3-9). 10. Power on the host. Chapter 1 1-19
-
 1
1 -
2
-
3
-
4
-
5
-
6
-
7
-
8
-
9
-
10
-
11
-
12
-
13
-
14
-
15
-
16
-
17
-
18
-
19
-
20
-
21
-
22
-
23
-
24
-
25
-
26
-
27
-
28
-
29
-
 30
30 -
 31
31 -
 32
32 -
 33
33 -
 34
34 -
 35
35 -
 36
36 -
 37
37 -
 38
38 -
 39
39 -
 40
40 -
41
-
42
-
43
-
44
-
45
-
46
-
47
-
48
-
49
-
50
-
51
-
52
-
53
-
54
-
55
-
56
-
57
-
58
-
59
-
60
-
61
-
62
-
63
-
64
-
65
-
66
-
67
-
68
-
69
-
70
-
71
-
72
-
73
-
74
-
75
-
76
-
77
-
78
-
79
-
80
-
81
-
82
-
83
-
84
-
85
-
86
-
87
-
88
-
89
-
90
-
91
-
92
-
93
-
94
-
95
-
96
-
97
-
98
-
99
-
100
-
101
-
102
-
103
-
104
-
105
-
106
-
107
-
108
-
109
-
110
-
111
-
112
-
113
-
114
-
115
-
116
-
117
-
118
-
119
-
120
-
121
-
122
-
123
-
124
-
125
-
126
-
127
-
128
-
129
-
130
-
131
-
132
-
133
-
134
-
135
-
136
-
137
-
138
-
139
-
140
-
141
-
142
-
143
-
144
-
145
-
146
-
147
-
148
-
149
-
150
-
151
-
152
-
153
-
154
-
155
-
156
-
157
-
158
-
159
-
160
-
161
-
162
-
163
-
164
-
165
-
166
-
167
-
168
-
169
-
170
-
171
-
172
-
173
-
174
-
175
-
176
-
177
-
178
-
179
-
180
-
181
-
182
-
183
-
184
-
185
-
186
-
187
-
188
-
189
-
190
-
191
-
192
-
193
-
194
-
195
-
196
-
197
-
198
-
199
-
200
-
201
-
202
-
203
-
204
-
205
-
206
-
207
-
208
-
209
-
210
-
211
-
212
-
213
-
214
-
215
-
216
-
217
-
218
-
219
-
220
-
221
-
222
-
223
-
224
-
225
-
226
-
227
-
228
-
229
-
230
-
231
-
232
-
233
-
234
-
235
-
236
-
237
-
238
-
239
-
240
 |
 |
