HP Z3200ps HP Designjet Z3200 Photo Printer Series - User Guide [English] - Page 100
Ensure the end of the blue handle catches the wire loop on the near side of the carriage.
 |
UPC - 884420403401
View all HP Z3200ps manuals
Add to My Manuals
Save this manual to your list of manuals |
Page 100 highlights
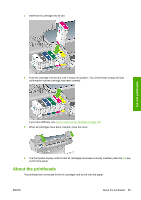
5. Push down as indicated by the arrow shown below. CAUTION: When installing the new printhead there may be some resistance, so you need to press it down firmly but smoothly. You should hear a beep and see confirmation on the front-panel display that the printhead has been inserted. If you have difficulty, see Cannot insert a printhead on page 138. 6. Insert any other printheads, that need to be installed, with the same procedure, then close the carriage lid. 7. Ensure the end of the blue handle catches the wire loop on the near side of the carriage. Ink and printheads 90 Chapter 8 Handling ink cartridges and printheads ENWW
-
 1
1 -
2
-
3
-
4
-
5
-
6
-
7
-
8
-
9
-
10
-
11
-
12
-
13
-
14
-
15
-
16
-
17
-
18
-
19
-
20
-
21
-
22
-
23
-
24
-
25
-
26
-
27
-
28
-
29
-
30
-
31
-
32
-
33
-
34
-
35
-
36
-
37
-
38
-
39
-
40
-
41
-
42
-
43
-
44
-
45
-
46
-
47
-
48
-
49
-
50
-
51
-
52
-
53
-
54
-
55
-
56
-
57
-
58
-
59
-
60
-
61
-
62
-
63
-
64
-
65
-
66
-
67
-
68
-
69
-
70
-
71
-
72
-
73
-
74
-
75
-
76
-
77
-
78
-
79
-
80
-
81
-
82
-
83
-
84
-
85
-
86
-
87
-
88
-
89
-
90
-
91
-
92
-
93
-
94
-
 95
95 -
 96
96 -
 97
97 -
 98
98 -
 99
99 -
 100
100 -
 101
101 -
 102
102 -
 103
103 -
 104
104 -
 105
105 -
106
-
107
-
108
-
109
-
110
-
111
-
112
-
113
-
114
-
115
-
116
-
117
-
118
-
119
-
120
-
121
-
122
-
123
-
124
-
125
-
126
-
127
-
128
-
129
-
130
-
131
-
132
-
133
-
134
-
135
-
136
-
137
-
138
-
139
-
140
-
141
-
142
-
143
-
144
-
145
-
146
-
147
-
148
-
149
-
150
-
151
-
152
-
153
-
154
-
155
-
156
-
157
-
158
-
159
-
160
-
161
-
162
-
163
-
164
-
165
-
166
-
167
-
168
-
169
-
170
-
171
-
172
-
173
-
174
 |
 |

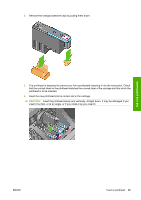
5.
Push down as indicated by the arrow shown below.
CAUTION:
When installing the new printhead there may be some resistance, so you need to
press it down firmly but smoothly. You should hear a beep and see confirmation on the front-panel
display that the printhead has been inserted. If you have difficulty, see
Cannot insert a printhead
on page
138
.
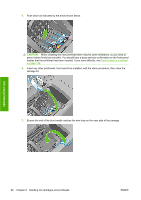
6.
Insert any other printheads, that need to be installed, with the same procedure, then close the
carriage lid.
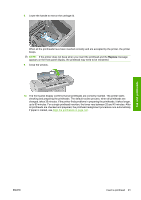
7.
Ensure the end of the blue handle catches the wire loop on the near side of the carriage.
90
Chapter 8
Handling ink cartridges and printheads
ENWW
Ink and printheads