HP Z3200ps HP Designjet Z3200 Photo Printer Series - User Guide [English] - Page 106
the screw with the screwdriver in your other hand.
 |
UPC - 884420403401
View all HP Z3200ps manuals
Add to My Manuals
Save this manual to your list of manuals |
Page 106 highlights
10. Slide the new cutter into position on the cutter rail. The two wheels on the bottom of the cutter should engage the central ridge on the cutter rail, and the two bushing guides should fit into the groove in the upper part of the cutter rail. Check that the cutter runs smoothly up and down the rail. You can leave it anywhere on the rail; the printer will park it correctly later. 11. Fit the cutter stop onto the end of the cutter rail, holding it there with one hand while you tighten the screw with the screwdriver in your other hand. Printer maintenance 96 Chapter 9 Maintaining the printer ENWW
-
 1
1 -
2
-
3
-
4
-
5
-
6
-
7
-
8
-
9
-
10
-
11
-
12
-
13
-
14
-
15
-
16
-
17
-
18
-
19
-
20
-
21
-
22
-
23
-
24
-
25
-
26
-
27
-
28
-
29
-
30
-
31
-
32
-
33
-
34
-
35
-
36
-
37
-
38
-
39
-
40
-
41
-
42
-
43
-
44
-
45
-
46
-
47
-
48
-
49
-
50
-
51
-
52
-
53
-
54
-
55
-
56
-
57
-
58
-
59
-
60
-
61
-
62
-
63
-
64
-
65
-
66
-
67
-
68
-
69
-
70
-
71
-
72
-
73
-
74
-
75
-
76
-
77
-
78
-
79
-
80
-
81
-
82
-
83
-
84
-
85
-
86
-
87
-
88
-
89
-
90
-
91
-
92
-
93
-
94
-
95
-
96
-
97
-
98
-
99
-
100
-
 101
101 -
 102
102 -
 103
103 -
 104
104 -
 105
105 -
 106
106 -
 107
107 -
 108
108 -
 109
109 -
 110
110 -
 111
111 -
112
-
113
-
114
-
115
-
116
-
117
-
118
-
119
-
120
-
121
-
122
-
123
-
124
-
125
-
126
-
127
-
128
-
129
-
130
-
131
-
132
-
133
-
134
-
135
-
136
-
137
-
138
-
139
-
140
-
141
-
142
-
143
-
144
-
145
-
146
-
147
-
148
-
149
-
150
-
151
-
152
-
153
-
154
-
155
-
156
-
157
-
158
-
159
-
160
-
161
-
162
-
163
-
164
-
165
-
166
-
167
-
168
-
169
-
170
-
171
-
172
-
173
-
174
 |
 |

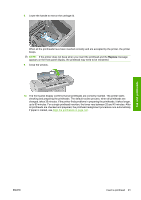
10.
Slide the new cutter into position on the cutter rail.
The two wheels on the bottom of the cutter should engage the central ridge on the cutter rail, and
the two bushing guides should fit into the groove in the upper part of the cutter rail.
Check that the cutter runs smoothly up and down the rail. You can leave it anywhere on the rail;
the printer will park it correctly later.
11.
Fit the cutter stop onto the end of the cutter rail, holding it there with one hand while you tighten
the screw with the screwdriver in your other hand.
96
Chapter 9
Maintaining the printer
ENWW
Printer maintenance