HP Z3200ps HP Designjet Z3200 Photo Printer Series - User Guide [English] - Page 137
Bronzing, Horizontal lines at the end of a cut sheet print, Vertical lines of different colors,
 |
UPC - 884420403401
View all HP Z3200ps manuals
Add to My Manuals
Save this manual to your list of manuals |
Page 137 highlights
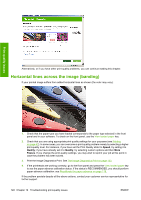
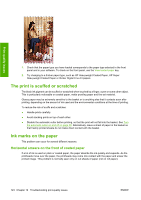
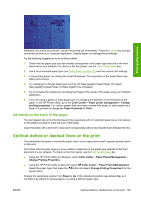
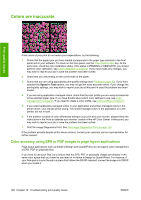
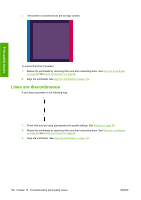
Print-quality issues Bronzing If you are printing on photo paper in grayscale, and you experience a gloss differential problem when fluorescent light is directly reflected towards you from the print, producing 'bronzed' reflections from the ink, try one of the following: ● If using standard print quality options, ensure that the slider is set to Quality (see Select print quality on page 43) ● If using custom print quality options, ensure that the Gloss enhancer option is set to Whole page (see If you are printing on photo paper on page 48) ● Increase the amount of gloss enhancer used (see If you are printing on photo paper on page 48) ● Display the print vertically or behind glass Horizontal lines at the end of a cut sheet print This type of defect affects only the end of a print, within approximately 30 mm of the trailing edge of the paper. You may see some very thin horizontal lines across the print. To avoid this problem: 1. Print the Image Diagnostics Print. See The Image Diagnostics Print on page 133. 2. Consider printing with roll paper. 3. Consider using larger margins around your image. Vertical lines of different colors If your print has vertical bands of different colors along it: 1. Try using thicker paper, choosing from the recommended paper types such as HP Heavyweight Coated Paper and HP Super Heavyweight Paper. See Order paper on page 103. 2. Try using higher print-quality settings (see Printing on page 42). For instance, if you have set the Print Quality slider to Speed, try setting it to Quality; if you have already set it to Quality, try selecting custom options and then More Passes. White spots on the print You may notice white spots on the print. This is probably due to paper fibers, dust or loose coating material. To avoid this problem: 1. Try cleaning the paper manually with a brush before printing, to remove any loose fibers or particles. 2. Always keep the cover of your printer closed. 3. Protect your paper rolls and sheets by storing them in bags or boxes. ENWW Bronzing 127
-
 1
1 -
2
-
3
-
4
-
5
-
6
-
7
-
8
-
9
-
10
-
11
-
12
-
13
-
14
-
15
-
16
-
17
-
18
-
19
-
20
-
21
-
22
-
23
-
24
-
25
-
26
-
27
-
28
-
29
-
30
-
31
-
32
-
33
-
34
-
35
-
36
-
37
-
38
-
39
-
40
-
41
-
42
-
43
-
44
-
45
-
46
-
47
-
48
-
49
-
50
-
51
-
52
-
53
-
54
-
55
-
56
-
57
-
58
-
59
-
60
-
61
-
62
-
63
-
64
-
65
-
66
-
67
-
68
-
69
-
70
-
71
-
72
-
73
-
74
-
75
-
76
-
77
-
78
-
79
-
80
-
81
-
82
-
83
-
84
-
85
-
86
-
87
-
88
-
89
-
90
-
91
-
92
-
93
-
94
-
95
-
96
-
97
-
98
-
99
-
100
-
101
-
102
-
103
-
104
-
105
-
106
-
107
-
108
-
109
-
110
-
111
-
112
-
113
-
114
-
115
-
116
-
117
-
118
-
119
-
120
-
121
-
122
-
123
-
124
-
125
-
126
-
127
-
128
-
129
-
130
-
131
-
 132
132 -
 133
133 -
 134
134 -
 135
135 -
 136
136 -
 137
137 -
 138
138 -
 139
139 -
 140
140 -
 141
141 -
 142
142 -
143
-
144
-
145
-
146
-
147
-
148
-
149
-
150
-
151
-
152
-
153
-
154
-
155
-
156
-
157
-
158
-
159
-
160
-
161
-
162
-
163
-
164
-
165
-
166
-
167
-
168
-
169
-
170
-
171
-
172
-
173
-
174
 |
 |
