HP Z3200ps HP Designjet Z3200 Photo Printer Series - User Guide [English] - Page 84
Print a digital album (Aperture, Mac OS), Under Color Management, select
 |
UPC - 884420403401
View all HP Z3200ps manuals
Add to My Manuals
Save this manual to your list of manuals |
Page 84 highlights
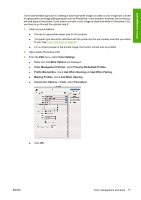
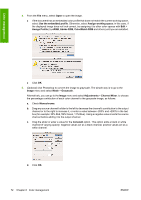
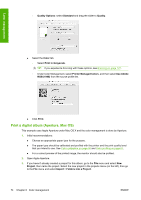
Color management ◦ Quality Options: select Standard and drag the slider to Quality. ● Select the Color tab. ◦ Select Print in Grayscale. TIP: If you experience bronzing with these options, see Bronzing on page 127. ◦ Under Color Management, select Printer Managed Colors, and then select Use Adobe RGB (1998) from the source profile list. ● Click Print. Print a digital album (Aperture, Mac OS) This example uses Apple Aperture under Mac OS X and the color management is done by Aperture. 1. Initial recommendations: ● Choose an appropriate paper type for the purpose. ● The paper type should be calibrated and profiled with the printer and the print-quality level that you intend to use. See Color calibration on page 60 and Color profiling on page 61. ● For a correct preview of the printed image, the monitor should also be profiled. 2. Open Apple Aperture. 3. If you haven't already created a project for this album, go to the File menu and select New Project, then name the project. Select the new project in the projects menu (on the left), then go to the File menu and select Import > Folders into a Project. 74 Chapter 6 Color management ENWW
-
 1
1 -
2
-
3
-
4
-
5
-
6
-
7
-
8
-
9
-
10
-
11
-
12
-
13
-
14
-
15
-
16
-
17
-
18
-
19
-
20
-
21
-
22
-
23
-
24
-
25
-
26
-
27
-
28
-
29
-
30
-
31
-
32
-
33
-
34
-
35
-
36
-
37
-
38
-
39
-
40
-
41
-
42
-
43
-
44
-
45
-
46
-
47
-
48
-
49
-
50
-
51
-
52
-
53
-
54
-
55
-
56
-
57
-
58
-
59
-
60
-
61
-
62
-
63
-
64
-
65
-
66
-
67
-
68
-
69
-
70
-
71
-
72
-
73
-
74
-
75
-
76
-
77
-
78
-
 79
79 -
 80
80 -
 81
81 -
 82
82 -
 83
83 -
 84
84 -
 85
85 -
 86
86 -
 87
87 -
 88
88 -
 89
89 -
90
-
91
-
92
-
93
-
94
-
95
-
96
-
97
-
98
-
99
-
100
-
101
-
102
-
103
-
104
-
105
-
106
-
107
-
108
-
109
-
110
-
111
-
112
-
113
-
114
-
115
-
116
-
117
-
118
-
119
-
120
-
121
-
122
-
123
-
124
-
125
-
126
-
127
-
128
-
129
-
130
-
131
-
132
-
133
-
134
-
135
-
136
-
137
-
138
-
139
-
140
-
141
-
142
-
143
-
144
-
145
-
146
-
147
-
148
-
149
-
150
-
151
-
152
-
153
-
154
-
155
-
156
-
157
-
158
-
159
-
160
-
161
-
162
-
163
-
164
-
165
-
166
-
167
-
168
-
169
-
170
-
171
-
172
-
173
-
174
 |
 |
