HP Z3200ps HP Designjet Z3200 Photo Printer Series - User Guide [English] - Page 140
Some objects are missing from the printed image, Lines are too thick, too thin or missing
 |
UPC - 884420403401
View all HP Z3200ps manuals
Add to My Manuals
Save this manual to your list of manuals |
Page 140 highlights
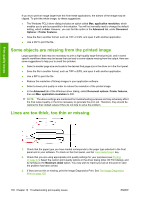
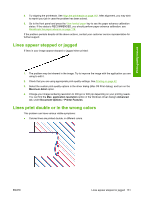
Print-quality issues If you try to print an image larger than this from these applications, the bottom of the image may be clipped. To print the whole image, try these suggestions: ● The Windows PCL3 driver dialog includes an option called Max. application resolution, which enables you to print successfully in this situation. You will not normally need to change the default setting, which is Auto. However, you can find the option in the Advanced tab, under Document Options > Printer Features. ● Save the file in another format, such as TIFF or EPS, and open it with another application. ● Use a RIP to print the file. Some objects are missing from the printed image Large quantities of data may be necessary to print a high-quality large-format print job, and in some specific workflows there may be issues that can lead to some objects missing from the output. Here are some suggestions to help you to avoid this problem. ● Select a smaller page size and scale to the desired final page size in the driver or in the front panel. ● Save the file in another format, such as TIFF or EPS, and open it with another application. ● Use a RIP to print the file. ● Reduce the resolution of bitmap images in your application software. ● Select a lower print quality in order to reduce the resolution of the printed image. ● In the Advanced tab of the Windows driver dialog, select Document options, Printer features, then set Max. application resolution to 300. NOTE: The above settings are mentioned for troubleshooting purposes and may adversely affect the final output quality or the time necessary to generate the print job. Therefore, they should be restored to their default values if they do not help to solve the problem. Lines are too thick, too thin or missing 1. Check that the paper type you have loaded corresponds to the paper type selected in the front panel and in your software. To check on the front panel, use the View loaded paper key. 2. Check that you are using appropriate print-quality settings for your purposes (see Printing on page 42). Select the custom print-quality options in the driver dialog (Mac OS Print dialog), and try turning on the Maximum detail option. You may wish to reprint your job at this point in case the problem has been solved. 3. If lines are too thin or missing, print the Image Diagnostics Print. See The Image Diagnostics Print on page 133. 130 Chapter 12 Troubleshooting print-quality issues ENWW
-
 1
1 -
2
-
3
-
4
-
5
-
6
-
7
-
8
-
9
-
10
-
11
-
12
-
13
-
14
-
15
-
16
-
17
-
18
-
19
-
20
-
21
-
22
-
23
-
24
-
25
-
26
-
27
-
28
-
29
-
30
-
31
-
32
-
33
-
34
-
35
-
36
-
37
-
38
-
39
-
40
-
41
-
42
-
43
-
44
-
45
-
46
-
47
-
48
-
49
-
50
-
51
-
52
-
53
-
54
-
55
-
56
-
57
-
58
-
59
-
60
-
61
-
62
-
63
-
64
-
65
-
66
-
67
-
68
-
69
-
70
-
71
-
72
-
73
-
74
-
75
-
76
-
77
-
78
-
79
-
80
-
81
-
82
-
83
-
84
-
85
-
86
-
87
-
88
-
89
-
90
-
91
-
92
-
93
-
94
-
95
-
96
-
97
-
98
-
99
-
100
-
101
-
102
-
103
-
104
-
105
-
106
-
107
-
108
-
109
-
110
-
111
-
112
-
113
-
114
-
115
-
116
-
117
-
118
-
119
-
120
-
121
-
122
-
123
-
124
-
125
-
126
-
127
-
128
-
129
-
130
-
131
-
132
-
133
-
134
-
 135
135 -
 136
136 -
 137
137 -
 138
138 -
 139
139 -
 140
140 -
 141
141 -
 142
142 -
 143
143 -
 144
144 -
 145
145 -
146
-
147
-
148
-
149
-
150
-
151
-
152
-
153
-
154
-
155
-
156
-
157
-
158
-
159
-
160
-
161
-
162
-
163
-
164
-
165
-
166
-
167
-
168
-
169
-
170
-
171
-
172
-
173
-
174
 |
 |
