IBM 8872 Service Guide - Page 121
Hot-swap
 |
UPC - 000435813060
View all IBM 8872 manuals
Add to My Manuals
Save this manual to your list of manuals |
Page 121 highlights
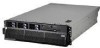
Hot-swap fan The server comes with 80-mm hot-swap fans in front of the PCI-X slots and 92-mm hot-swap fans in front of the memory cards. The following removal and installation procedures apply to either size fan. When a fan fails or is removed, the other fans in the server speed up to maintain a safe operating temperature in the server until the fan is reinstalled or replaced. When the fan is installed correctly the fans will slow down. To remove a hot-swap fan, complete the following steps: Fan Error LED Hot-swap fan 5 Hot-swap fan 6 Hot-swap fan 7 Hot-swap fan 8 Hot-swap fan 1 Hot-swap fan 2 Hot-swap fan 3 Hot-swap fan 4 1. Read the safety information that begins on page vii and "Installation guidelines" on page 99. 2. Remove the top cover (see "Top cover and bezel" on page 113). Attention: To ensure proper cooling and airflow, do not operate the server for more than 2 minutes with the top cover removed. 3. Open the fan-locking handle by sliding the orange release latch in the direction of the arrow. 4. Pull upward on the free end of the handle to lift the fan out of the server. 5. If you are instructed to return the fan, follow all packaging instructions, and use any packaging materials for shipping that are supplied to you. To install the replacement hot-swap fan, complete the following steps: 1. Open the fan-locking handle on the replacement fan. 2. Lower the fan into the socket, and close the handle to the locked position. 3. Install the top cover (see "Top cover and bezel" on page 113). Chapter 4. Removing and replacing server components 105
-
 1
1 -
2
-
3
-
4
-
5
-
6
-
7
-
8
-
9
-
10
-
11
-
12
-
13
-
14
-
15
-
16
-
17
-
18
-
19
-
20
-
21
-
22
-
23
-
24
-
25
-
26
-
27
-
28
-
29
-
30
-
31
-
32
-
33
-
34
-
35
-
36
-
37
-
38
-
39
-
40
-
41
-
42
-
43
-
44
-
45
-
46
-
47
-
48
-
49
-
50
-
51
-
52
-
53
-
54
-
55
-
56
-
57
-
58
-
59
-
60
-
61
-
62
-
63
-
64
-
65
-
66
-
67
-
68
-
69
-
70
-
71
-
72
-
73
-
74
-
75
-
76
-
77
-
78
-
79
-
80
-
81
-
82
-
83
-
84
-
85
-
86
-
87
-
88
-
89
-
90
-
91
-
92
-
93
-
94
-
95
-
96
-
97
-
98
-
99
-
100
-
101
-
102
-
103
-
104
-
105
-
106
-
107
-
108
-
109
-
110
-
111
-
112
-
113
-
114
-
115
-
 116
116 -
 117
117 -
 118
118 -
 119
119 -
 120
120 -
 121
121 -
 122
122 -
 123
123 -
 124
124 -
 125
125 -
 126
126 -
127
-
128
-
129
-
130
-
131
-
132
-
133
-
134
-
135
-
136
-
137
-
138
-
139
-
140
-
141
-
142
-
143
-
144
-
145
-
146
-
147
-
148
-
149
-
150
-
151
-
152
-
153
-
154
-
155
-
156
-
157
-
158
-
159
-
160
-
161
-
162
-
163
-
164
-
165
-
166
-
167
-
168
-
169
-
170
 |
 |
