Intel SPSH4 Product Guide - Page 67
Removing the Front Access Cover,
 |
UPC - 735858156462
View all Intel SPSH4 manuals
Add to My Manuals
Save this manual to your list of manuals |
Page 67 highlights
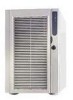
Removing the Front Access Cover The front access cover provides access to the hot-swap fans, to devices in the peripherals bay, and to the hot-swap drive bay. To remove the front access cover: 1. Remove the rear access cover (page 66). 2. Release the two captive cover screws, as shown in Figure 4. 3. Lift the rear edge of the cover slightly and slide it toward the rear of the chassis. 4. Lift the cover up and off of the chassis. A OM13383 Figure 4. Removing the Front Access Cover Installing the Front Access Cover ✏ NOTE Before installing the front access cover, check that you have not left tools or loose parts inside the system. To install the front access cover: 1. Position the cover on the chassis so that the cover tabs align with the chassis slots. 2. While lightly pressing the cover against the chassis, slide it toward the front of the chassis until the cover tabs fully engage the chassis slots. 3. Attach the cover to the chassis with the captive screws. 4. Install the rear access cover (page 66). Installing and Removing Components 67
-
 1
1 -
2
-
3
-
4
-
5
-
6
-
7
-
8
-
9
-
10
-
11
-
12
-
13
-
14
-
15
-
16
-
17
-
18
-
19
-
20
-
21
-
22
-
23
-
24
-
25
-
26
-
27
-
28
-
29
-
30
-
31
-
32
-
33
-
34
-
35
-
36
-
37
-
38
-
39
-
40
-
41
-
42
-
43
-
44
-
45
-
46
-
47
-
48
-
49
-
50
-
51
-
52
-
53
-
54
-
55
-
56
-
57
-
58
-
59
-
60
-
61
-
 62
62 -
 63
63 -
 64
64 -
 65
65 -
 66
66 -
 67
67 -
 68
68 -
 69
69 -
 70
70 -
 71
71 -
 72
72 -
73
-
74
-
75
-
76
-
77
-
78
-
79
-
80
-
81
-
82
-
83
-
84
-
85
-
86
-
87
-
88
-
89
-
90
-
91
-
92
-
93
-
94
-
95
-
96
-
97
-
98
-
99
-
100
-
101
-
102
-
103
-
104
-
105
-
106
-
107
-
108
-
109
-
110
-
111
-
112
-
113
-
114
-
115
-
116
-
117
-
118
-
119
-
120
-
121
-
122
-
123
-
124
-
125
-
126
-
127
-
128
-
129
-
130
-
131
-
132
-
133
-
134
-
135
-
136
-
137
-
138
-
139
-
140
-
141
-
142
-
143
-
144
-
145
-
146
-
147
-
148
-
149
-
150
-
151
-
152
-
153
-
154
-
155
-
156
-
157
-
158
-
159
-
160
-
161
-
162
-
163
-
164
-
165
-
166
-
167
-
168
-
169
-
170
 |
 |
