Kenwood TS-890S Operation Manual - Page 130
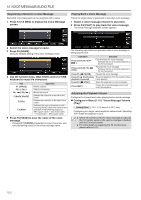
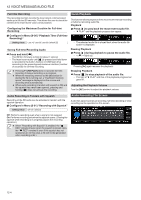
Press F2 [TX MSG] to display the Voice Message
 |
View all Kenwood TS-890S manuals
Add to My Manuals
Save this manual to your list of manuals |
Page 130 highlights
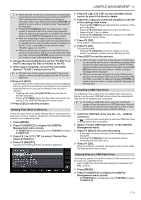
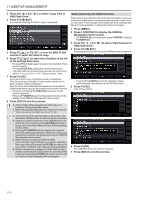
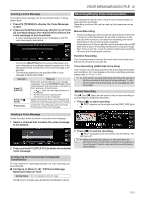
12 VOICE MESSAGE/AUDIO FILE Registering a Name for a Voice Message Recorded voice messages can be assigned with a name. 1 Press F2 [TX MSG] to display the Voice Message screen. Playing Back a Voice Message Follow the steps below to play back a recorded voice message. 1 Select a voice message channel to play back. 2 Press F4 [PLAY] to play back the voice message. The voice message playback screen appears. . .. 2 Select the voice message to name. 3 Press F6 [NAME]. Doing so enables editing of the voice message name. 4 Use the function keys, [MULTI/CH] control or USB keyboard to input the characters. Key F1 [SPACE] F2 [-]/ F3 [+] F4 [ ]/ F5 [ ] F [BACK SPACE] F [DEL] F [CHAR] Operation Inserts a space. Selects a character. Moves the cursor. Deletes the character to the left of the cursor. Deletes the character to the right of the cursor. Switches the type of character to edit. Pressing the key each time switches the selection in the following sequence: ABC (upper case) → abc (lower case) → !"# (symbols) → ABC (upper case) 5 Press F6 [SAVE] to save the name of the voice message. • Pressing F7 [CANCEL] discards the input characters and exits the editing mode for the voice message name. The following operations are possible while a voice message is being played back. Operation Press and hold F6 [FF ]. Press and hold F2 [ REW] . Press F3 [ PAUSE]. Press F3 [ PLAY] while playback is paused Press F4 [ STOP]. Press [ESC]. Behavior Fast forwards the voice message. • Release the key to resume playback at the normal speed. Rewinds the voice message. • Release the key to resume playback at the normal speed. Pauses the voice message. Resumes playback from the position where it was paused. Stops the playback of voice message. Closes the Voice Message screen and ends the playback. Adjusting the Playback Volume Configure the volume level when playing back a voice message. Configure in Menu [1-01] "Voice Message Volume (Play)" Setting Value Off/ 1 to 10 (default) to 20 (1 step) Configuring to a larger value raises the volume level. Selecting "Off" mutes the playback sound. ● When TX monitor is ON, the voice message is output as the TX monitor audio so the volume changes in tandem with the TX monitor level. ● For more details on adjusting the TX monitor level, please refer to (8-3). 12-2
-
 1
1 -
2
-
3
-
4
-
5
-
6
-
7
-
8
-
9
-
10
-
11
-
12
-
13
-
14
-
15
-
16
-
17
-
18
-
19
-
20
-
21
-
22
-
23
-
24
-
25
-
26
-
27
-
28
-
29
-
30
-
31
-
32
-
33
-
34
-
35
-
36
-
37
-
38
-
39
-
40
-
41
-
42
-
43
-
44
-
45
-
46
-
47
-
48
-
49
-
50
-
51
-
52
-
53
-
54
-
55
-
56
-
57
-
58
-
59
-
60
-
61
-
62
-
63
-
64
-
65
-
66
-
67
-
68
-
69
-
70
-
71
-
72
-
73
-
74
-
75
-
76
-
77
-
78
-
79
-
80
-
81
-
82
-
83
-
84
-
85
-
86
-
87
-
88
-
89
-
90
-
91
-
92
-
93
-
94
-
95
-
96
-
97
-
98
-
99
-
100
-
101
-
102
-
103
-
104
-
105
-
106
-
107
-
108
-
109
-
110
-
111
-
112
-
113
-
114
-
115
-
116
-
117
-
118
-
119
-
120
-
121
-
122
-
123
-
124
-
 125
125 -
 126
126 -
 127
127 -
 128
128 -
 129
129 -
 130
130 -
 131
131 -
 132
132 -
 133
133 -
 134
134 -
 135
135 -
136
-
137
-
138
-
139
-
140
-
141
-
142
-
143
-
144
-
145
-
146
-
147
-
148
-
149
-
150
-
151
-
152
-
153
-
154
-
155
-
156
-
157
-
158
-
159
-
160
-
161
-
162
-
163
-
164
-
165
-
166
-
167
-
168
-
169
-
170
-
171
-
172
-
173
-
174
-
175
-
176
-
177
-
178
-
179
-
180
-
181
-
182
-
183
-
184
-
185
-
186
-
187
-
188
-
189
-
190
-
191
-
192
-
193
-
194
-
195
-
196
 |
 |
