Kenwood TS-890S Operation Manual - Page 131
Recording/Playing Voice Communication
 |
View all Kenwood TS-890S manuals
Add to My Manuals
Save this manual to your list of manuals |
Page 131 highlights
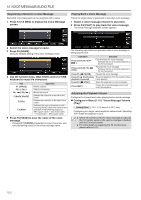
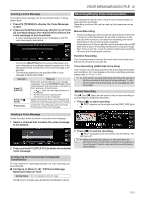
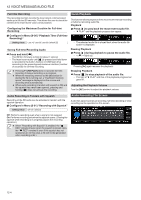
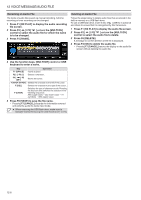
VOICE MESSAGE/AUDIO FILE 12 Sending a Voice Message A recorded voice message can be transmitted while it is being played back. 1 Press F2 [TX MSG] to display the Voice Message screen. 2 Press and hold the function key (F2 [CH 1] to F7 [CH 6]) corresponding to the channel that contains the voice message to be transmitted. • A voice message playback screen is displayed, and the voice message is transmitted. • Turning the [MIC/PITCH] control while transmission of a voice message is in progress enables the gain level of the microphone used exclusively for the voice message to be adjusted. • The following operations are possible while a voice message is being transmitted. Operation Press F5 [REPEAT]. Press F4 [ STOP]. Press [ESC]. Behavior Plays back and transmits the voice message repeatedly. Pressing F5 [REPEAT] again ends repeat playback and transmission, and returns this transceiver to the RX mode. • > lights up while repeat playback is in progress. • The time interval for repeating the transmission can be configured. Stops transmission of the voice message and closes the voice message transmission screen. Closes the Voice Message screen and ends transmission of the voice message. Recording/Playing Voice Communication This transceiver can be used to record voice communication or play back the recordings. Recording functions that can be used on this transceiver are as follows. Manual Recording • Voice recordings up to 9 hours per file can be stored in the builtin memory of this transceiver. As the built-in memory is also used by other functions, the maximum recording time varies depending on the remaining space available. • Voice data up to 18 hours per file can be recorded when a USB flash drive is used. If recording continues for a duration longer than 18 hours per file, a new file will be created upon reaching 18 hours and recording will continue. Full-time Recording This recording function records the most recent voice data up to the last 30 seconds to an audio file. Timer Recording (USB Flash Drive Only) This function records audio based on the preconfigured duration and conditions. For more details on the timer recording operation, please refer to "Timer" (14-4). ● If DC power is turned off during recording, the saving of the file recorded at that time is not guaranteed. To turn off the power during recording, do so using [ ] on the front panel. Manual Recording The [ ] and [ ] keys can be used to start or stop recording of communication using this transceiver. 1 Press [ ] to start recording. • " REC" appears on the screen and the [REC] LED lights up. . .. Deleting a Voice Message Follow the steps below to delete a recorded voice message. 1 Select a channel that contains the voice message to be deleted. 2 Press and hold F7 [(DELETE)] to delete the selected voice message. 2 Press [ ] to end the recording. • " REC" disappears from the screen and the [REC] LED light goes off. ● When the remaining memory at the destination for storing the file runs out while recording is in progress, a "recording end" tone is output and the recording ends automatically. Configuring the Time Interval for Repeated Transmission The time interval for repeating playback of a voice message can be configured. Configure in Menu [5-16] "CW/Voice Message Retransmit Interval Time" Setting Value 0 to 10 (default) to 60 [s] (1 step) Configuring to a larger value lengthens the playback interval. 12-3
-
 1
1 -
2
-
3
-
4
-
5
-
6
-
7
-
8
-
9
-
10
-
11
-
12
-
13
-
14
-
15
-
16
-
17
-
18
-
19
-
20
-
21
-
22
-
23
-
24
-
25
-
26
-
27
-
28
-
29
-
30
-
31
-
32
-
33
-
34
-
35
-
36
-
37
-
38
-
39
-
40
-
41
-
42
-
43
-
44
-
45
-
46
-
47
-
48
-
49
-
50
-
51
-
52
-
53
-
54
-
55
-
56
-
57
-
58
-
59
-
60
-
61
-
62
-
63
-
64
-
65
-
66
-
67
-
68
-
69
-
70
-
71
-
72
-
73
-
74
-
75
-
76
-
77
-
78
-
79
-
80
-
81
-
82
-
83
-
84
-
85
-
86
-
87
-
88
-
89
-
90
-
91
-
92
-
93
-
94
-
95
-
96
-
97
-
98
-
99
-
100
-
101
-
102
-
103
-
104
-
105
-
106
-
107
-
108
-
109
-
110
-
111
-
112
-
113
-
114
-
115
-
116
-
117
-
118
-
119
-
120
-
121
-
122
-
123
-
124
-
125
-
 126
126 -
 127
127 -
 128
128 -
 129
129 -
 130
130 -
 131
131 -
 132
132 -
 133
133 -
 134
134 -
 135
135 -
 136
136 -
137
-
138
-
139
-
140
-
141
-
142
-
143
-
144
-
145
-
146
-
147
-
148
-
149
-
150
-
151
-
152
-
153
-
154
-
155
-
156
-
157
-
158
-
159
-
160
-
161
-
162
-
163
-
164
-
165
-
166
-
167
-
168
-
169
-
170
-
171
-
172
-
173
-
174
-
175
-
176
-
177
-
178
-
179
-
180
-
181
-
182
-
183
-
184
-
185
-
186
-
187
-
188
-
189
-
190
-
191
-
192
-
193
-
194
-
195
-
196
 |
 |
