Kyocera KM-3035 Fax System (J) Operation Guide Rev-1 - Page 15
Basic fax screen on the touch panel
 |
View all Kyocera KM-3035 manuals
Add to My Manuals
Save this manual to your list of manuals |
Page 15 highlights
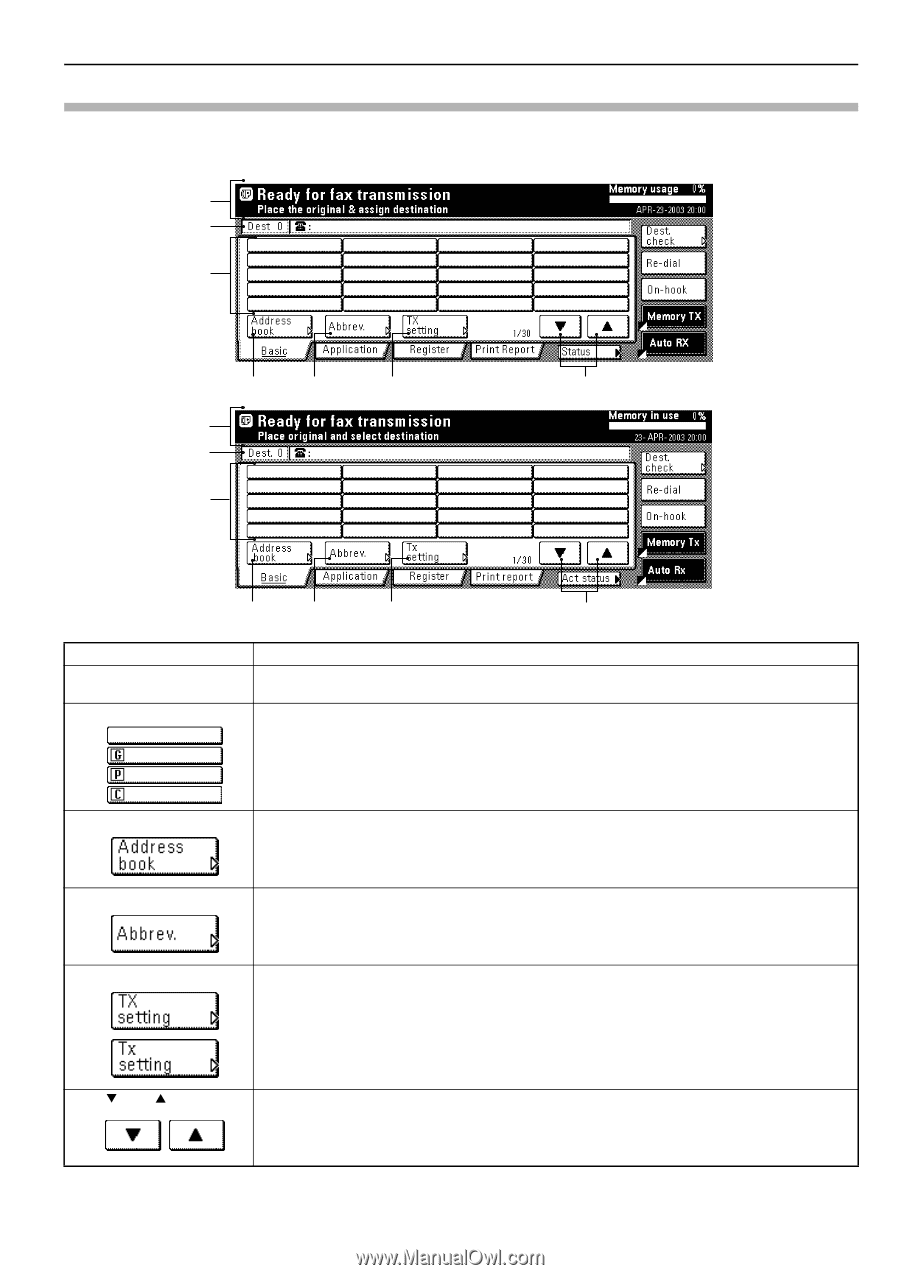
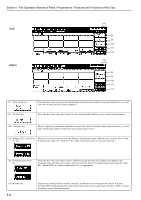
Section 1 Fax Operation (Names of Parts / Preparations / Features and Functions of this Fax) Basic fax screen on the touch panel The initial screen that appears in the touch panel when you press the Fax key in any other mode in order to change to the Fax Operation mode is called the "basic fax screen". The following contains information on the basic keys which are displayed in this screen and their functions. Inch (1) (2) (3) (4) (5) (6) (7) Metric (1) (2) (3) (4) (5) (6) (7) (1) Message display (2) Number of destinations display (3) Speed-dial keys Current status, the next step in a procedure and error messages are shown in the message display. The number of destinations that you have chosen to dial to is shown in this area. Keys that you have registered to function as either a one-touch key, a group dial key (G), a program key (P) or a chain dial key (C) are displayed here. (4) "Address book" key Press this key when you want to use the address book. (Refer to page 2-21.) (5) "Abbrev." key (6) "TX setting" key Press this key when you want to use the abbreviated number that a destination number is registered under in order to dial that number. (Refer to page 2-19.) Press this key when you want to perform settings related to transmission conditions such as the size of the documents to be transmitted, the image quality of those documents, the contrast at which you want to send them and the time when they should be sent. Once you press this key, the TX Setting screen will appear. (7) "T" and "S" cursor keys Use these keys when you want to display speed-dial keys other than those which are currently displayed. 1-3
-
 1
1 -
2
-
3
-
4
-
5
-
6
-
7
-
8
-
9
-
 10
10 -
 11
11 -
 12
12 -
 13
13 -
 14
14 -
 15
15 -
 16
16 -
 17
17 -
 18
18 -
 19
19 -
 20
20 -
21
-
22
-
23
-
24
-
25
-
26
-
27
-
28
-
29
-
30
-
31
-
32
-
33
-
34
-
35
-
36
-
37
-
38
-
39
-
40
-
41
-
42
-
43
-
44
-
45
-
46
-
47
-
48
-
49
-
50
-
51
-
52
-
53
-
54
-
55
-
56
-
57
-
58
-
59
-
60
-
61
-
62
-
63
-
64
-
65
-
66
-
67
-
68
-
69
-
70
-
71
-
72
-
73
-
74
-
75
-
76
-
77
-
78
-
79
-
80
-
81
-
82
-
83
-
84
-
85
-
86
-
87
-
88
-
89
-
90
-
91
-
92
-
93
-
94
-
95
-
96
-
97
-
98
-
99
-
100
-
101
-
102
-
103
-
104
-
105
-
106
-
107
-
108
-
109
-
110
-
111
-
112
-
113
-
114
-
115
-
116
-
117
-
118
-
119
-
120
-
121
-
122
-
123
-
124
-
125
-
126
-
127
-
128
-
129
-
130
-
131
-
132
-
133
-
134
-
135
-
136
-
137
-
138
-
139
-
140
-
141
-
142
-
143
-
144
-
145
-
146
-
147
-
148
-
149
-
150
-
151
-
152
-
153
-
154
-
155
-
156
-
157
-
158
-
159
-
160
-
161
-
162
-
163
-
164
-
165
-
166
-
167
-
168
-
169
-
170
-
171
-
172
-
173
-
174
-
175
-
176
-
177
-
178
-
179
-
180
-
181
-
182
-
183
-
184
-
185
-
186
-
187
-
188
-
189
-
190
-
191
-
192
-
193
-
194
-
195
-
196
-
197
-
198
-
199
-
200
-
201
-
202
-
203
-
204
 |
 |