Lenovo ThinkCentre M92 Hardware Maintenance Manual (HMM) (May 2012) - ThinkCen - Page 129
on the storage converter, and then press the mSATA solid state drive downward.
 |
View all Lenovo ThinkCentre M92 manuals
Add to My Manuals
Save this manual to your list of manuals |
Page 129 highlights
9. To install a new mSATA solid state drive, insert the mSATA solid state drive into the mini PCI Express slot on the storage converter, and then press the mSATA solid state drive downward. Figure 54. Installing the mSATA solid state drive into the storage converter 10. Install the two screws to secure the mSATA solid state drive to the storage converter. Figure 55. Installing the screws that secure the mSATA solid state drive Chapter 9. Replacing FRUs (machine types: 2697, 2698, 2742, 2750, 2935, 2943, 2960, 2967, 2986, 2992, 2994, 2999, 3182, 3184, 3186, 3190, 3201, 3204, 3208, 3212, 3217, 3220, 3226, 3228, 3302, 3391, and 3392) 123
-
 1
1 -
2
-
3
-
4
-
5
-
6
-
7
-
8
-
9
-
10
-
11
-
12
-
13
-
14
-
15
-
16
-
17
-
18
-
19
-
20
-
21
-
22
-
23
-
24
-
25
-
26
-
27
-
28
-
29
-
30
-
31
-
32
-
33
-
34
-
35
-
36
-
37
-
38
-
39
-
40
-
41
-
42
-
43
-
44
-
45
-
46
-
47
-
48
-
49
-
50
-
51
-
52
-
53
-
54
-
55
-
56
-
57
-
58
-
59
-
60
-
61
-
62
-
63
-
64
-
65
-
66
-
67
-
68
-
69
-
70
-
71
-
72
-
73
-
74
-
75
-
76
-
77
-
78
-
79
-
80
-
81
-
82
-
83
-
84
-
85
-
86
-
87
-
88
-
89
-
90
-
91
-
92
-
93
-
94
-
95
-
96
-
97
-
98
-
99
-
100
-
101
-
102
-
103
-
104
-
105
-
106
-
107
-
108
-
109
-
110
-
111
-
112
-
113
-
114
-
115
-
116
-
117
-
118
-
119
-
120
-
121
-
122
-
123
-
 124
124 -
 125
125 -
 126
126 -
 127
127 -
 128
128 -
 129
129 -
 130
130 -
 131
131 -
 132
132 -
 133
133 -
 134
134 -
135
-
136
-
137
-
138
-
139
-
140
-
141
-
142
-
143
-
144
-
145
-
146
-
147
-
148
-
149
-
150
-
151
-
152
-
153
-
154
-
155
-
156
-
157
-
158
-
159
-
160
-
161
-
162
-
163
-
164
-
165
-
166
-
167
-
168
-
169
-
170
-
171
-
172
-
173
-
174
-
175
-
176
-
177
-
178
-
179
-
180
-
181
-
182
-
183
-
184
-
185
-
186
-
187
-
188
-
189
-
190
-
191
-
192
-
193
-
194
-
195
-
196
-
197
-
198
-
199
-
200
-
201
-
202
-
203
-
204
-
205
-
206
-
207
-
208
-
209
-
210
-
211
-
212
-
213
-
214
-
215
-
216
-
217
-
218
-
219
-
220
-
221
-
222
-
223
-
224
-
225
-
226
-
227
-
228
-
229
-
230
-
231
-
232
-
233
-
234
-
235
-
236
-
237
-
238
-
239
-
240
-
241
-
242
-
243
-
244
-
245
-
246
-
247
-
248
-
249
-
250
-
251
-
252
-
253
-
254
-
255
-
256
-
257
-
258
-
259
-
260
-
261
-
262
-
263
-
264
-
265
-
266
-
267
-
268
-
269
-
270
-
271
-
272
-
273
-
274
-
275
-
276
-
277
-
278
-
279
-
280
-
281
-
282
 |
 |

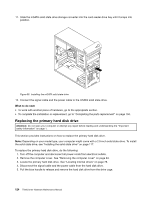
9. To install a new mSATA solid state drive, insert the mSATA solid state drive into the mini PCI Express slot
on the storage converter, and then press the mSATA solid state drive downward.
Figure54. Installing the mSATA solid state drive into the storage converter
10. Install the two screws to secure the mSATA solid state drive to the storage converter.
Figure55. Installing the screws that secure the mSATA solid state drive
Chapter 9
.
Replacing FRUs (machine types: 2697, 2698, 2742, 2750, 2935, 2943, 2960, 2967, 2986, 2992, 2994, 2999, 3182,
3184, 3186, 3190, 3201, 3204, 3208, 3212, 3217, 3220, 3226, 3228, 3302, 3391, and 3392)
123