Lenovo ThinkCentre M92 Hardware Maintenance Manual (HMM) (May 2012) - ThinkCen - Page 199
upward to remove it out of the chassis.
 |
View all Lenovo ThinkCentre M92 manuals
Add to My Manuals
Save this manual to your list of manuals |
Page 199 highlights
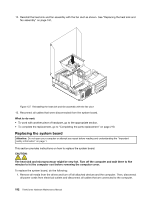
2. Open the computer cover. See "Opening the computer cover" on page 154. 3. Remove the front bezel. See "Removing and reinstalling the front bezel" on page 154. 4. Pivot the optical drive bay assembly upward to gain access to the system board. See "Accessing the system board components and drives" on page 156. 5. Remove all memory modules and PCI cards that are currently installed. See "Installing or replacing a memory module" on page 157 and "Installing or replacing a PCI card" on page 159. 6. Remove the heat sink and fan assembly from the failing system board. See "Replacing the heat sink and fan assembly" on page 181. 7. Carefully take note of the location of all cable connections on the system board and disconnect all the cables. See "Locating parts on the system board" on page 83. 8. Remove the eight screws that secure the system board to the chassis by following the sequence shown in the following illustration. Figure 138. Removing the eight screws that secure the system board 9. Slide the system board to the front of the computer and then carefully pivot the failing system board upward to remove it out of the chassis. 10. Remove the microprocessor from the failing system board and install it on the new system board. See "Replacing the microprocessor" on page 189. 11. Install the new system board into the chassis by aligning the eight mounting studs in the chassis with the corresponding holes in the new system board. Then, install the eight screws to secure the system board by following the sequence shown in the following illustration. Chapter 10. Replacing FRUs (machine types: 2756, 2800, 2929, 2932, 2934, 2941, 2945, 2961, 2982, 2988, 2993, 2996, 3181, 3183, 3185, 3187, 3198, 3202, 3207, 3209, 3214, 3218, 3224, 3227, 3306, 3393, and 3395) 193
-
 1
1 -
2
-
3
-
4
-
5
-
6
-
7
-
8
-
9
-
10
-
11
-
12
-
13
-
14
-
15
-
16
-
17
-
18
-
19
-
20
-
21
-
22
-
23
-
24
-
25
-
26
-
27
-
28
-
29
-
30
-
31
-
32
-
33
-
34
-
35
-
36
-
37
-
38
-
39
-
40
-
41
-
42
-
43
-
44
-
45
-
46
-
47
-
48
-
49
-
50
-
51
-
52
-
53
-
54
-
55
-
56
-
57
-
58
-
59
-
60
-
61
-
62
-
63
-
64
-
65
-
66
-
67
-
68
-
69
-
70
-
71
-
72
-
73
-
74
-
75
-
76
-
77
-
78
-
79
-
80
-
81
-
82
-
83
-
84
-
85
-
86
-
87
-
88
-
89
-
90
-
91
-
92
-
93
-
94
-
95
-
96
-
97
-
98
-
99
-
100
-
101
-
102
-
103
-
104
-
105
-
106
-
107
-
108
-
109
-
110
-
111
-
112
-
113
-
114
-
115
-
116
-
117
-
118
-
119
-
120
-
121
-
122
-
123
-
124
-
125
-
126
-
127
-
128
-
129
-
130
-
131
-
132
-
133
-
134
-
135
-
136
-
137
-
138
-
139
-
140
-
141
-
142
-
143
-
144
-
145
-
146
-
147
-
148
-
149
-
150
-
151
-
152
-
153
-
154
-
155
-
156
-
157
-
158
-
159
-
160
-
161
-
162
-
163
-
164
-
165
-
166
-
167
-
168
-
169
-
170
-
171
-
172
-
173
-
174
-
175
-
176
-
177
-
178
-
179
-
180
-
181
-
182
-
183
-
184
-
185
-
186
-
187
-
188
-
189
-
190
-
191
-
192
-
193
-
 194
194 -
 195
195 -
 196
196 -
 197
197 -
 198
198 -
 199
199 -
 200
200 -
 201
201 -
 202
202 -
 203
203 -
 204
204 -
205
-
206
-
207
-
208
-
209
-
210
-
211
-
212
-
213
-
214
-
215
-
216
-
217
-
218
-
219
-
220
-
221
-
222
-
223
-
224
-
225
-
226
-
227
-
228
-
229
-
230
-
231
-
232
-
233
-
234
-
235
-
236
-
237
-
238
-
239
-
240
-
241
-
242
-
243
-
244
-
245
-
246
-
247
-
248
-
249
-
250
-
251
-
252
-
253
-
254
-
255
-
256
-
257
-
258
-
259
-
260
-
261
-
262
-
263
-
264
-
265
-
266
-
267
-
268
-
269
-
270
-
271
-
272
-
273
-
274
-
275
-
276
-
277
-
278
-
279
-
280
-
281
-
282
 |
 |
