Lenovo ThinkPad S430 User Guide - Page 118
Startup menu, Startup, Attention, Changing the startup sequence, Network Boot, Network, Notes
 |
View all Lenovo ThinkPad S430 manuals
Add to My Manuals
Save this manual to your list of manuals |
Page 118 highlights
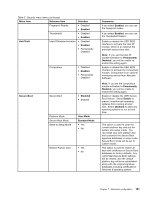
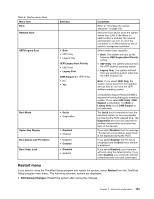
Startup menu To change the computer startup settings, select Startup from the ThinkPad Setup main menu. Attention: • After you change the startup sequence, you must be extremely careful not to specify a wrong device during a copy, save, or format operation. If you specify a wrong device, your data and programs might be erased or overwritten. • If you are using the BitLocker drive encryption, you should not change the startup sequence. BitLocker drive encryption detects the change of startup sequence and locks the computer from booting. Changing the startup sequence To change the startup sequence, do the following: 1. Select Boot or Network Boot, then press Enter. The default boot list is displayed, showing the order in which devices will be started up. Even devices that are not attached to or installed on your computer are listed. • Use the Boot submenu to specify the startup sequence that runs when you turn on the power. • Use the Network submenu to specify the startup sequence that runs when Wake on LAN is enabled. Wake on LAN is commonly used by LAN administrators in corporate networks to get remote access to your computer. 2. Set the startup sequence by using the following keys: • Use cursor keys to select a device. • Use F6 or the combination of Shift and + to move the device up to a higher priority. • Use F5 or - to move the device down to a lower priority. • Use Shift+! to exclude or include a device. 3. Press F10 to save the changes and restart the system. To change the startup sequence temporarily so that the system starts up from a different drive, do the following: 1. Turn off the computer. 2. Turn on the computer, then, while the ThinkPad logo is displayed at the lower-left of the screen, press F12. 3. Select the device you want to start first. Note: The Boot menu will be displayed when the system cannot boot from any device or the operating system cannot be found. The following table shows the contents of the Startup menu items. Notes: • Default values are in boldface. • On each submenu, press Enter to show selectable options and select a desired option. • Some items are displayed on the menu only if the computer supports the corresponding features. The following table lists the Startup menu items. 102 User Guide
-
 1
1 -
2
-
3
-
4
-
5
-
6
-
7
-
8
-
9
-
10
-
11
-
12
-
13
-
14
-
15
-
16
-
17
-
18
-
19
-
20
-
21
-
22
-
23
-
24
-
25
-
26
-
27
-
28
-
29
-
30
-
31
-
32
-
33
-
34
-
35
-
36
-
37
-
38
-
39
-
40
-
41
-
42
-
43
-
44
-
45
-
46
-
47
-
48
-
49
-
50
-
51
-
52
-
53
-
54
-
55
-
56
-
57
-
58
-
59
-
60
-
61
-
62
-
63
-
64
-
65
-
66
-
67
-
68
-
69
-
70
-
71
-
72
-
73
-
74
-
75
-
76
-
77
-
78
-
79
-
80
-
81
-
82
-
83
-
84
-
85
-
86
-
87
-
88
-
89
-
90
-
91
-
92
-
93
-
94
-
95
-
96
-
97
-
98
-
99
-
100
-
101
-
102
-
103
-
104
-
105
-
106
-
107
-
108
-
109
-
110
-
111
-
112
-
 113
113 -
 114
114 -
 115
115 -
 116
116 -
 117
117 -
 118
118 -
 119
119 -
 120
120 -
 121
121 -
 122
122 -
 123
123 -
124
-
125
-
126
-
127
-
128
-
129
-
130
-
131
-
132
-
133
-
134
-
135
-
136
-
137
-
138
-
139
-
140
-
141
-
142
-
143
-
144
-
145
-
146
-
147
-
148
-
149
-
150
-
151
-
152
-
153
-
154
-
155
-
156
-
157
-
158
-
159
-
160
-
161
-
162
-
163
-
164
-
165
-
166
-
167
-
168
-
169
-
170
 |
 |
