| Section |
Page |
| Table of contents |
3 |
| Notices and safety information |
15 |
| Laser notice |
15 |
| Laser |
15 |
| Avis relatif à l’utilisation de laser |
15 |
| Avvertenze sui prodotti laser |
15 |
| Avisos sobre el láser |
16 |
| Declaração sobre Laser |
16 |
| Laserinformatie |
16 |
| Lasermeddelelse |
16 |
| Laserilmoitus |
17 |
| Huomautus laserlaitteesta |
17 |
| Laser-notis |
17 |
| Laser-melding |
17 |
| Avís sobre el Làser |
18 |
| Lithium warning |
21 |
| Consignes de sécurité |
21 |
| Norme di sicurezza |
21 |
| Sicherheitshinweise |
22 |
| Pautas de Seguridad |
22 |
| Informações de Segurança |
22 |
| Informació de Seguretat |
23 |
| Preface |
24 |
| 1. General information |
25 |
| Maintenance approach |
25 |
| Printer overview |
26 |
| Printer configurations |
26 |
| Options |
27 |
| Supported paper sizes, types, and weights |
28 |
| Printer configurations |
31 |
| Tools required for service |
32 |
| Acronyms |
33 |
| 2. Diagnostic information |
35 |
| Start |
35 |
| Confirm the installation status |
36 |
| Power-on Reset sequence |
36 |
| Entering Diagnostics Menu |
36 |
| User attendance messages |
37 |
| Error code table |
45 |
| Service checks |
148 |
| Sensor (input) service check |
148 |
| Sensor (fuser output) service check |
148 |
| Sensor (narrow media) service check |
149 |
| Sensor (duplex input) service check |
149 |
| Sensor (duplex input) service check (external duplex only) |
150 |
| Sensor (duplex exit) service check (external duplex only) |
150 |
| Sensor (pass through) service check |
151 |
| Sensor (envelope feeder empty) service check |
151 |
| Sensor (ADF top door interlock) service check |
151 |
| Switch (ADF closed interlock) jam service check |
152 |
| Sensor (ADF sheet through) static jam service check |
153 |
| Sensor (ADF sheet through) late jam service check 290.01 |
154 |
| Sensor (ADF 1st scan) late jam service check |
155 |
| Sensor (ADF sheet through) lingering jam service check |
157 |
| Sensor (1st scan) static jam service check |
159 |
| Sensor (2nd scan) static jam service check |
160 |
| Sensor (2nd scan) lingering jam service check |
160 |
| Sensor (ADF media exit) late jam service check |
162 |
| ADF top door open jam service check |
163 |
| Media missing jam service check |
164 |
| Sensor (ADF media exit) static jam service check |
165 |
| Sensor (ADF media exit) late jam service check |
166 |
| Sensor (ADF media exit) lingering jam service check |
168 |
| Sensor (input) late jam service check. |
170 |
| Sensor (input) lingering jam service check. |
172 |
| Sensor (input) early jam service check |
174 |
| Sensor (input) static jam service check |
175 |
| Sensor (fuser output) late jam service check. |
176 |
| Sensor (fuser output) lingering jam service check. |
177 |
| Sensor (fuser output) static jam service check |
179 |
| Sensor (narrow media) late jam service check. |
179 |
| Sensor (narrow media) static jam service check |
180 |
| Sensor (duplex input) late jam service check. |
181 |
| Sensor (duplex input) lingering jam service check. |
183 |
| Sensor (duplex input) static jam service check. |
184 |
| Sensor (pass through) late jam service check |
186 |
| Sensor (pass through) lingering jam service check. |
187 |
| Sensor (pass through) static jam service check |
188 |
| Sensor (stapler pass through) late jam service check |
189 |
| Sensor (stapler pass through) lingering jam service check |
190 |
| Sensor (stapler pass through) static jam service check |
190 |
| Sensor (output pass through) late jam service check |
191 |
| Sensor (output pass through) lingering jam service check |
191 |
| Sensor (output pass through) static jam service check |
192 |
| Sensor (mailbox empty) late jam service check |
192 |
| Sensor (mailbox empty) lingering jam service check |
193 |
| Sensor (mailbox empty) static jam service check |
194 |
| Sensor (toner empty) service check |
194 |
| Sensor (scanner HP) service check |
195 |
| Sensor (ADF 2nd scan) late jam service check |
195 |
| NVRAM mismatch failure (950.00 through 950.29) service check |
196 |
| Image quality trouble |
197 |
| Printer Related Troubleshooting |
197 |
| Image Quality |
198 |
| ADF & Scanner Related Troubleshooting |
217 |
| ADF & Scanner Image Quality |
218 |
| Network service check |
225 |
| 3. Diagnostic aids |
227 |
| Understanding the printer control panel |
227 |
| Understanding the home screen |
228 |
| Using the touch-screen buttons |
230 |
| Sample touch screen |
230 |
| Other touch-screen buttons |
231 |
| Accessing service menus |
233 |
| Diagnostics Menu |
234 |
| Entering Diagnostics Menu |
234 |
| Available tests |
234 |
| Registration (printer) |
237 |
| PRINT TESTS |
238 |
| HARDWARE TESTS |
240 |
| DUPLEX TESTS |
242 |
| INPUT TRAY TESTS |
245 |
| OUTPUT BIN TESTS |
246 |
| BASE SENSOR TEST |
246 |
| DEVICE TESTS |
247 |
| PRINTER SETUP |
248 |
| EP SETUP |
250 |
| REPORTS |
251 |
| EVENT LOG |
251 |
| SCANNER TESTS |
253 |
| Configuration menu (CONFIG MENU) |
254 |
| Entering Configuration Menu |
254 |
| Available menus |
254 |
| Maintenance Counter Value |
255 |
| Reset Maintenance Counter |
255 |
| USB Scan to Local |
256 |
| Print Quality Pages |
256 |
| Reports |
257 |
| SIZE SENSING |
257 |
| Panel Menus |
258 |
| PPDS Emulation |
258 |
| Factory Defaults |
259 |
| Energy Conserve |
259 |
| Min Copy Memory |
260 |
| NumPad Job Assist |
260 |
| Format Fax Storage |
260 |
| Fax Storage Location |
260 |
| ADF Edge Erase |
260 |
| FB Edge Erase |
261 |
| Scanner Manual Registration |
261 |
| Disable Scanner |
262 |
| Paper Prompts |
262 |
| Envelope Prompts |
262 |
| Action for Prompts |
263 |
| Jobs On Disk |
264 |
| Disk Encryption |
264 |
| Wipe Disk |
265 |
| Font Sharpening |
265 |
| Require Standby |
265 |
| LES Applications |
266 |
| Key Repeat Initial Delay |
266 |
| Key Repeat Rate |
266 |
| Wiper Message |
266 |
| Clear Custom Status |
266 |
| Exit Configuration Menu |
267 |
| Printer configurations |
268 |
| Printer theory |
269 |
| Models X651, X652, X654 and X656 paper path rolls and sensors |
269 |
| Model X658 paper path rolls and sensors |
270 |
| Functions of main components |
270 |
| Media tray assembly |
272 |
| Multi-purpose feeder (MPF) |
274 |
| Supported paper sizes, types, and weights |
275 |
| Registration |
277 |
| Transfer |
278 |
| Polygon printhead assembly |
279 |
| Fuser |
280 |
| Fuser components |
281 |
| Exit |
283 |
| Drive |
283 |
| Electrical components and controller |
284 |
| Control |
286 |
| Printhead control |
286 |
| Fuser control |
286 |
| Xerographic and print cartridge components |
287 |
| Document scanning at ADF |
293 |
| Document scanning at platen |
293 |
| Names and functions of components |
293 |
| Scanner unit assembly |
293 |
| Names and functions of components |
296 |
| ADF |
296 |
| High Capacity Input Tray (HCIT) tray assembly |
299 |
| 250-sheet/550-sheet tray assembly |
300 |
| The following is a cross section of the printer and the tandem tray module, showing the main components directly associated with the media path and transport. |
303 |
| Models X651, X652, X654 and X656 paper path rolls and sensors |
303 |
| Model X658 paper path rolls and sensors |
304 |
| Media tray assembly |
305 |
| Duplex |
307 |
| Paper jams |
308 |
| Understanding jam numbers and locations |
308 |
| Adjusting skew |
318 |
| Flatbed scanner skew adjustment |
319 |
| ADF skew adjustment (via ADF document tray) |
319 |
| ADF skew adjustment (Via duplex CCD assembly) |
321 |
| 4. Repair information |
323 |
| Handling ESD-sensitive parts |
323 |
| Adjustments |
324 |
| Polygon printhead mechanical registration adjustment |
324 |
| Alignment assembly adjustment |
324 |
| Fuser solenoid adjustment |
326 |
| Gap adjustment |
326 |
| Removal procedures |
327 |
| Before starting service work |
327 |
| Charge roll assembly removal (X651, X652, X654, X656, and X658) |
328 |
| Duplex assembly removal (X654, X656, and X658) |
329 |
| Duplex cooling fan removal (X654, X656, and X658) |
330 |
| Duplex drive motor assembly removal (X654, X656, and X658) |
331 |
| Duplex input sensor assembly removal (X654, X656, and X658) |
332 |
| Duplex guide assembly, front removal (X654, X656, and X658) |
332 |
| Media turn guide removal (X651, X652, X654, X656, and X658) |
334 |
| Fuser access door assembly removal (X651, X652, X654, X656, and X658) |
334 |
| Main cooling fan removal (X651, X652, X654, X656, and X658) |
335 |
| Fuser drive release linkage removal (X651, X652, X654, X656, and X658) |
337 |
| Fuser unit assembly removal (X651, X652, X654, X656, and X658) |
337 |
| Fuser wiper cover assembly removal (X651, X652, X654, X656, and X658) |
338 |
| HVPS card assembly removal (X651, X652, X654, X656, and X658) |
339 |
| Inner deflector removal (X651, X652, X654, X656, and X658) |
339 |
| Option drive shaft removal (X651, X652, X654, X656, and X658) |
340 |
| Main drive motor assembly removal (X651, X652, X654, X656, and X658) |
342 |
| Alignment assembly removal (X651, X652, X654, X656, and X658) |
343 |
| Media out actuator removal (X651, X652, X654, X656, and X658) |
345 |
| Media support removal (X651, X652, X654, X656, and X658) |
345 |
| Tray roller catch assembly removal (X651, X652, X654, X656, and X658) |
346 |
| MPF cam gear removal (X651, X652, X654, X656, and X658) |
346 |
| MPF lift plate assembly removal (X651, X652, X654, X656, and X658) |
347 |
| MPF media out actuator removal (X651, X652, X654, X656, and X658) |
347 |
| MPF pick roll assembly removal (X651, X652, X654, X656, and X658) |
348 |
| MPF pick solenoid assembly removal (X651, X652, X654, X656, and X658) |
348 |
| Pick arm assembly removal (X651, X652, X654, X656, and X658) |
351 |
| Pick roll assembly removal (X651, X652, X654, X656, and X658) |
353 |
| Print cartridge cooling fan removal (X651, X652, X654, X656, and X658) |
353 |
| Print cartridge clamp assembly removal (X651, X652, X654, X656, and X658) |
354 |
| Print cartridge ID connector assembly removal (X651, X652, X654, X656, and X658) |
355 |
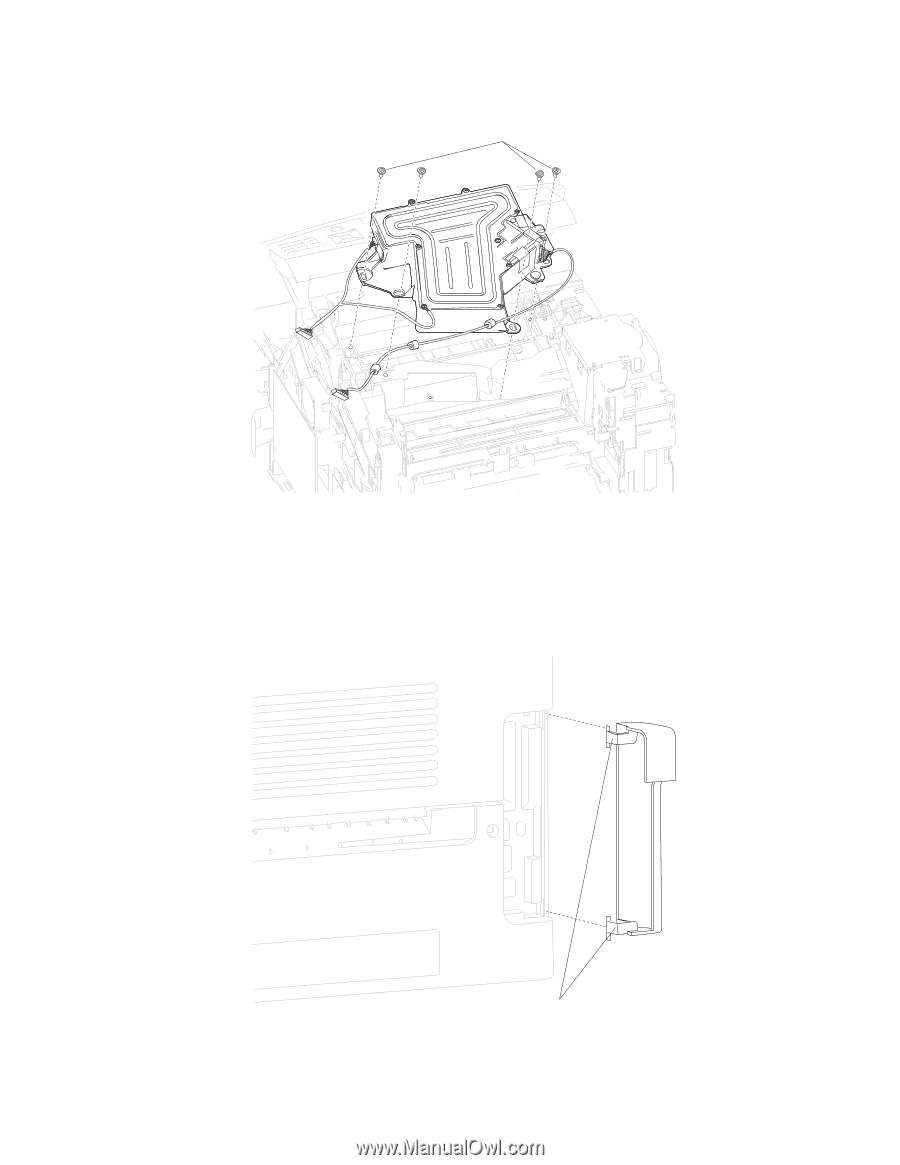
| Printhead assembly removal (X654, X656, and X658) |
356 |
| Connection access cover, rear removal (X651, X652, X654, X656, and X658) |
357 |
| Connection bezel assembly, rear removal (X651 and X652) |
358 |
| Door assembly, rear removal (X651, X652, X654, X656, and X658) |
359 |
| Duplex guide assembly, rear removal (X654, X656, and X658) |
359 |
| Cover assembly, rear lower (X654, X656, and X658) |
361 |
| Redrive motor assembly removal (X654, X656, and X658) |
361 |
| Sensor (duplex input) removal (X654, X656, and X658) |
364 |
| Sensor (media low) removal (X651, X652, X654, X656, and X658) |
364 |
| Sensor (media empty) removal (X651, X652, X654, X656, and X658) |
364 |
| Sensor (toner empty) removal (X651, X652, X654, X656, and X658) |
365 |
| Sensor (input) removal (X651, X652, X654, X656, and X658) |
365 |
| Sensor shield assembly removal (X651, X652, X654, X656, and X658) |
366 |
| Standard bin actuator assembly removal (X651, X652, X654, X656, and X658) |
367 |
| Sensor (standard bin exit) actuator removal (X651, X652, X654, X656, and X658) |
367 |
| Sensor (toner density) removal (X651, X652, X654, X656, and X658) |
368 |
| Switch (media size) assembly removal (X651, X652, X654, X656, and X658) |
368 |
| LVPS card assembly removal (X654, X656, and X658) |
370 |
| Access door removal (X651, X652, X654, X656, and X658) |
371 |
| System card assembly removal (X651, X652, X654, X656, and X658) |
373 |
| Transfer roll assembly removal (X651, X652, X654, X656, and X658) |
376 |
| Transfer roll bracket assembly, left removal (X651, X652, X654, X656, and X658) |
377 |
| Transfer roll bracket assembly, right removal (X651, X652, X654, X656, and X658) |
377 |
| Transfer deflector removal (X651, X652, X654, X656, and X658) |
379 |
| Redrive assembly removal (X651, X652, X654, X656, and X658) |
380 |
| ADF feed / pick roll assembly removal (models X651, X652, X654, X656, and X658) |
381 |
| ADF separator roll removal |
381 |
| ADF separator torque limiter assembly removal (models X651, X652, X654, X656, and X658) |
383 |
| ADF cover, front removal (models X651, X652, X654, X656, and X658) |
384 |
| ADF cover, rear removal (models X651, X652, X654, X656, and X658) |
385 |
| ADF document tray assembly removal (models X651, X652, X654, X656, and X658) |
385 |
| ADF top door assembly removal (models X651, X652, X654, X656, and X658) |
386 |
| ADF controller card removal (models X651, X652, X654, X656, and X658) |
387 |
| ADF platen cushion removal (models X651, X652, X654, X656, and X658) |
388 |
| ADF lower door assembly removal (models X651, X652, X654, X656, and X658) |
388 |
| ADF duplex CCD scan glass assembly removal (models X654, X656, and X658) |
389 |
| ADF duplex CCD assembly removal (models X654, X656, and X658) |
390 |
| ADF pinch roll assembly removal (models X651, X652, X654, X656, and X658) |
392 |
| ADF turn guide removal (models X651, X652, X654, X656, and X658) |
393 |
| ADF media pinch pad assembly removal (models X651, X652, X654, X656, and X658) |
394 |
| Sensor (ADF media exit) fan bracket assembly removal (models X654, X656, and X658) |
395 |
| ADF transport drive motor bracket assembly w/cable removal (models X651, X652, X654, X656, & X658) |
396 |
| ADF feed drive motor assembly removal (models X651, X652, X654, X656, and X658) |
396 |
| ADF pick roll position cam assembly removal (models X651, X652, X654, X656, and X658) |
398 |
| ADF solenoid assembly removal (models X651, X652, X654, X656, and X658) |
399 |
| Sensor (ADF top door interlock) removal (models X651, X652, X654, X656, and X658) |
399 |
| Sensor (ADF lower door interlock) removal (models X651, X652, X654, X656, and X658) |
400 |
| Sensor (ADF 2nd scan) removal (models X651, X652, X654, X656, and X658) |
400 |
| Sensor (ADF 1st scan) removal (models X651, X652, X654, X656, and X658) |
401 |
| Sensor (ADF sheet through) removal (models X651, X652, X654, X656, and X658) |
402 |
| Sensor (ADF document set) removal (models X651, X652, X654, X656, and X658) |
403 |
| Switch (ADF closed interlock) removal (models X651, X652, X654, X656, and X658) |
404 |
| ADF unit assembly removal (models X651, X652, X654 and X656) |
405 |
| ADF unit assembly removal (model X658) |
405 |
| ADF left hinge removal (models X651, X652, X654, X656, and X658) |
406 |
| ADF right hinge removal (models X651, X652, X654, X656, and X658). |
407 |
| Cover, left rear corner removal (model X658) |
408 |
| Cover, right rear corner removal (model X658) |
408 |
| Sensor (ADF media exit) fan bracket assembly removal (models X652, X654, X656, and X658) |
409 |
| Sensor (ADF media exit) bracket assembly removal (X651) |
410 |
| Scanner CCD assembly removal (models X651, X652, X654, X656, and X658) |
411 |
| Scanner reference LED cable assembly removal (models X651, X652, X654, X656, and X658) |
412 |
| Scanner unit assembly removal (models X651, X652, X654 and X656) |
412 |
| Scanner unit assembly removal (model X658) |
414 |
| MPF tray door assembly removal (models X651, X652, X654, and X656) |
415 |
| MPF tray door assembly removal (model X658) |
417 |
| Fuser access assembly removal (models X651, X652, X654, X656, and X658) |
419 |
| Output cover assembly removal (model X651, X652, X654 and X656) |
419 |
| Output cover assembly removal (model X658) |
420 |
| Redrive assembly removal (model X658) |
420 |
| Redrive assembly removal (models X651, X652, X654, and X656) |
421 |
| Laser cover removal (model X658) |
422 |
| Laser cover removal (models X651, X652, X654, and X656) |
424 |
| Standard output bin LED assembly removal (models X651, X652, X654, and X656) |
426 |
| MPF media guide assembly removal (model X658) |
427 |
| Operator panel assembly removal (model X658) |
428 |
| Operator panel door assembly removal (models X651, X652, X654, and X656) |
430 |
| Operator panel cover latch assembly removal (models X651, X652, X654, and X656) |
433 |
| Print cartridge cover assembly removal (model X658) |
434 |
| Side cover, right removal (model X658) |
435 |
| Side cover, right removal (models X651, X652, X654, and X656) |
436 |
| Side cover, left removal (model X658) |
436 |
| Side cover, left removal (models X651, X652, X654, and X656) |
437 |
| Door assembly, rear removal (models X651, X652, X654, X656, and X658) |
438 |
| Cover, rear lower removal (models X651, X652, X654, X656, and X658) |
439 |
| Scanner support cover, right rear removal (model X658) |
441 |
| Scanner support inner cover, right removal (model X658) |
442 |
| Scanner support cover, right removal (model X658) |
443 |
| Scanner controller card assembly removal (model X658) |
443 |
| Scanner controller card assembly removal (models X651, X652, X654 and X656) |
446 |
| Scanner cover, rear removal (models X651, X652, X654, X656, and X658) |
447 |
| Scanner cover, left removal (models X651, X652, X654 and X656) |
448 |
| Scanner cover, left removal (model X658) |
449 |
| Scanner cover, right removal (models X651, X652, X654, and X656) |
450 |
| Scanner cover, right removal (model X658) |
450 |
| Scanner cover, front removal (models X651, X652, X654 and X656) |
451 |
| Scanner cover, front removal (model X658) |
452 |
| Scanner platen glass cover assembly removal (model X658) |
453 |
| Scanner platen glass cover assembly removal (models X651, X652, X654 and X656) |
454 |
| Scanner support platform removal (models X651, X652, X654, and X656) |
455 |
| Carriage belt tensioner assembly removal (models X651, X652, X654, X656, and X658) |
457 |
| Carriage drive motor assembly with cable removal (models X651, X652, X654, X656 & X658) |
458 |
| Carriage belt removal (models X651, X652, X654, X656, and X658) |
459 |
| Scanner / ADF duplex CCD exposure lamp removal (models X651, X652, X654, X656, and X658) |
461 |
| Scanner interface card assembly removal (models X651, X652, X654, X656, and X658) |
462 |
| Scanner cooling fan filter removal (models X651, X652, X654, X656, and X658) |
463 |
| Scanner cooling fan removal (models X651, X652, X654, X656, and X658) |
463 |
| Scanner support cover, left rear removal (model X658) |
464 |
| Scanner support cover, left front removal (model X658) |
465 |
| Scanner support cover, left removal (model X658) |
466 |
| Scanner support inner cover, left removal (model X658) |
466 |
| Sensor (platen glass length) assembly removal (models X651, X652, X654, X656, and X658) |
467 |
| Sensor (scanner HP) assembly w/bracket removal (models X651, X652, X654, X656 & X658) |
468 |
| LVPS cooling fan |
468 |
| Option removals |
470 |
| High capacity input tray |
470 |
| High capacity input tray (HCIT) media tray assembly removal |
471 |
| High capacity input tray (HCIT) tray cover, front removal |
472 |
| High capacity input tray (HCIT) cover, rear removal |
474 |
| High capacity input tray (HCIT) cover, right removal |
476 |
| High capacity input tray (HCIT) cover, left removal |
478 |
| High capacity input tray (HCIT) anti-tip latch assembly removal |
479 |
| High capacity input tray (HCIT) drawer slide assembly removal |
481 |
| High capacity input tray (HCIT) tray lift drive motor assembly removal |
481 |
| High capacity input tray (HCIT) controller card assembly removal |
483 |
| High capacity input tray (HCIT) media size actuator assembly removal |
484 |
| Sensor (HCIT tray raised HP) with cable assembly removal |
486 |
| Sensor (HCIT pass through) with cable removal |
487 |
| High capacity input tray (HCIT) pick arm bracket assembly removal |
489 |
| High capacity input tray (HCIT) tray closed latch with spring removal |
491 |
| 250-sheet media tray assembly removal |
492 |
| 250-sheet option drawer assembly removal |
492 |
| 250-sheet pick arm bracket assembly removal |
493 |
| 250-sheet media out actuator removal |
494 |
| Anti-tip latch assembly removal |
494 |
| 250-sheet frame assembly removal. |
495 |
| Sensor (pass through) with cable removal |
495 |
| 250-sheet controller card assembly removal |
498 |
| Media size actuator removal |
500 |
| Media tray catch spring removal |
501 |
| Tray roller catch assembly removal |
502 |
| 550-sheet option tray assembly |
504 |
| 550-sheet media tray assembly removal |
505 |
| 550-sheet option drawer assembly removal |
505 |
| 550-sheet pick arm bracket assembly removal |
506 |
| 550-sheet bellcrank recoil spring removal |
507 |
| Media out actuator removal (models T652 and T654) |
507 |
| Anti-tip latch assembly removal |
508 |
| 550-sheet frame assembly removal |
509 |
| Upper interface cable assembly removal |
511 |
| Lower interface cable assembly removal |
511 |
| Sensor (pass through) with cable removal |
512 |
| 550-sheet controller card assembly removal |
512 |
| Media size actuator removal |
514 |
| 550-sheet option drive shaft with spring removal |
515 |
| Media tray catch spring removal |
516 |
| Media tray roller catch assembly removal |
516 |
| Stapler finisher rear door assembly removal |
517 |
| Stapler finisher right cover removal |
517 |
| Stapler finisher left cover removal |
517 |
| Stapler finisher top cover removal |
517 |
| Stapler finisher handle cover removal |
517 |
| Stapler finisher ADF output bin removal |
517 |
| Stapler finisher LED sensor cover removal |
517 |
| Stapler finisher sensor (finisher media bin present) removal |
517 |
| Stapler finisher standard output bin LED and LED clear lens removal |
518 |
| Stapler finisher tamper recoil spring removal |
518 |
| Stapler finisher tamper drive belt removal |
518 |
| Stapler finisher tamper drive motor assembly removal |
518 |
| Stapler finisher media stack flap and media stack flap actuator removal |
518 |
| Stapler finisher stapler unit assembly removal |
518 |
| Stapler finisher bin spring removal |
518 |
| Stapler finisher controller card assembly removal |
519 |
| Stapler finisher paddle drive motor assembly removal |
519 |
| Stapler finisher sensor (media stack) removal |
519 |
| Stapler finisher sensor (paddle HP) removal |
519 |
| Stapler finisher sensor (stapler access door interlock) removal |
519 |
| Stapler finisher sensor (tamper HP left and right) removal |
519 |
| Stapler finisher sensor (bin full send) removal |
519 |
| Stapler finisher sensor (bin full receive) removal |
519 |
| Stapler finisher sensor (media in stapler) removal |
520 |
| Stapler finisher stapler cover removal |
520 |
| Stapler finisher sensor (diverter HP) removal |
520 |
| 4-bin mailbox assembly left cover removal |
520 |
| 4-bin mailbox assembly controller card assembly removal |
520 |
| 4-bin mailbox assembly sensor (media bin full) removal |
520 |
| 4-bin mailbox assembly sensor (diverter gate HP) removal |
520 |
| 4-bin mailbox assembly rear door assembly removal |
521 |
| 4-bin mailbox assembly left rear inner cover removal |
521 |
| 4-bin mailbox assembly right cover removal |
521 |
| 4-bin mailbox assembly right rear inner cover removal |
521 |
| 4-bin mailbox assembly LED card assembly removal |
521 |
| 4-bin mailbox assembly media output bin light pipe removal |
521 |
| 4-bin mailbox assembly top cover removal |
521 |
| 4-bin mailbox assembly diverter gate solenoid removal |
521 |
| 4-bin mailbox assembly transport solenoid removal |
522 |
| 4-bin mailbox assembly media diverter spring removal |
522 |
| 4-bin mailbox assembly media bin diverter (bin 1 through 3) removal |
522 |
| 4-bin mailbox assembly media bin diverter (bin 4) removal |
522 |
| 4-bin mailbox assembly sensor (pass through) removal |
522 |
| 4-bin mailbox assembly sensor (mailbox empty) removal |
522 |
| 4-bin mailbox assembly standard output bin LED removal |
523 |
| 4-bin mailbox assembly LED clear lens removal |
523 |
| 4-bin mailbox assembly media bin full actuator removal |
523 |
| Offset stacker rear door assembly removal |
523 |
| Offset stacker right cover removal |
523 |
| Offset stacker left cover removal |
523 |
| Offset stacker top cover removal |
523 |
| Offset stacker handle cover removal |
523 |
| Offset stacker ADF output bin removal |
524 |
| Offset stacker LED sensor cover removal |
524 |
| Offset stacker sensor (finisher media bin present) removal |
524 |
| Offset stacker standard output bin LED and LED clear lens removal |
524 |
| Offset stacker tamper recoil spring removal |
524 |
| Offset stacker tamper drive belt removal |
524 |
| Offset stacker tamper drive motor assembly removal |
524 |
| Offset stacker media stack flap and media stack flap actuator removal |
525 |
| Offset stacker bin spring removal |
525 |
| Offset stacker controller card assembly removal |
526 |
| Offset stacker paddle drive motor assembly removal |
526 |
| Offset stacker sensor (media stack) removal |
526 |
| Offset stacker sensor (paddle HP) removal |
526 |
| Offset stacker sensor (tamper HP left and right) removal |
526 |
| Offset stacker sensor (bin full send) removal |
526 |
| Offset stacker sensor (bin full receive) removal |
526 |
| Offset stacker sensor (diverter HP) removal |
526 |
| 5. Connector locations |
529 |
| Locations |
529 |
| Sensors-ADF |
529 |
| Sensors-Flatbed |
529 |
| 6. Preventive maintenance |
531 |
| Safety inspection guide |
531 |
| Lubrication specifications |
531 |
| Scheduled maintenance |
531 |
| Maintenance kit |
531 |
| Maintaining the printer |
532 |
| Cleaning the exterior of the printer |
532 |
| Cleaning the scanner glass |
532 |
| 7. Parts catalog |
535 |
| How to use this parts catalog |
535 |
| Assembly 1: Covers (X651, X652, X654, and X656) |
536 |
| Assembly 2: Covers 1 (X658) |
538 |
| Assembly 3: Covers 2 (X658) |
540 |
| Assembly 4: Media path, pick arm and ducts |
542 |
| Assembly 5: Drive motor assemblies |
544 |
| Assembly 6: Printhead, fuser assembly, and electronics |
546 |
| Assembly 7: Flatbed scanner |
548 |
| Assembly 8: ADF covers |
550 |
| Assembly 9: ADF feed and drive |
552 |
| Assembly 10: ADF electronics |
554 |
| Assembly 11: 550 Sheet option tray assembly (X658) |
556 |
| Assembly 12: 250 Sheet option tray assembly (X651, X652, X654, and X656) |
558 |
| Assembly 13: 550 Sheet option tray assembly (X651, X652, X654, and X656) |
560 |
| Assembly 14: HCIT Sheet option tray assembly (X651, X652, X654, and X656) |
562 |
| Assembly 15: Finisher assembly #1 |
564 |
| Assembly 16: Finisher assembly #2 |
566 |
| Assembly 17: Offset stacker |
568 |
| Assembly 18: 4-bin mailbox assembly #1 |
570 |
| Assembly 19: 4-bin mailbox assembly #2 |
572 |
| Assembly 20: 4-bin mailbox assembly #3 |
574 |
| Assembly 21: Envelope feeder |
576 |
| Assembly 22: Electrical cables |
578 |
| Assembly 23: Miscellaneous |
580 |
| Assembly 24: Miscellaneous (continued) |
581 |
| Index |
582 |

 1
1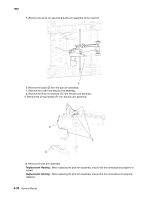 352
352 353
353 354
354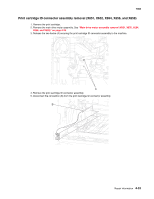 355
355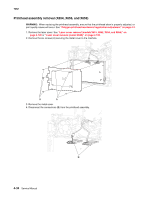 356
356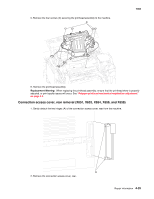 357
357 358
358 359
359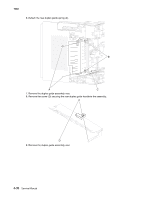 360
360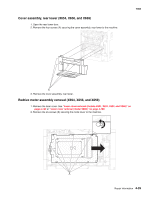 361
361 362
362