| Section |
Page |
| Table of contents |
3 |
| Notices and safety information |
15 |
| Laser notice |
15 |
| Laser |
15 |
| Avis relatif à l’utilisation de laser |
15 |
| Avvertenze sui prodotti laser |
15 |
| Avisos sobre el láser |
16 |
| Declaração sobre Laser |
16 |
| Laserinformatie |
16 |
| Lasermeddelelse |
16 |
| Laserilmoitus |
17 |
| Huomautus laserlaitteesta |
17 |
| Laser-notis |
17 |
| Laser-melding |
17 |
| Avís sobre el Làser |
18 |
| Lithium warning |
21 |
| Consignes de sécurité |
21 |
| Norme di sicurezza |
21 |
| Sicherheitshinweise |
22 |
| Pautas de Seguridad |
22 |
| Informações de Segurança |
22 |
| Informació de Seguretat |
23 |
| Preface |
24 |
| 1. General information |
25 |
| Maintenance approach |
25 |
| Printer overview |
26 |
| Printer configurations |
26 |
| Options |
27 |
| Supported paper sizes, types, and weights |
28 |
| Printer configurations |
31 |
| Tools required for service |
32 |
| Acronyms |
33 |
| 2. Diagnostic information |
35 |
| Start |
35 |
| Confirm the installation status |
36 |
| Power-on Reset sequence |
36 |
| Entering Diagnostics Menu |
36 |
| User attendance messages |
37 |
| Error code table |
45 |
| Service checks |
148 |
| Sensor (input) service check |
148 |
| Sensor (fuser output) service check |
148 |
| Sensor (narrow media) service check |
149 |
| Sensor (duplex input) service check |
149 |
| Sensor (duplex input) service check (external duplex only) |
150 |
| Sensor (duplex exit) service check (external duplex only) |
150 |
| Sensor (pass through) service check |
151 |
| Sensor (envelope feeder empty) service check |
151 |
| Sensor (ADF top door interlock) service check |
151 |
| Switch (ADF closed interlock) jam service check |
152 |
| Sensor (ADF sheet through) static jam service check |
153 |
| Sensor (ADF sheet through) late jam service check 290.01 |
154 |
| Sensor (ADF 1st scan) late jam service check |
155 |
| Sensor (ADF sheet through) lingering jam service check |
157 |
| Sensor (1st scan) static jam service check |
159 |
| Sensor (2nd scan) static jam service check |
160 |
| Sensor (2nd scan) lingering jam service check |
160 |
| Sensor (ADF media exit) late jam service check |
162 |
| ADF top door open jam service check |
163 |
| Media missing jam service check |
164 |
| Sensor (ADF media exit) static jam service check |
165 |
| Sensor (ADF media exit) late jam service check |
166 |
| Sensor (ADF media exit) lingering jam service check |
168 |
| Sensor (input) late jam service check. |
170 |
| Sensor (input) lingering jam service check. |
172 |
| Sensor (input) early jam service check |
174 |
| Sensor (input) static jam service check |
175 |
| Sensor (fuser output) late jam service check. |
176 |
| Sensor (fuser output) lingering jam service check. |
177 |
| Sensor (fuser output) static jam service check |
179 |
| Sensor (narrow media) late jam service check. |
179 |
| Sensor (narrow media) static jam service check |
180 |
| Sensor (duplex input) late jam service check. |
181 |
| Sensor (duplex input) lingering jam service check. |
183 |
| Sensor (duplex input) static jam service check. |
184 |
| Sensor (pass through) late jam service check |
186 |
| Sensor (pass through) lingering jam service check. |
187 |
| Sensor (pass through) static jam service check |
188 |
| Sensor (stapler pass through) late jam service check |
189 |
| Sensor (stapler pass through) lingering jam service check |
190 |
| Sensor (stapler pass through) static jam service check |
190 |
| Sensor (output pass through) late jam service check |
191 |
| Sensor (output pass through) lingering jam service check |
191 |
| Sensor (output pass through) static jam service check |
192 |
| Sensor (mailbox empty) late jam service check |
192 |
| Sensor (mailbox empty) lingering jam service check |
193 |
| Sensor (mailbox empty) static jam service check |
194 |
| Sensor (toner empty) service check |
194 |
| Sensor (scanner HP) service check |
195 |
| Sensor (ADF 2nd scan) late jam service check |
195 |
| NVRAM mismatch failure (950.00 through 950.29) service check |
196 |
| Image quality trouble |
197 |
| Printer Related Troubleshooting |
197 |
| Image Quality |
198 |
| ADF & Scanner Related Troubleshooting |
217 |
| ADF & Scanner Image Quality |
218 |
| Network service check |
225 |
| 3. Diagnostic aids |
227 |
| Understanding the printer control panel |
227 |
| Understanding the home screen |
228 |
| Using the touch-screen buttons |
230 |
| Sample touch screen |
230 |
| Other touch-screen buttons |
231 |
| Accessing service menus |
233 |
| Diagnostics Menu |
234 |
| Entering Diagnostics Menu |
234 |
| Available tests |
234 |
| Registration (printer) |
237 |
| PRINT TESTS |
238 |
| HARDWARE TESTS |
240 |
| DUPLEX TESTS |
242 |
| INPUT TRAY TESTS |
245 |
| OUTPUT BIN TESTS |
246 |
| BASE SENSOR TEST |
246 |
| DEVICE TESTS |
247 |
| PRINTER SETUP |
248 |
| EP SETUP |
250 |
| REPORTS |
251 |
| EVENT LOG |
251 |
| SCANNER TESTS |
253 |
| Configuration menu (CONFIG MENU) |
254 |
| Entering Configuration Menu |
254 |
| Available menus |
254 |
| Maintenance Counter Value |
255 |
| Reset Maintenance Counter |
255 |
| USB Scan to Local |
256 |
| Print Quality Pages |
256 |
| Reports |
257 |
| SIZE SENSING |
257 |
| Panel Menus |
258 |
| PPDS Emulation |
258 |
| Factory Defaults |
259 |
| Energy Conserve |
259 |
| Min Copy Memory |
260 |
| NumPad Job Assist |
260 |
| Format Fax Storage |
260 |
| Fax Storage Location |
260 |
| ADF Edge Erase |
260 |
| FB Edge Erase |
261 |
| Scanner Manual Registration |
261 |
| Disable Scanner |
262 |
| Paper Prompts |
262 |
| Envelope Prompts |
262 |
| Action for Prompts |
263 |
| Jobs On Disk |
264 |
| Disk Encryption |
264 |
| Wipe Disk |
265 |
| Font Sharpening |
265 |
| Require Standby |
265 |
| LES Applications |
266 |
| Key Repeat Initial Delay |
266 |
| Key Repeat Rate |
266 |
| Wiper Message |
266 |
| Clear Custom Status |
266 |
| Exit Configuration Menu |
267 |
| Printer configurations |
268 |
| Printer theory |
269 |
| Models X651, X652, X654 and X656 paper path rolls and sensors |
269 |
| Model X658 paper path rolls and sensors |
270 |
| Functions of main components |
270 |
| Media tray assembly |
272 |
| Multi-purpose feeder (MPF) |
274 |
| Supported paper sizes, types, and weights |
275 |
| Registration |
277 |
| Transfer |
278 |
| Polygon printhead assembly |
279 |
| Fuser |
280 |
| Fuser components |
281 |
| Exit |
283 |
| Drive |
283 |
| Electrical components and controller |
284 |
| Control |
286 |
| Printhead control |
286 |
| Fuser control |
286 |
| Xerographic and print cartridge components |
287 |
| Document scanning at ADF |
293 |
| Document scanning at platen |
293 |
| Names and functions of components |
293 |
| Scanner unit assembly |
293 |
| Names and functions of components |
296 |
| ADF |
296 |
| High Capacity Input Tray (HCIT) tray assembly |
299 |
| 250-sheet/550-sheet tray assembly |
300 |
| The following is a cross section of the printer and the tandem tray module, showing the main components directly associated with the media path and transport. |
303 |
| Models X651, X652, X654 and X656 paper path rolls and sensors |
303 |
| Model X658 paper path rolls and sensors |
304 |
| Media tray assembly |
305 |
| Duplex |
307 |
| Paper jams |
308 |
| Understanding jam numbers and locations |
308 |
| Adjusting skew |
318 |
| Flatbed scanner skew adjustment |
319 |
| ADF skew adjustment (via ADF document tray) |
319 |
| ADF skew adjustment (Via duplex CCD assembly) |
321 |
| 4. Repair information |
323 |
| Handling ESD-sensitive parts |
323 |
| Adjustments |
324 |
| Polygon printhead mechanical registration adjustment |
324 |
| Alignment assembly adjustment |
324 |
| Fuser solenoid adjustment |
326 |
| Gap adjustment |
326 |
| Removal procedures |
327 |
| Before starting service work |
327 |
| Charge roll assembly removal (X651, X652, X654, X656, and X658) |
328 |
| Duplex assembly removal (X654, X656, and X658) |
329 |
| Duplex cooling fan removal (X654, X656, and X658) |
330 |
| Duplex drive motor assembly removal (X654, X656, and X658) |
331 |
| Duplex input sensor assembly removal (X654, X656, and X658) |
332 |
| Duplex guide assembly, front removal (X654, X656, and X658) |
332 |
| Media turn guide removal (X651, X652, X654, X656, and X658) |
334 |
| Fuser access door assembly removal (X651, X652, X654, X656, and X658) |
334 |
| Main cooling fan removal (X651, X652, X654, X656, and X658) |
335 |
| Fuser drive release linkage removal (X651, X652, X654, X656, and X658) |
337 |
| Fuser unit assembly removal (X651, X652, X654, X656, and X658) |
337 |
| Fuser wiper cover assembly removal (X651, X652, X654, X656, and X658) |
338 |
| HVPS card assembly removal (X651, X652, X654, X656, and X658) |
339 |
| Inner deflector removal (X651, X652, X654, X656, and X658) |
339 |
| Option drive shaft removal (X651, X652, X654, X656, and X658) |
340 |
| Main drive motor assembly removal (X651, X652, X654, X656, and X658) |
342 |
| Alignment assembly removal (X651, X652, X654, X656, and X658) |
343 |
| Media out actuator removal (X651, X652, X654, X656, and X658) |
345 |
| Media support removal (X651, X652, X654, X656, and X658) |
345 |
| Tray roller catch assembly removal (X651, X652, X654, X656, and X658) |
346 |
| MPF cam gear removal (X651, X652, X654, X656, and X658) |
346 |
| MPF lift plate assembly removal (X651, X652, X654, X656, and X658) |
347 |
| MPF media out actuator removal (X651, X652, X654, X656, and X658) |
347 |
| MPF pick roll assembly removal (X651, X652, X654, X656, and X658) |
348 |
| MPF pick solenoid assembly removal (X651, X652, X654, X656, and X658) |
348 |
| Pick arm assembly removal (X651, X652, X654, X656, and X658) |
351 |
| Pick roll assembly removal (X651, X652, X654, X656, and X658) |
353 |
| Print cartridge cooling fan removal (X651, X652, X654, X656, and X658) |
353 |
| Print cartridge clamp assembly removal (X651, X652, X654, X656, and X658) |
354 |
| Print cartridge ID connector assembly removal (X651, X652, X654, X656, and X658) |
355 |
| Printhead assembly removal (X654, X656, and X658) |
356 |
| Connection access cover, rear removal (X651, X652, X654, X656, and X658) |
357 |
| Connection bezel assembly, rear removal (X651 and X652) |
358 |
| Door assembly, rear removal (X651, X652, X654, X656, and X658) |
359 |
| Duplex guide assembly, rear removal (X654, X656, and X658) |
359 |
| Cover assembly, rear lower (X654, X656, and X658) |
361 |
| Redrive motor assembly removal (X654, X656, and X658) |
361 |
| Sensor (duplex input) removal (X654, X656, and X658) |
364 |
| Sensor (media low) removal (X651, X652, X654, X656, and X658) |
364 |
| Sensor (media empty) removal (X651, X652, X654, X656, and X658) |
364 |
| Sensor (toner empty) removal (X651, X652, X654, X656, and X658) |
365 |
| Sensor (input) removal (X651, X652, X654, X656, and X658) |
365 |
| Sensor shield assembly removal (X651, X652, X654, X656, and X658) |
366 |
| Standard bin actuator assembly removal (X651, X652, X654, X656, and X658) |
367 |
| Sensor (standard bin exit) actuator removal (X651, X652, X654, X656, and X658) |
367 |
| Sensor (toner density) removal (X651, X652, X654, X656, and X658) |
368 |
| Switch (media size) assembly removal (X651, X652, X654, X656, and X658) |
368 |
| LVPS card assembly removal (X654, X656, and X658) |
370 |
| Access door removal (X651, X652, X654, X656, and X658) |
371 |
| System card assembly removal (X651, X652, X654, X656, and X658) |
373 |
| Transfer roll assembly removal (X651, X652, X654, X656, and X658) |
376 |
| Transfer roll bracket assembly, left removal (X651, X652, X654, X656, and X658) |
377 |
| Transfer roll bracket assembly, right removal (X651, X652, X654, X656, and X658) |
377 |
| Transfer deflector removal (X651, X652, X654, X656, and X658) |
379 |
| Redrive assembly removal (X651, X652, X654, X656, and X658) |
380 |
| ADF feed / pick roll assembly removal (models X651, X652, X654, X656, and X658) |
381 |
| ADF separator roll removal |
381 |
| ADF separator torque limiter assembly removal (models X651, X652, X654, X656, and X658) |
383 |
| ADF cover, front removal (models X651, X652, X654, X656, and X658) |
384 |
| ADF cover, rear removal (models X651, X652, X654, X656, and X658) |
385 |
| ADF document tray assembly removal (models X651, X652, X654, X656, and X658) |
385 |
| ADF top door assembly removal (models X651, X652, X654, X656, and X658) |
386 |
| ADF controller card removal (models X651, X652, X654, X656, and X658) |
387 |
| ADF platen cushion removal (models X651, X652, X654, X656, and X658) |
388 |
| ADF lower door assembly removal (models X651, X652, X654, X656, and X658) |
388 |
| ADF duplex CCD scan glass assembly removal (models X654, X656, and X658) |
389 |
| ADF duplex CCD assembly removal (models X654, X656, and X658) |
390 |
| ADF pinch roll assembly removal (models X651, X652, X654, X656, and X658) |
392 |
| ADF turn guide removal (models X651, X652, X654, X656, and X658) |
393 |
| ADF media pinch pad assembly removal (models X651, X652, X654, X656, and X658) |
394 |
| Sensor (ADF media exit) fan bracket assembly removal (models X654, X656, and X658) |
395 |
| ADF transport drive motor bracket assembly w/cable removal (models X651, X652, X654, X656, & X658) |
396 |
| ADF feed drive motor assembly removal (models X651, X652, X654, X656, and X658) |
396 |
| ADF pick roll position cam assembly removal (models X651, X652, X654, X656, and X658) |
398 |
| ADF solenoid assembly removal (models X651, X652, X654, X656, and X658) |
399 |
| Sensor (ADF top door interlock) removal (models X651, X652, X654, X656, and X658) |
399 |
| Sensor (ADF lower door interlock) removal (models X651, X652, X654, X656, and X658) |
400 |
| Sensor (ADF 2nd scan) removal (models X651, X652, X654, X656, and X658) |
400 |
| Sensor (ADF 1st scan) removal (models X651, X652, X654, X656, and X658) |
401 |
| Sensor (ADF sheet through) removal (models X651, X652, X654, X656, and X658) |
402 |
| Sensor (ADF document set) removal (models X651, X652, X654, X656, and X658) |
403 |
| Switch (ADF closed interlock) removal (models X651, X652, X654, X656, and X658) |
404 |
| ADF unit assembly removal (models X651, X652, X654 and X656) |
405 |
| ADF unit assembly removal (model X658) |
405 |
| ADF left hinge removal (models X651, X652, X654, X656, and X658) |
406 |
| ADF right hinge removal (models X651, X652, X654, X656, and X658). |
407 |
| Cover, left rear corner removal (model X658) |
408 |
| Cover, right rear corner removal (model X658) |
408 |
| Sensor (ADF media exit) fan bracket assembly removal (models X652, X654, X656, and X658) |
409 |
| Sensor (ADF media exit) bracket assembly removal (X651) |
410 |
| Scanner CCD assembly removal (models X651, X652, X654, X656, and X658) |
411 |
| Scanner reference LED cable assembly removal (models X651, X652, X654, X656, and X658) |
412 |
| Scanner unit assembly removal (models X651, X652, X654 and X656) |
412 |
| Scanner unit assembly removal (model X658) |
414 |
| MPF tray door assembly removal (models X651, X652, X654, and X656) |
415 |
| MPF tray door assembly removal (model X658) |
417 |
| Fuser access assembly removal (models X651, X652, X654, X656, and X658) |
419 |
| Output cover assembly removal (model X651, X652, X654 and X656) |
419 |
| Output cover assembly removal (model X658) |
420 |
| Redrive assembly removal (model X658) |
420 |
| Redrive assembly removal (models X651, X652, X654, and X656) |
421 |
| Laser cover removal (model X658) |
422 |
| Laser cover removal (models X651, X652, X654, and X656) |
424 |
| Standard output bin LED assembly removal (models X651, X652, X654, and X656) |
426 |
| MPF media guide assembly removal (model X658) |
427 |
| Operator panel assembly removal (model X658) |
428 |
| Operator panel door assembly removal (models X651, X652, X654, and X656) |
430 |
| Operator panel cover latch assembly removal (models X651, X652, X654, and X656) |
433 |
| Print cartridge cover assembly removal (model X658) |
434 |
| Side cover, right removal (model X658) |
435 |
| Side cover, right removal (models X651, X652, X654, and X656) |
436 |
| Side cover, left removal (model X658) |
436 |
| Side cover, left removal (models X651, X652, X654, and X656) |
437 |
| Door assembly, rear removal (models X651, X652, X654, X656, and X658) |
438 |
| Cover, rear lower removal (models X651, X652, X654, X656, and X658) |
439 |
| Scanner support cover, right rear removal (model X658) |
441 |
| Scanner support inner cover, right removal (model X658) |
442 |
| Scanner support cover, right removal (model X658) |
443 |
| Scanner controller card assembly removal (model X658) |
443 |
| Scanner controller card assembly removal (models X651, X652, X654 and X656) |
446 |
| Scanner cover, rear removal (models X651, X652, X654, X656, and X658) |
447 |
| Scanner cover, left removal (models X651, X652, X654 and X656) |
448 |
| Scanner cover, left removal (model X658) |
449 |
| Scanner cover, right removal (models X651, X652, X654, and X656) |
450 |
| Scanner cover, right removal (model X658) |
450 |
| Scanner cover, front removal (models X651, X652, X654 and X656) |
451 |
| Scanner cover, front removal (model X658) |
452 |
| Scanner platen glass cover assembly removal (model X658) |
453 |
| Scanner platen glass cover assembly removal (models X651, X652, X654 and X656) |
454 |
| Scanner support platform removal (models X651, X652, X654, and X656) |
455 |
| Carriage belt tensioner assembly removal (models X651, X652, X654, X656, and X658) |
457 |
| Carriage drive motor assembly with cable removal (models X651, X652, X654, X656 & X658) |
458 |
| Carriage belt removal (models X651, X652, X654, X656, and X658) |
459 |
| Scanner / ADF duplex CCD exposure lamp removal (models X651, X652, X654, X656, and X658) |
461 |
| Scanner interface card assembly removal (models X651, X652, X654, X656, and X658) |
462 |
| Scanner cooling fan filter removal (models X651, X652, X654, X656, and X658) |
463 |
| Scanner cooling fan removal (models X651, X652, X654, X656, and X658) |
463 |
| Scanner support cover, left rear removal (model X658) |
464 |
| Scanner support cover, left front removal (model X658) |
465 |
| Scanner support cover, left removal (model X658) |
466 |
| Scanner support inner cover, left removal (model X658) |
466 |
| Sensor (platen glass length) assembly removal (models X651, X652, X654, X656, and X658) |
467 |
| Sensor (scanner HP) assembly w/bracket removal (models X651, X652, X654, X656 & X658) |
468 |
| LVPS cooling fan |
468 |
| Option removals |
470 |
| High capacity input tray |
470 |
| High capacity input tray (HCIT) media tray assembly removal |
471 |
| High capacity input tray (HCIT) tray cover, front removal |
472 |
| High capacity input tray (HCIT) cover, rear removal |
474 |
| High capacity input tray (HCIT) cover, right removal |
476 |
| High capacity input tray (HCIT) cover, left removal |
478 |
| High capacity input tray (HCIT) anti-tip latch assembly removal |
479 |
| High capacity input tray (HCIT) drawer slide assembly removal |
481 |
| High capacity input tray (HCIT) tray lift drive motor assembly removal |
481 |
| High capacity input tray (HCIT) controller card assembly removal |
483 |
| High capacity input tray (HCIT) media size actuator assembly removal |
484 |
| Sensor (HCIT tray raised HP) with cable assembly removal |
486 |
| Sensor (HCIT pass through) with cable removal |
487 |
| High capacity input tray (HCIT) pick arm bracket assembly removal |
489 |
| High capacity input tray (HCIT) tray closed latch with spring removal |
491 |
| 250-sheet media tray assembly removal |
492 |
| 250-sheet option drawer assembly removal |
492 |
| 250-sheet pick arm bracket assembly removal |
493 |
| 250-sheet media out actuator removal |
494 |
| Anti-tip latch assembly removal |
494 |
| 250-sheet frame assembly removal. |
495 |
| Sensor (pass through) with cable removal |
495 |
| 250-sheet controller card assembly removal |
498 |
| Media size actuator removal |
500 |
| Media tray catch spring removal |
501 |
| Tray roller catch assembly removal |
502 |
| 550-sheet option tray assembly |
504 |
| 550-sheet media tray assembly removal |
505 |
| 550-sheet option drawer assembly removal |
505 |
| 550-sheet pick arm bracket assembly removal |
506 |
| 550-sheet bellcrank recoil spring removal |
507 |
| Media out actuator removal (models T652 and T654) |
507 |
| Anti-tip latch assembly removal |
508 |
| 550-sheet frame assembly removal |
509 |
| Upper interface cable assembly removal |
511 |
| Lower interface cable assembly removal |
511 |
| Sensor (pass through) with cable removal |
512 |
| 550-sheet controller card assembly removal |
512 |
| Media size actuator removal |
514 |
| 550-sheet option drive shaft with spring removal |
515 |
| Media tray catch spring removal |
516 |
| Media tray roller catch assembly removal |
516 |
| Stapler finisher rear door assembly removal |
517 |
| Stapler finisher right cover removal |
517 |
| Stapler finisher left cover removal |
517 |
| Stapler finisher top cover removal |
517 |
| Stapler finisher handle cover removal |
517 |
| Stapler finisher ADF output bin removal |
517 |
| Stapler finisher LED sensor cover removal |
517 |
| Stapler finisher sensor (finisher media bin present) removal |
517 |
| Stapler finisher standard output bin LED and LED clear lens removal |
518 |
| Stapler finisher tamper recoil spring removal |
518 |
| Stapler finisher tamper drive belt removal |
518 |
| Stapler finisher tamper drive motor assembly removal |
518 |
| Stapler finisher media stack flap and media stack flap actuator removal |
518 |
| Stapler finisher stapler unit assembly removal |
518 |
| Stapler finisher bin spring removal |
518 |
| Stapler finisher controller card assembly removal |
519 |
| Stapler finisher paddle drive motor assembly removal |
519 |
| Stapler finisher sensor (media stack) removal |
519 |
| Stapler finisher sensor (paddle HP) removal |
519 |
| Stapler finisher sensor (stapler access door interlock) removal |
519 |
| Stapler finisher sensor (tamper HP left and right) removal |
519 |
| Stapler finisher sensor (bin full send) removal |
519 |
| Stapler finisher sensor (bin full receive) removal |
519 |
| Stapler finisher sensor (media in stapler) removal |
520 |
| Stapler finisher stapler cover removal |
520 |
| Stapler finisher sensor (diverter HP) removal |
520 |
| 4-bin mailbox assembly left cover removal |
520 |
| 4-bin mailbox assembly controller card assembly removal |
520 |
| 4-bin mailbox assembly sensor (media bin full) removal |
520 |
| 4-bin mailbox assembly sensor (diverter gate HP) removal |
520 |
| 4-bin mailbox assembly rear door assembly removal |
521 |
| 4-bin mailbox assembly left rear inner cover removal |
521 |
| 4-bin mailbox assembly right cover removal |
521 |
| 4-bin mailbox assembly right rear inner cover removal |
521 |
| 4-bin mailbox assembly LED card assembly removal |
521 |
| 4-bin mailbox assembly media output bin light pipe removal |
521 |
| 4-bin mailbox assembly top cover removal |
521 |
| 4-bin mailbox assembly diverter gate solenoid removal |
521 |
| 4-bin mailbox assembly transport solenoid removal |
522 |
| 4-bin mailbox assembly media diverter spring removal |
522 |
| 4-bin mailbox assembly media bin diverter (bin 1 through 3) removal |
522 |
| 4-bin mailbox assembly media bin diverter (bin 4) removal |
522 |
| 4-bin mailbox assembly sensor (pass through) removal |
522 |
| 4-bin mailbox assembly sensor (mailbox empty) removal |
522 |
| 4-bin mailbox assembly standard output bin LED removal |
523 |
| 4-bin mailbox assembly LED clear lens removal |
523 |
| 4-bin mailbox assembly media bin full actuator removal |
523 |
| Offset stacker rear door assembly removal |
523 |
| Offset stacker right cover removal |
523 |
| Offset stacker left cover removal |
523 |
| Offset stacker top cover removal |
523 |
| Offset stacker handle cover removal |
523 |
| Offset stacker ADF output bin removal |
524 |
| Offset stacker LED sensor cover removal |
524 |
| Offset stacker sensor (finisher media bin present) removal |
524 |
| Offset stacker standard output bin LED and LED clear lens removal |
524 |
| Offset stacker tamper recoil spring removal |
524 |
| Offset stacker tamper drive belt removal |
524 |
| Offset stacker tamper drive motor assembly removal |
524 |
| Offset stacker media stack flap and media stack flap actuator removal |
525 |
| Offset stacker bin spring removal |
525 |
| Offset stacker controller card assembly removal |
526 |
| Offset stacker paddle drive motor assembly removal |
526 |
| Offset stacker sensor (media stack) removal |
526 |
| Offset stacker sensor (paddle HP) removal |
526 |
| Offset stacker sensor (tamper HP left and right) removal |
526 |
| Offset stacker sensor (bin full send) removal |
526 |
| Offset stacker sensor (bin full receive) removal |
526 |
| Offset stacker sensor (diverter HP) removal |
526 |
| 5. Connector locations |
529 |
| Locations |
529 |
| Sensors-ADF |
529 |
| Sensors-Flatbed |
529 |
| 6. Preventive maintenance |
531 |
| Safety inspection guide |
531 |
| Lubrication specifications |
531 |
| Scheduled maintenance |
531 |
| Maintenance kit |
531 |
| Maintaining the printer |
532 |
| Cleaning the exterior of the printer |
532 |
| Cleaning the scanner glass |
532 |
| 7. Parts catalog |
535 |
| How to use this parts catalog |
535 |
| Assembly 1: Covers (X651, X652, X654, and X656) |
536 |
| Assembly 2: Covers 1 (X658) |
538 |
| Assembly 3: Covers 2 (X658) |
540 |
| Assembly 4: Media path, pick arm and ducts |
542 |
| Assembly 5: Drive motor assemblies |
544 |
| Assembly 6: Printhead, fuser assembly, and electronics |
546 |
| Assembly 7: Flatbed scanner |
548 |
| Assembly 8: ADF covers |
550 |
| Assembly 9: ADF feed and drive |
552 |
| Assembly 10: ADF electronics |
554 |
| Assembly 11: 550 Sheet option tray assembly (X658) |
556 |
| Assembly 12: 250 Sheet option tray assembly (X651, X652, X654, and X656) |
558 |
| Assembly 13: 550 Sheet option tray assembly (X651, X652, X654, and X656) |
560 |
| Assembly 14: HCIT Sheet option tray assembly (X651, X652, X654, and X656) |
562 |
| Assembly 15: Finisher assembly #1 |
564 |
| Assembly 16: Finisher assembly #2 |
566 |
| Assembly 17: Offset stacker |
568 |
| Assembly 18: 4-bin mailbox assembly #1 |
570 |
| Assembly 19: 4-bin mailbox assembly #2 |
572 |
| Assembly 20: 4-bin mailbox assembly #3 |
574 |
| Assembly 21: Envelope feeder |
576 |
| Assembly 22: Electrical cables |
578 |
| Assembly 23: Miscellaneous |
580 |
| Assembly 24: Miscellaneous (continued) |
581 |
| Index |
582 |

 1
1 2
2 3
3 4
4 5
5 6
6 7
7 8
8 9
9 10
10 11
11 12
12 13
13 14
14 15
15 16
16 17
17 18
18 19
19 20
20 21
21 22
22 23
23 24
24 25
25 26
26 27
27 28
28 29
29 30
30 31
31 32
32 33
33 34
34 35
35 36
36 37
37 38
38 39
39 40
40 41
41 42
42 43
43 44
44 45
45 46
46 47
47 48
48 49
49 50
50 51
51 52
52 53
53 54
54 55
55 56
56 57
57 58
58 59
59 60
60 61
61 62
62 63
63 64
64 65
65 66
66 67
67 68
68 69
69 70
70 71
71 72
72 73
73 74
74 75
75 76
76 77
77 78
78 79
79 80
80 81
81 82
82 83
83 84
84 85
85 86
86 87
87 88
88 89
89 90
90 91
91 92
92 93
93 94
94 95
95 96
96 97
97 98
98 99
99 100
100 101
101 102
102 103
103 104
104 105
105 106
106 107
107 108
108 109
109 110
110 111
111 112
112 113
113 114
114 115
115 116
116 117
117 118
118 119
119 120
120 121
121 122
122 123
123 124
124 125
125 126
126 127
127 128
128 129
129 130
130 131
131 132
132 133
133 134
134 135
135 136
136 137
137 138
138 139
139 140
140 141
141 142
142 143
143 144
144 145
145 146
146 147
147 148
148 149
149 150
150 151
151 152
152 153
153 154
154 155
155 156
156 157
157 158
158 159
159 160
160 161
161 162
162 163
163 164
164 165
165 166
166 167
167 168
168 169
169 170
170 171
171 172
172 173
173 174
174 175
175 176
176 177
177 178
178 179
179 180
180 181
181 182
182 183
183 184
184 185
185 186
186 187
187 188
188 189
189 190
190 191
191 192
192 193
193 194
194 195
195 196
196 197
197 198
198 199
199 200
200 201
201 202
202 203
203 204
204 205
205 206
206 207
207 208
208 209
209 210
210 211
211 212
212 213
213 214
214 215
215 216
216 217
217 218
218 219
219 220
220 221
221 222
222 223
223 224
224 225
225 226
226 227
227 228
228 229
229 230
230 231
231 232
232 233
233 234
234 235
235 236
236 237
237 238
238 239
239 240
240 241
241 242
242 243
243 244
244 245
245 246
246 247
247 248
248 249
249 250
250 251
251 252
252 253
253 254
254 255
255 256
256 257
257 258
258 259
259 260
260 261
261 262
262 263
263 264
264 265
265 266
266 267
267 268
268 269
269 270
270 271
271 272
272 273
273 274
274 275
275 276
276 277
277 278
278 279
279 280
280 281
281 282
282 283
283 284
284 285
285 286
286 287
287 288
288 289
289 290
290 291
291 292
292 293
293 294
294 295
295 296
296 297
297 298
298 299
299 300
300 301
301 302
302 303
303 304
304 305
305 306
306 307
307 308
308 309
309 310
310 311
311 312
312 313
313 314
314 315
315 316
316 317
317 318
318 319
319 320
320 321
321 322
322 323
323 324
324 325
325 326
326 327
327 328
328 329
329 330
330 331
331 332
332 333
333 334
334 335
335 336
336 337
337 338
338 339
339 340
340 341
341 342
342 343
343 344
344 345
345 346
346 347
347 348
348 349
349 350
350 351
351 352
352 353
353 354
354 355
355 356
356 357
357 358
358 359
359 360
360 361
361 362
362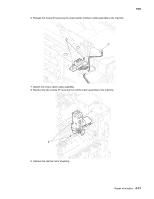 363
363 364
364 365
365 366
366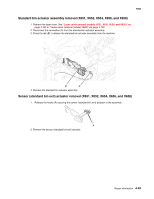 367
367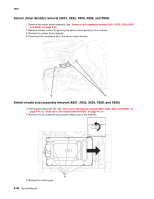 368
368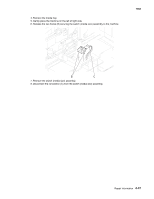 369
369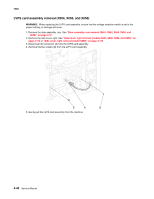 370
370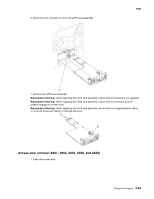 371
371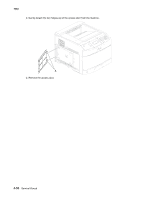 372
372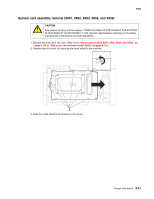 373
373 374
374 375
375 376
376 377
377 378
378 379
379 380
380 381
381 382
382 383
383 384
384 385
385 386
386 387
387 388
388 389
389 390
390 391
391 392
392 393
393 394
394 395
395 396
396 397
397 398
398 399
399 400
400 401
401 402
402 403
403 404
404 405
405 406
406 407
407 408
408 409
409 410
410 411
411 412
412 413
413 414
414 415
415 416
416 417
417 418
418 419
419 420
420 421
421 422
422 423
423 424
424 425
425 426
426 427
427 428
428 429
429 430
430 431
431 432
432 433
433 434
434 435
435 436
436 437
437 438
438 439
439 440
440 441
441 442
442 443
443 444
444 445
445 446
446 447
447 448
448 449
449 450
450 451
451 452
452 453
453 454
454 455
455 456
456 457
457 458
458 459
459 460
460 461
461 462
462 463
463 464
464 465
465 466
466 467
467 468
468 469
469 470
470 471
471 472
472 473
473 474
474 475
475 476
476 477
477 478
478 479
479 480
480 481
481 482
482 483
483 484
484 485
485 486
486 487
487 488
488 489
489 490
490 491
491 492
492 493
493 494
494 495
495 496
496 497
497 498
498 499
499 500
500 501
501 502
502 503
503 504
504 505
505 506
506 507
507 508
508 509
509 510
510 511
511 512
512 513
513 514
514 515
515 516
516 517
517 518
518 519
519 520
520 521
521 522
522 523
523 524
524 525
525 526
526 527
527 528
528 529
529 530
530 531
531 532
532 533
533 534
534 535
535 536
536 537
537 538
538 539
539 540
540 541
541 542
542 543
543 544
544 545
545 546
546 547
547 548
548 549
549 550
550 551
551 552
552 553
553 554
554 555
555 556
556 557
557 558
558 559
559 560
560 561
561 562
562 563
563 564
564 565
565 566
566 567
567 568
568 569
569 570
570 571
571 572
572 573
573 574
574 575
575 576
576 577
577 578
578 579
579 580
580 581
581 582
582 583
583 584
584 585
585 586
586 587
587 588
588 589
589 590
590 591
591 592
592 593
593 594
594


