Lexmark X658DFE Service Manual - Page 519
Stapler finisher controller card assembly removal
 |
UPC - 734646275965
View all Lexmark X658DFE manuals
Add to My Manuals
Save this manual to your list of manuals |
Page 519 highlights
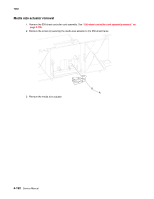
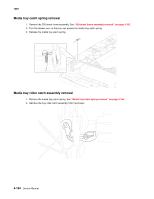
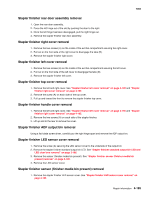
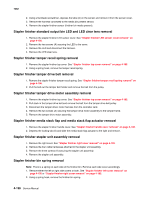
7462 Stapler finisher controller card assembly removal 1. Remove the left stapler finisher left cover. See "Stapler finisher left cover removal" on page 4-195. 2. Disconnect all harnesses to the controller card. 3. Remove the three screws (A) securing the stapler controller card assembly. 4. Remove the stapler finisher controller card assembly. Stapler finisher paddle drive motor assembly removal 1. Remove the left stapler finisher left cover. See "Stapler finisher left cover removal" on page 4-195. 2. Disconnect the paddle motor harness from the controller card. 3. Remove the cable from the harness clip. 4. Remove the two screws (A) securing the two paddle drive motor assemblies. 5. Remove the paddle drive motor assembly. Stapler finisher sensor (media stack) removal 1. Remove the stapler finisher top cover. See "Stapler finisher top cover removal" on page 4-195. 2. Disconnect the harness to the sensor (media stack). 3. Using your fingers, pinch the tab securing the stapler finisher sensor (media stack) and remove. Stapler finisher sensor (paddle HP) removal 1. Remove the stapler finisher left cover. See "Stapler finisher left cover removal" on page 4-195. 2. Disconnect the harness to the stapler finisher sensor (paddle home position). 3. Using your fingers, pinch the tab securing the stapler finisher sensor (paddle home position) and remove. Stapler finisher sensor (stapler access door interlock) removal 1. Remove the stapler finisher right cover. See "Stapler finisher right cover removal" on page 4-195. 2. Disconnect the harness to the stapler finisher sensor (stapler access door interlock). 3. Using your fingers, pinch the tab securing the stapler finisher sensor (stapler access door interlock) and remove. Stapler finisher sensor (tamper HP left and right) removal 1. Remove the stapler finisher top cover. See "Stapler finisher top cover removal" on page 4-195. 2. Disconnect the harness to the stapler finisher sensor (tamper HP left and right). 3. Using your fingers, pinch the tab securing the staple finisher sensor (tamper HP left and right) and remove. Stapler finisher sensor (bin full send) removal 1. Remove the stapler finisher controller card assembly. See "Stapler finisher controller card assembly removal" on page 4-197. 2. Remove the two screws (A) securing the staple finisher sensor (bin full send). 3. Disconnect the harness and remove. Stapler finisher sensor (bin full receive) removal 1. Remove the stapler finisher right cover. See "Stapler finisher right cover removal" on page 4-195. Repair information 4-197
-
 1
1 -
2
-
3
-
4
-
5
-
6
-
7
-
8
-
9
-
10
-
11
-
12
-
13
-
14
-
15
-
16
-
17
-
18
-
19
-
20
-
21
-
22
-
23
-
24
-
25
-
26
-
27
-
28
-
29
-
30
-
31
-
32
-
33
-
34
-
35
-
36
-
37
-
38
-
39
-
40
-
41
-
42
-
43
-
44
-
45
-
46
-
47
-
48
-
49
-
50
-
51
-
52
-
53
-
54
-
55
-
56
-
57
-
58
-
59
-
60
-
61
-
62
-
63
-
64
-
65
-
66
-
67
-
68
-
69
-
70
-
71
-
72
-
73
-
74
-
75
-
76
-
77
-
78
-
79
-
80
-
81
-
82
-
83
-
84
-
85
-
86
-
87
-
88
-
89
-
90
-
91
-
92
-
93
-
94
-
95
-
96
-
97
-
98
-
99
-
100
-
101
-
102
-
103
-
104
-
105
-
106
-
107
-
108
-
109
-
110
-
111
-
112
-
113
-
114
-
115
-
116
-
117
-
118
-
119
-
120
-
121
-
122
-
123
-
124
-
125
-
126
-
127
-
128
-
129
-
130
-
131
-
132
-
133
-
134
-
135
-
136
-
137
-
138
-
139
-
140
-
141
-
142
-
143
-
144
-
145
-
146
-
147
-
148
-
149
-
150
-
151
-
152
-
153
-
154
-
155
-
156
-
157
-
158
-
159
-
160
-
161
-
162
-
163
-
164
-
165
-
166
-
167
-
168
-
169
-
170
-
171
-
172
-
173
-
174
-
175
-
176
-
177
-
178
-
179
-
180
-
181
-
182
-
183
-
184
-
185
-
186
-
187
-
188
-
189
-
190
-
191
-
192
-
193
-
194
-
195
-
196
-
197
-
198
-
199
-
200
-
201
-
202
-
203
-
204
-
205
-
206
-
207
-
208
-
209
-
210
-
211
-
212
-
213
-
214
-
215
-
216
-
217
-
218
-
219
-
220
-
221
-
222
-
223
-
224
-
225
-
226
-
227
-
228
-
229
-
230
-
231
-
232
-
233
-
234
-
235
-
236
-
237
-
238
-
239
-
240
-
241
-
242
-
243
-
244
-
245
-
246
-
247
-
248
-
249
-
250
-
251
-
252
-
253
-
254
-
255
-
256
-
257
-
258
-
259
-
260
-
261
-
262
-
263
-
264
-
265
-
266
-
267
-
268
-
269
-
270
-
271
-
272
-
273
-
274
-
275
-
276
-
277
-
278
-
279
-
280
-
281
-
282
-
283
-
284
-
285
-
286
-
287
-
288
-
289
-
290
-
291
-
292
-
293
-
294
-
295
-
296
-
297
-
298
-
299
-
300
-
301
-
302
-
303
-
304
-
305
-
306
-
307
-
308
-
309
-
310
-
311
-
312
-
313
-
314
-
315
-
316
-
317
-
318
-
319
-
320
-
321
-
322
-
323
-
324
-
325
-
326
-
327
-
328
-
329
-
330
-
331
-
332
-
333
-
334
-
335
-
336
-
337
-
338
-
339
-
340
-
341
-
342
-
343
-
344
-
345
-
346
-
347
-
348
-
349
-
350
-
351
-
352
-
353
-
354
-
355
-
356
-
357
-
358
-
359
-
360
-
361
-
362
-
363
-
364
-
365
-
366
-
367
-
368
-
369
-
370
-
371
-
372
-
373
-
374
-
375
-
376
-
377
-
378
-
379
-
380
-
381
-
382
-
383
-
384
-
385
-
386
-
387
-
388
-
389
-
390
-
391
-
392
-
393
-
394
-
395
-
396
-
397
-
398
-
399
-
400
-
401
-
402
-
403
-
404
-
405
-
406
-
407
-
408
-
409
-
410
-
411
-
412
-
413
-
414
-
415
-
416
-
417
-
418
-
419
-
420
-
421
-
422
-
423
-
424
-
425
-
426
-
427
-
428
-
429
-
430
-
431
-
432
-
433
-
434
-
435
-
436
-
437
-
438
-
439
-
440
-
441
-
442
-
443
-
444
-
445
-
446
-
447
-
448
-
449
-
450
-
451
-
452
-
453
-
454
-
455
-
456
-
457
-
458
-
459
-
460
-
461
-
462
-
463
-
464
-
465
-
466
-
467
-
468
-
469
-
470
-
471
-
472
-
473
-
474
-
475
-
476
-
477
-
478
-
479
-
480
-
481
-
482
-
483
-
484
-
485
-
486
-
487
-
488
-
489
-
490
-
491
-
492
-
493
-
494
-
495
-
496
-
497
-
498
-
499
-
500
-
501
-
502
-
503
-
504
-
505
-
506
-
507
-
508
-
509
-
510
-
511
-
512
-
513
-
 514
514 -
 515
515 -
 516
516 -
 517
517 -
 518
518 -
 519
519 -
 520
520 -
 521
521 -
 522
522 -
 523
523 -
 524
524 -
525
-
526
-
527
-
528
-
529
-
530
-
531
-
532
-
533
-
534
-
535
-
536
-
537
-
538
-
539
-
540
-
541
-
542
-
543
-
544
-
545
-
546
-
547
-
548
-
549
-
550
-
551
-
552
-
553
-
554
-
555
-
556
-
557
-
558
-
559
-
560
-
561
-
562
-
563
-
564
-
565
-
566
-
567
-
568
-
569
-
570
-
571
-
572
-
573
-
574
-
575
-
576
-
577
-
578
-
579
-
580
-
581
-
582
-
583
-
584
-
585
-
586
-
587
-
588
-
589
-
590
-
591
-
592
-
593
-
594
 |
 |