Lexmark X658DFE Service Manual - Page 521
-bin mailbox assembly rear door assembly removal
 |
UPC - 734646275965
View all Lexmark X658DFE manuals
Add to My Manuals
Save this manual to your list of manuals |
Page 521 highlights
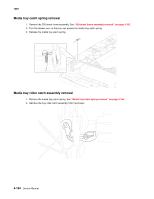
7462 3. Remove the 4-bin mailbox assembly left rear inner cover. See "4-bin mailbox assembly left rear inner cover removal" on page 3-199Pinch the tabs securing the sensor (diverter gate HP) and remove the sensor from the 4-bin mailbox assembly. 4. Disconnect the harness from the sensor (diverter gate HP). 4-bin mailbox assembly rear door assembly removal 1. Open the rear door. 2. Gently spread each side of the 4-bin mailbox assembly until the rear door hinge is free to be removed. 3. Remove the rear door assembly. 4-bin mailbox assembly left rear inner cover removal 1. Remove the 4-bin mailbox assembly rear door assembly. See "4-bin mailbox assembly rear door assembly removal" on page 3-199. 2. Firmly grasp the top of the left rear inner cover and pull out to remove. 4-bin mailbox assembly right cover removal 1. Place the 4-bin mailbox assembly on its side. 2. Remove the two screws (A) from the bottom side of the right cover securing cover in place. 3. Using your fingers, pull up on the top of the right cover and pull out simultaneously to remove. 4-bin mailbox assembly right rear inner cover removal Firmly grasp the top of the right rear inner cover and pull out to remove. 4-bin mailbox assembly LED card assembly removal 1. Remove the 4-bin mailbox assembly right cover. See "4-bin mailbox assembly right cover removal" on page 3-199. 2. Disconnect the 3 wire harnesses attached to the LED card assembly. 3. Remove the three screws (A) securing the LED card assembly to the 4-bin mailbox assembly. 4. Remove the 4-bin mailbox assembly LED card assembly. 4-bin mailbox assembly media output bin light pipe removal 1. Remove the 4-bin mailbox LED card assembly. See "4-bin mailbox assembly LED card assembly removal" on page 3-199. 2. Remove the appropriate media output bin light pipe. 4-bin mailbox assembly top cover removal 1. Remove the 4-bin mailbox assembly left cover. See "4-bin mailbox assembly left cover removal" on page 3-198. 2. Remove the right cover. See "4-bin mailbox assembly right cover removal" on page 3-199. 3. Remove the four screws (A) on each side of the top cover securing it to the 4-bin mailbox assembly. 4. Side the top cover towards the rear and remove. 4-bin mailbox assembly diverter gate solenoid removal 1. Remove the 4-bin mailbox assembly top cover. See "4-bin mailbox assembly top cover removal" on page 3-199. 2. Remove the screw (A) securing the diverter gate solenoid to the 4-bin mailbox assembly. Repair information 4-199
-
 1
1 -
2
-
3
-
4
-
5
-
6
-
7
-
8
-
9
-
10
-
11
-
12
-
13
-
14
-
15
-
16
-
17
-
18
-
19
-
20
-
21
-
22
-
23
-
24
-
25
-
26
-
27
-
28
-
29
-
30
-
31
-
32
-
33
-
34
-
35
-
36
-
37
-
38
-
39
-
40
-
41
-
42
-
43
-
44
-
45
-
46
-
47
-
48
-
49
-
50
-
51
-
52
-
53
-
54
-
55
-
56
-
57
-
58
-
59
-
60
-
61
-
62
-
63
-
64
-
65
-
66
-
67
-
68
-
69
-
70
-
71
-
72
-
73
-
74
-
75
-
76
-
77
-
78
-
79
-
80
-
81
-
82
-
83
-
84
-
85
-
86
-
87
-
88
-
89
-
90
-
91
-
92
-
93
-
94
-
95
-
96
-
97
-
98
-
99
-
100
-
101
-
102
-
103
-
104
-
105
-
106
-
107
-
108
-
109
-
110
-
111
-
112
-
113
-
114
-
115
-
116
-
117
-
118
-
119
-
120
-
121
-
122
-
123
-
124
-
125
-
126
-
127
-
128
-
129
-
130
-
131
-
132
-
133
-
134
-
135
-
136
-
137
-
138
-
139
-
140
-
141
-
142
-
143
-
144
-
145
-
146
-
147
-
148
-
149
-
150
-
151
-
152
-
153
-
154
-
155
-
156
-
157
-
158
-
159
-
160
-
161
-
162
-
163
-
164
-
165
-
166
-
167
-
168
-
169
-
170
-
171
-
172
-
173
-
174
-
175
-
176
-
177
-
178
-
179
-
180
-
181
-
182
-
183
-
184
-
185
-
186
-
187
-
188
-
189
-
190
-
191
-
192
-
193
-
194
-
195
-
196
-
197
-
198
-
199
-
200
-
201
-
202
-
203
-
204
-
205
-
206
-
207
-
208
-
209
-
210
-
211
-
212
-
213
-
214
-
215
-
216
-
217
-
218
-
219
-
220
-
221
-
222
-
223
-
224
-
225
-
226
-
227
-
228
-
229
-
230
-
231
-
232
-
233
-
234
-
235
-
236
-
237
-
238
-
239
-
240
-
241
-
242
-
243
-
244
-
245
-
246
-
247
-
248
-
249
-
250
-
251
-
252
-
253
-
254
-
255
-
256
-
257
-
258
-
259
-
260
-
261
-
262
-
263
-
264
-
265
-
266
-
267
-
268
-
269
-
270
-
271
-
272
-
273
-
274
-
275
-
276
-
277
-
278
-
279
-
280
-
281
-
282
-
283
-
284
-
285
-
286
-
287
-
288
-
289
-
290
-
291
-
292
-
293
-
294
-
295
-
296
-
297
-
298
-
299
-
300
-
301
-
302
-
303
-
304
-
305
-
306
-
307
-
308
-
309
-
310
-
311
-
312
-
313
-
314
-
315
-
316
-
317
-
318
-
319
-
320
-
321
-
322
-
323
-
324
-
325
-
326
-
327
-
328
-
329
-
330
-
331
-
332
-
333
-
334
-
335
-
336
-
337
-
338
-
339
-
340
-
341
-
342
-
343
-
344
-
345
-
346
-
347
-
348
-
349
-
350
-
351
-
352
-
353
-
354
-
355
-
356
-
357
-
358
-
359
-
360
-
361
-
362
-
363
-
364
-
365
-
366
-
367
-
368
-
369
-
370
-
371
-
372
-
373
-
374
-
375
-
376
-
377
-
378
-
379
-
380
-
381
-
382
-
383
-
384
-
385
-
386
-
387
-
388
-
389
-
390
-
391
-
392
-
393
-
394
-
395
-
396
-
397
-
398
-
399
-
400
-
401
-
402
-
403
-
404
-
405
-
406
-
407
-
408
-
409
-
410
-
411
-
412
-
413
-
414
-
415
-
416
-
417
-
418
-
419
-
420
-
421
-
422
-
423
-
424
-
425
-
426
-
427
-
428
-
429
-
430
-
431
-
432
-
433
-
434
-
435
-
436
-
437
-
438
-
439
-
440
-
441
-
442
-
443
-
444
-
445
-
446
-
447
-
448
-
449
-
450
-
451
-
452
-
453
-
454
-
455
-
456
-
457
-
458
-
459
-
460
-
461
-
462
-
463
-
464
-
465
-
466
-
467
-
468
-
469
-
470
-
471
-
472
-
473
-
474
-
475
-
476
-
477
-
478
-
479
-
480
-
481
-
482
-
483
-
484
-
485
-
486
-
487
-
488
-
489
-
490
-
491
-
492
-
493
-
494
-
495
-
496
-
497
-
498
-
499
-
500
-
501
-
502
-
503
-
504
-
505
-
506
-
507
-
508
-
509
-
510
-
511
-
512
-
513
-
514
-
515
-
 516
516 -
 517
517 -
 518
518 -
 519
519 -
 520
520 -
 521
521 -
 522
522 -
 523
523 -
 524
524 -
 525
525 -
 526
526 -
527
-
528
-
529
-
530
-
531
-
532
-
533
-
534
-
535
-
536
-
537
-
538
-
539
-
540
-
541
-
542
-
543
-
544
-
545
-
546
-
547
-
548
-
549
-
550
-
551
-
552
-
553
-
554
-
555
-
556
-
557
-
558
-
559
-
560
-
561
-
562
-
563
-
564
-
565
-
566
-
567
-
568
-
569
-
570
-
571
-
572
-
573
-
574
-
575
-
576
-
577
-
578
-
579
-
580
-
581
-
582
-
583
-
584
-
585
-
586
-
587
-
588
-
589
-
590
-
591
-
592
-
593
-
594
 |
 |