Onkyo TX NR807 Owner Manual - Page 143
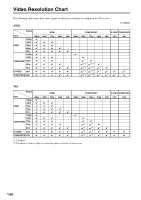
Component Video Monitor Out., Note Tx-nr807
 |
UPC - 751398008788
View all Onkyo TX NR807 manuals
Add to My Manuals
Save this manual to your list of manuals |
Page 143 highlights
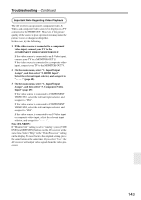
Troubleshooting-Continued Important Note Regarding Video Playback The AV receiver can upconvert component video, SVideo, and composite video sources for display on a TV connected to the HDMI OUT. However, if the picture quality of the source is poor, upconversion may make the picture worse or disappear altogether. In this case, try the following: 1 If the video source is connected to a component video input, connect your TV to the COMPONENT VIDEO MONITOR OUT. If the video source is connected to an S-Video input, connect your TV to a MONITOR OUT S. If the video source is connected to a composite video input, connect your TV to the MONITOR OUT V. 2 On the main menu, select "1. Input/Output Assign", and then select "2. HDMI Input". Select the relevant input selector, and assign it to page 48). 3 On the main menu, select "1. Input/Output Assign", and then select "3. Component Video Input" (page 49): If the video source is connected to COMPONENT VIDEO IN1, select the relevant input selector, and assign it to "IN1". If the video source is connected to COMPONENT VIDEO IN2, select the relevant input selector, and assign it to "IN2". If the video source is connected to an S-Video input or composite video input, select the relevant input selector, and assign it to Note (TX-NR807): If "Monitor Out" setting is set to "Analog", press [VCR/ DVR] and [RETURN] buttons on the AV receiver at the same time. Select "Skip" in the "VideoProcessor" setting on the display. To reset back to the original setting, press the same button at the same time. If you select "Use", the AV receiver will output video signals from the video processor. 143
-
 1
1 -
2
-
3
-
4
-
5
-
6
-
7
-
8
-
9
-
10
-
11
-
12
-
13
-
14
-
15
-
16
-
17
-
18
-
19
-
20
-
21
-
22
-
23
-
24
-
25
-
26
-
27
-
28
-
29
-
30
-
31
-
32
-
33
-
34
-
35
-
36
-
37
-
38
-
39
-
40
-
41
-
42
-
43
-
44
-
45
-
46
-
47
-
48
-
49
-
50
-
51
-
52
-
53
-
54
-
55
-
56
-
57
-
58
-
59
-
60
-
61
-
62
-
63
-
64
-
65
-
66
-
67
-
68
-
69
-
70
-
71
-
72
-
73
-
74
-
75
-
76
-
77
-
78
-
79
-
80
-
81
-
82
-
83
-
84
-
85
-
86
-
87
-
88
-
89
-
90
-
91
-
92
-
93
-
94
-
95
-
96
-
97
-
98
-
99
-
100
-
101
-
102
-
103
-
104
-
105
-
106
-
107
-
108
-
109
-
110
-
111
-
112
-
113
-
114
-
115
-
116
-
117
-
118
-
119
-
120
-
121
-
122
-
123
-
124
-
125
-
126
-
127
-
128
-
129
-
130
-
131
-
132
-
133
-
134
-
135
-
136
-
137
-
 138
138 -
 139
139 -
 140
140 -
 141
141 -
 142
142 -
 143
143 -
 144
144 -
 145
145 -
 146
146 -
 147
147 -
 148
148
 |
 |
