Onkyo TX NR807 Owner Manual - Page 5

Contents, Introduction, Connection, Basic Operations, Using the Listening Modes, Multi Zone, Others - and 1 4 hdmi

Page 5 highlights

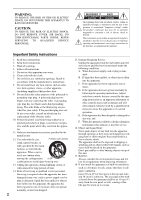
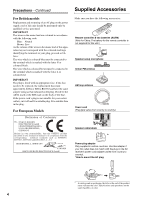
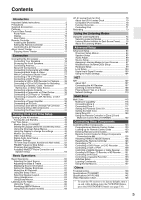
Contents Introduction Important Safety Instructions 2 Precautions 3 Supplied Accessories 4 Features 6 Front & Rear Panels 8 Front Panel 8 Display 10 Rear Panel 11 Remote Controller 14 Installing the Batteries 14 Aiming the Remote Controller 14 Controlling the AV Receiver 15 About Home Theater 17 Enjoying Home Theater 17 Connection Connecting the AV receiver 18 Connecting Your Speakers 18 Bi-amping the Front Speakers 21 Connecting Antenna 22 About AV Connections 24 Connecting Components with HDMI 25 Connecting Both Audio & Video 27 Which Connections Should I Use 27 Connecting a TV or Projector 30 Connecting a DVD Player 31 Connecting a VCR or DVD Recorder for Playback ........ 32 Connecting a VCR or DVD Recorder for Recording ....... 33 Connecting a Satellite, Cable, Terrestrial Set-top box, or Other Video Source 34 Connecting a Game Console 35 Connecting a Camcorder or Other Device 36 Connecting a CD Player or Turntable 37 Connecting a Cassette, CDR, MiniDisc, or DAT Recorder 38 Connecting a Power Amplifier 39 Connecting an RI Dock 40 Connecting a Dock with the Universal Port Connector....... 40 Connecting Onkyo V Components 41 Connecting the Power Cord 41 Turning On & First Time Setup Turning On the AV receiver 42 Turning On and Standby 42 First Time Setup 43 Monitor Setup (TX-NR807 43 Selecting the Language used for the onscreen setup menus ..... 44 Using the Onscreen Setup Menus 45 Using the Display to change the settings 45 Monitor Out Setup 46 Video Input Setup 48 Digital Audio Input Setup 50 Speaker Settings 51 TV Format Setup (European, Australian and Asian models) ...... 52 FM/AM Frequency Step Setup 52 Changing the Input Display 53 Audyssey MultEQ® Room Correction and Speaker Setup 54 Basic Operations Basic Operations 60 Selecting the Input Source 60 Adjusting the Bass & Treble 61 Displaying Source Information 61 Setting the Display Brightness 62 Muting the AV Receiver 62 Using the Sleep Timer 62 Selecting Speaker Layout 63 Using Headphones 63 Using Easy Macros 64 Listening to the Radio 66 Using the Tuner 66 Presetting AM/FM Stations 67 Using RDS (European models 68 UP-A1 series Dock for iPod 70 About the UP-A1 series Dock 70 Compatible iPod models 70 Function Overview 70 Controlling iPod 71 Recording 73 Using the Listening Modes Using the Listening Modes 74 Selecting Listening Modes 74 Listening Modes Available for Each Source Format ......... 75 About the Listening Modes 81 Advanced Setup Advanced Setup 84 Onscreen Setup Menus 84 Speaker Setup 85 Audio Adjust 89 Source Setup 93 Assigning Listening Modes to Input Sources 97 Miscellaneous (Volume/OSD) Setup 98 Hardware Setup 99 Lock Setup 103 Digital Input Signal Formats 103 Using the Audio Settings 104 NET NET 107 About NET 107 Connecting the AV Receiver 107 Listening to Internet Radio 108 Playing Music Files on a Server 109 Network Settings 113 Multi Zone Multi Zone 115 Multiroom Capability 115 Connecting Zone 2 116 Connecting Zone 3 117 Setting the Powered Zone 2/3 118 Setting the Multi Zone 119 Using Zone 2/3 120 Using the Remote Controller in Zone 2/3 and Multiroom Control Kits (TX-NR807 122 Controlling Other Components Controlling Other Components 123 Preprogrammed Remote Control Codes 123 Looking up for Remote Control Code 123 Entering Remote Control Codes 125 Remote Control Codes for Onkyo Components Connected via V 126 Resetting REMOTE MODE Buttons 126 Resetting the Remote Controller 126 Controlling a TV 127 Controlling a DVD Player, or DVD Recorder .......... 128 Controlling a VCR or PVR 129 Controlling a Satellite Receiver or Cable Receiver ....... 130 Controlling a CD Player, CD Recorder, or MD Recorder...... 131 Controlling an RI Dock 132 Controlling a Cassette Recorder 133 Activities Setup 134 Learning Commands 136 Using Normal Macros 137 Others Troubleshooting 138 Specifications (TX-NR807 144 Specifications (HT-RC180 145 Video Resolution Chart 146 * To reset the AV receiver to its factory defaults, turn it on and, while holding down the [VCR/DVR] button, press the [ON/STANDBY] button (see page 138). 5

  • 1
  • 2
  • 3
  • 4
  • 5
  • 6
  • 7
  • 8
  • 9
  • 10
  • 11
  • 12
  • 13
  • 14
  • 15
  • 16
  • 17
  • 18
  • 19
  • 20
  • 21
  • 22
  • 23
  • 24
  • 25
  • 26
  • 27
  • 28
  • 29
  • 30
  • 31
  • 32
  • 33
  • 34
  • 35
  • 36
  • 37
  • 38
  • 39
  • 40
  • 41
  • 42
  • 43
  • 44
  • 45
  • 46
  • 47
  • 48
  • 49
  • 50
  • 51
  • 52
  • 53
  • 54
  • 55
  • 56
  • 57
  • 58
  • 59
  • 60
  • 61
  • 62
  • 63
  • 64
  • 65
  • 66
  • 67
  • 68
  • 69
  • 70
  • 71
  • 72
  • 73
  • 74
  • 75
  • 76
  • 77
  • 78
  • 79
  • 80
  • 81
  • 82
  • 83
  • 84
  • 85
  • 86
  • 87
  • 88
  • 89
  • 90
  • 91
  • 92
  • 93
  • 94
  • 95
  • 96
  • 97
  • 98
  • 99
  • 100
  • 101
  • 102
  • 103
  • 104
  • 105
  • 106
  • 107
  • 108
  • 109
  • 110
  • 111
  • 112
  • 113
  • 114
  • 115
  • 116
  • 117
  • 118
  • 119
  • 120
  • 121
  • 122
  • 123
  • 124
  • 125
  • 126
  • 127
  • 128
  • 129
  • 130
  • 131
  • 132
  • 133
  • 134
  • 135
  • 136
  • 137
  • 138
  • 139
  • 140
  • 141
  • 142
  • 143
  • 144
  • 145
  • 146
  • 147
  • 148

5
Contents
Important Safety Instructions
..........................................
2
Precautions
....................................................................
3
Supplied Accessories
.....................................................
4
Features
.........................................................................
6
Front & Rear Panels
.......................................................
8
Front Panel
.................................................................
8
Display
......................................................................
10
Rear Panel
................................................................
11
Remote Controller
........................................................
14
Installing the Batteries
..............................................
14
Aiming the Remote Controller
..................................
14
Controlling the AV Receiver
.....................................
15
About Home Theater
....................................................
17
Enjoying Home Theater
............................................
17
Connecting the AV receiver
..........................................
18
Connecting Your Speakers
.......................................
18
Bi-amping the Front Speakers
..................................
21
Connecting Antenna
.................................................
22
About AV Connections
.............................................
24
Connecting Components with HDMI
........................
25
Connecting Both Audio & Video
...............................
27
Which Connections Should I Use?
...........................
27
Connecting a TV or Projector
...................................
30
Connecting a DVD Player
.........................................
31
Connecting a VCR or DVD Recorder for Playback
........
32
Connecting a VCR or DVD Recorder for Recording
.......
33
Connecting a Satellite, Cable, Terrestrial
Set-top box, or Other Video Source
.......................
34
Connecting a Game Console
...................................
35
Connecting a Camcorder or Other Device
...............
36
Connecting a CD Player or Turntable
.......................
37
Connecting a Cassette, CDR, MiniDisc, or DAT
Recorder
................................................................
38
Connecting a Power Amplifier
..................................
39
Connecting an RI Dock
.............................................
40
Connecting a Dock with the Universal Port Connector
.......
40
Connecting Onkyo
u
Components
........................
41
Connecting the Power Cord
.....................................
41
Turning On the AV receiver
..........................................
42
Turning On and Standby
..........................................
42
First Time Setup
...........................................................
43
Monitor Setup (TX-NR807)
.......................................
43
Selecting the Language used for the onscreen setup menus
.....
44
Using the Onscreen Setup Menus
............................
45
Using the Display to change the settings
.................
45
Monitor Out Setup
....................................................
46
Video Input Setup
.....................................................
48
Digital Audio Input Setup
..........................................
50
Speaker Settings
......................................................
51
TV Format Setup (European, Australian and Asian models)
......
52
FM/AM Frequency Step Setup
.................................
52
Changing the Input Display
......................................
53
Audyssey MultEQ
®
Room Correction and
Speaker Setup
.......................................................
54
Basic Operations
..........................................................
60
Selecting the Input Source
.......................................
60
Adjusting the Bass & Treble
.....................................
61
Displaying Source Information
..................................
61
Setting the Display Brightness
..................................
62
Muting the AV Receiver
............................................
62
Using the Sleep Timer
..............................................
62
Selecting Speaker Layout
.........................................
63
Using Headphones
...................................................
63
Using Easy Macros
...................................................
64
Listening to the Radio
...................................................
66
Using the Tuner
........................................................
66
Presetting AM/FM Stations
.......................................
67
Using RDS (European models)
................................
68
UP-A1 series Dock for iPod
..........................................
70
About the UP-A1 series Dock
...................................
70
Compatible iPod models
...........................................
70
Function Overview
....................................................
70
Controlling iPod
........................................................
71
Recording
.....................................................................
73
Using the Listening Modes
...........................................
74
Selecting Listening Modes
........................................
74
Listening Modes Available for Each Source Format
.........
75
About the Listening Modes
.......................................
81
Advanced Setup
...........................................................
84
Onscreen Setup Menus
............................................
84
Speaker Setup
..........................................................
85
Audio Adjust
..............................................................
89
Source Setup
............................................................
93
Assigning Listening Modes to Input Sources
............
97
Miscellaneous (Volume/OSD) Setup
........................
98
Hardware Setup
........................................................
99
Lock Setup
..............................................................
103
Digital Input Signal Formats
....................................
103
Using the Audio Settings
........................................
104
NET
............................................................................
107
About NET
..............................................................
107
Connecting the AV Receiver
...................................
107
Listening to Internet Radio
......................................
108
Playing Music Files on a Server
.............................
109
Network Settings
.....................................................
113
Multi Zone
...................................................................
115
Multiroom Capability
...............................................
115
Connecting Zone 2
.................................................
116
Connecting Zone 3
.................................................
117
Setting the Powered Zone 2/3
................................
118
Setting the Multi Zone
.............................................
119
Using Zone 2/3
.......................................................
120
Using the Remote Controller in Zone 2/3 and
Multiroom Control Kits (TX-NR807)
.....................
122
Controlling Other Components
...................................
123
Preprogrammed Remote Control Codes
................
123
Looking up for Remote Control Code
.....................
123
Entering Remote Control Codes
.............................
125
Remote Control Codes for Onkyo Components
Connected via
u
................................................
126
Resetting REMOTE MODE Buttons
.......................
126
Resetting the Remote Controller
............................
126
Controlling a TV
......................................................
127
Controlling a DVD Player, or DVD Recorder
..........
128
Controlling a VCR or PVR
......................................
129
Controlling a Satellite Receiver or Cable Receiver
.......
130
Controlling a CD Player, CD Recorder, or MD Recorder
......
131
Controlling an RI Dock
............................................
132
Controlling a Cassette Recorder
.............................
133
Activities Setup
.......................................................
134
Learning Commands
..............................................
136
Using Normal Macros
.............................................
137
Troubleshooting
..........................................................
138
Specifications (TX-NR807)
.........................................
144
Specifications (HT-RC180)
.........................................
145
Video Resolution Chart
...............................................
146
Introduction
Connection
Turning On & First Time Setup
Basic Operations
Using the Listening Modes
Advanced Setup
NET
Multi Zone
Controlling Other Components
Others
*
To reset the AV receiver to its factory defaults, turn it
on and, while holding down the [VCR/DVR] button,
press the [ON/STANDBY] button (see page 138).