Onkyo TX NR807 Owner Manual - Page 43
First Time Setup, Monitor Setup (TX-NR807 - remote control
 |
UPC - 751398008788
View all Onkyo TX NR807 manuals
Add to My Manuals
Save this manual to your list of manuals |
Page 43 highlights
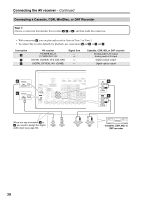
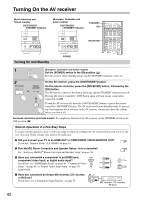
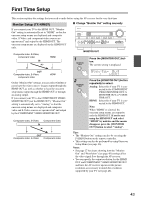
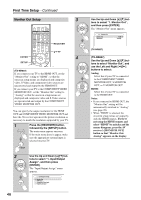
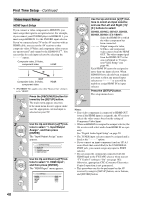
First Time Setup This section explains the settings that you need to make before using the AV receiver for the very first time. Monitor Setup (TX-NR807) ■ Change "Monitor Out" setting manually If you connect your TV to the HDMI OUT, "Monitor Out" setting is automatically set to "HDMI" so that the onscreen setup menus are displayed and composite video, S-Video, and component video sources are upconverted* and output by the HDMI OUT. The onscreen setup menus are displayed on the HDMI OUT only. Composite video, S-Video, component video IN HDMI MONITOR OUT 1 Press the [MONITOR OUT] but- ton. The current setting is displayed. OUT Composite video, S-Video, component video HDMI On the "Monitor Out" settings, you can select whether or not to have the video sources' images output through the HDMI OUT, as well as whether to have the onscreen setup menu output through the HDMI OUT or through an analog output. If you connect your TV to the COMPONENT VIDEO MONITOR OUT (not the HDMI OUT), "Monitor Out" setting is automatically set to "Analog" so that the onscreen setup menus are displayed and composite video and S-Video sources are upconverted* and output by the COMPONENT VIDEO MONITOR OUT. Composite video, S-Video Component video IN OUT Composite video, S-Video Component video 2 Press the [MONITOR OUT] button repeatedly to select: Analog: Select this if your TV is con- nected to the COMPONENT VIDEO MONITOR OUT, S MONITOR OUT, or V MON- ITOR OUT. HDMI: Select this if your TV is con- nected to the HDMI OUT. Note: When "HDMI" is selected, the onscreen setup menus are output by only the HDMI OUT. If you're not using the HDMI OUT and select "HDMI" by mistake and the menus disappear, press the [MONITOR OUT] button to select "Analog". Tips: • The "Monitor Out" setting can also be set using the [VIDEO] button on the remote controller. • This setting can also be performed by using Onscreen Setup Menu (see page 46). Notes: • See page 27 for charts showing how the "Monitor Out" and "Resolution" (see page 46) settings affect the video signal flow through the AV receiver. • You can specify the output resolution for the HDMI OUT and COMPONENT VIDEO MONITOR OUT and have the AV receiver upconvert the picture resolution as necessary to match the resolution supported by your TV (see page 46). 43
-
 1
1 -
2
-
3
-
4
-
5
-
6
-
7
-
8
-
9
-
10
-
11
-
12
-
13
-
14
-
15
-
16
-
17
-
18
-
19
-
20
-
21
-
22
-
23
-
24
-
25
-
26
-
27
-
28
-
29
-
30
-
31
-
32
-
33
-
34
-
35
-
36
-
37
-
 38
38 -
 39
39 -
 40
40 -
 41
41 -
 42
42 -
 43
43 -
 44
44 -
 45
45 -
 46
46 -
 47
47 -
 48
48 -
49
-
50
-
51
-
52
-
53
-
54
-
55
-
56
-
57
-
58
-
59
-
60
-
61
-
62
-
63
-
64
-
65
-
66
-
67
-
68
-
69
-
70
-
71
-
72
-
73
-
74
-
75
-
76
-
77
-
78
-
79
-
80
-
81
-
82
-
83
-
84
-
85
-
86
-
87
-
88
-
89
-
90
-
91
-
92
-
93
-
94
-
95
-
96
-
97
-
98
-
99
-
100
-
101
-
102
-
103
-
104
-
105
-
106
-
107
-
108
-
109
-
110
-
111
-
112
-
113
-
114
-
115
-
116
-
117
-
118
-
119
-
120
-
121
-
122
-
123
-
124
-
125
-
126
-
127
-
128
-
129
-
130
-
131
-
132
-
133
-
134
-
135
-
136
-
137
-
138
-
139
-
140
-
141
-
142
-
143
-
144
-
145
-
146
-
147
-
148
 |
 |
