Onkyo TX NR807 Owner Manual - Page 8
Front & Rear Panels, Front Panel - receivers
 |
UPC - 751398008788
View all Onkyo TX NR807 manuals
Add to My Manuals
Save this manual to your list of manuals |
Page 8 highlights
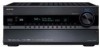
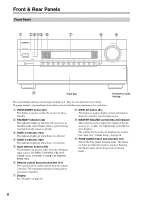
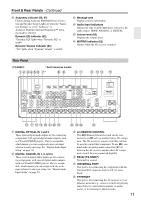
Front & Rear Panels Front Panel B CDEF G H I J K Front flap Pull here to open the flap The actual front panel has various logos printed on it. They are not shown here for clarity. The page numbers in parentheses show where you can find the main explanation for each item. B ON/STANDBY button (42) This button is used to set the AV receiver to On or Standby. C STANDBY indicator (42) This indicator lights up when the AV receiver is in Standby mode, and it flashes while a signal is being received from the remote controller. D ZONE 2 indicator (120) This indicator lights up when Zone 2 is selected. E ZONE 3 indicator (120) This indicator lights up when Zone 3 is selected. F Input selector buttons (60) These buttons are used to select from the following input sources: DVD/BD, VCR/DVR, CBL/SAT, GAME, AUX, TV/TAPE, TUNER, CD, PHONO, PORT, NET. G Remote control sensor/transmitter (14) The sensor receives control signals from the remote controller. The transmitter transmits setting data to the remote controller. H Display See "Display" on page 10. I DISPLAY button (61) This button is used to display various information about the currently selected input source. J MASTER VOLUME control (60) and indicator This control is used to adjust the volume of the AV receiver to -2 dB, -81.5 dB through +18.0 dB (relative display). The volume level can also be displayed as an absolute value. See "Volume Setup" on page 98. K PURE AUDIO button and indicator (74) Selects the Pure Audio listening mode. The indicator lights up when this mode is selected. Pressing this button again selects the previous listening mode. 8
-
 1
1 -
2
-
 3
3 -
 4
4 -
 5
5 -
 6
6 -
 7
7 -
 8
8 -
 9
9 -
 10
10 -
 11
11 -
 12
12 -
 13
13 -
14
-
15
-
16
-
17
-
18
-
19
-
20
-
21
-
22
-
23
-
24
-
25
-
26
-
27
-
28
-
29
-
30
-
31
-
32
-
33
-
34
-
35
-
36
-
37
-
38
-
39
-
40
-
41
-
42
-
43
-
44
-
45
-
46
-
47
-
48
-
49
-
50
-
51
-
52
-
53
-
54
-
55
-
56
-
57
-
58
-
59
-
60
-
61
-
62
-
63
-
64
-
65
-
66
-
67
-
68
-
69
-
70
-
71
-
72
-
73
-
74
-
75
-
76
-
77
-
78
-
79
-
80
-
81
-
82
-
83
-
84
-
85
-
86
-
87
-
88
-
89
-
90
-
91
-
92
-
93
-
94
-
95
-
96
-
97
-
98
-
99
-
100
-
101
-
102
-
103
-
104
-
105
-
106
-
107
-
108
-
109
-
110
-
111
-
112
-
113
-
114
-
115
-
116
-
117
-
118
-
119
-
120
-
121
-
122
-
123
-
124
-
125
-
126
-
127
-
128
-
129
-
130
-
131
-
132
-
133
-
134
-
135
-
136
-
137
-
138
-
139
-
140
-
141
-
142
-
143
-
144
-
145
-
146
-
147
-
148
 |
 |
