Onkyo TX NR807 Owner Manual - Page 55
Using Audyssey MultEQ, Notes, HT-RC180
 |
UPC - 751398008788
View all Onkyo TX NR807 manuals
Add to My Manuals
Save this manual to your list of manuals |
Page 55 highlights
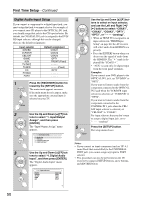
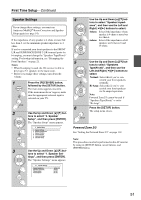
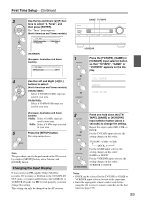
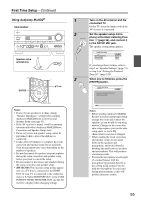
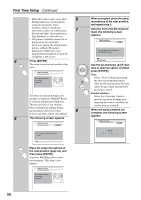
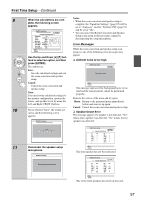
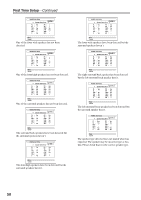
First Time Setup-Continued Using Audyssey MultEQ® 1 ON/STANDBY 2 Speaker setup microphone ENTER 3 RXFS Notes: • If any of your speakers is 4 ohms, change "Speaker Impedance" setting before running Audyssey MultEQ Room Correction and Speaker Setup (see page 51). • If the AV receiver is muted, it will be unmuted automatically when Audyssey MultEQ Room Correction and Speaker Setup starts. • Room correction and speaker setup cannot be performed while a pair of headphones is connected. • It takes about 30 minutes to complete the room correction and speaker setup for six positions. Total measurement time varies depending on the number of speakers. • Do not disconnect the speaker setup microphone during the room correction and speaker setup, unless you want to cancel the setup. • Do not connect or disconnect any speakers during the room correction and speaker setup. • (HT-RC180) The onscreen setup menus appear only on a TV that is connected to the HDMI OUT. If your TV is connected to the composite video or S-Video MONITOR OUT, or the COMPONENT VIDEO MONITOR OUT, use the AV receiver's display when changing settings. Turn on the AV receiver and the connected TV. On the TV, select the input to which the AV receiver is connected. Set the speaker setup microphone at the Main Listening Posi- tion 1 (page 54), and connect it to the SETUP MIC jack. The speaker setting menu appears. MultEQ: Auto Setup Speakers Type(Front) Powered Zone2 Powered Zone3 Normal Not Act Not Act If you change these settings, refer to step 5 on "Speaker Settings" (page 51) or step 4 on "Setting the Powered Zone 2/3" (page 118). When you've finished, press the [ENTER] button. MultEQ: Auto Setup Please place setup microphone at center of listening area at ear height. Next Notes: • Before starting Audyssey MultEQ Room Correction and Speaker Setup, arrange the room and connect the speakers as you would for enjoying movies. Changes to the room after auto setup requires you run the auto setup again, as room EQ characteristics may have changed. • When starting the room correction and speaker setup, do not stand between the speakers and microphone, and avoid obstacles blocking the path between speakers and microphone. This will produce inaccurate results. • Position the microphone at ear height of a seated listener with the microphone tip pointed directly at the ceiling using a tripod. Do not hold the microphone in your hand during measurements as this will produce inacurate results. 55
-
 1
1 -
2
-
3
-
4
-
5
-
6
-
7
-
8
-
9
-
10
-
11
-
12
-
13
-
14
-
15
-
16
-
17
-
18
-
19
-
20
-
21
-
22
-
23
-
24
-
25
-
26
-
27
-
28
-
29
-
30
-
31
-
32
-
33
-
34
-
35
-
36
-
37
-
38
-
39
-
40
-
41
-
42
-
43
-
44
-
45
-
46
-
47
-
48
-
49
-
 50
50 -
 51
51 -
 52
52 -
 53
53 -
 54
54 -
 55
55 -
 56
56 -
 57
57 -
 58
58 -
 59
59 -
 60
60 -
61
-
62
-
63
-
64
-
65
-
66
-
67
-
68
-
69
-
70
-
71
-
72
-
73
-
74
-
75
-
76
-
77
-
78
-
79
-
80
-
81
-
82
-
83
-
84
-
85
-
86
-
87
-
88
-
89
-
90
-
91
-
92
-
93
-
94
-
95
-
96
-
97
-
98
-
99
-
100
-
101
-
102
-
103
-
104
-
105
-
106
-
107
-
108
-
109
-
110
-
111
-
112
-
113
-
114
-
115
-
116
-
117
-
118
-
119
-
120
-
121
-
122
-
123
-
124
-
125
-
126
-
127
-
128
-
129
-
130
-
131
-
132
-
133
-
134
-
135
-
136
-
137
-
138
-
139
-
140
-
141
-
142
-
143
-
144
-
145
-
146
-
147
-
148
 |
 |
