Panasonic DMREZ28 Dvd Recorder - English / Spanish - Page 13
to start automatic channel, Cable, then
 |
View all Panasonic DMREZ28 manuals
Add to My Manuals
Save this manual to your list of manuals |
Page 13 highlights
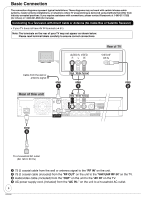
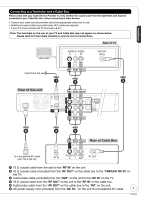
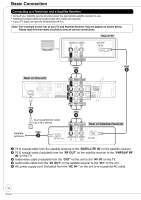
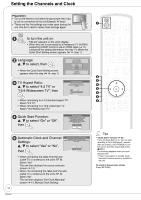
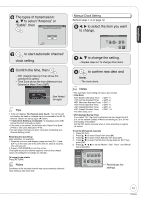
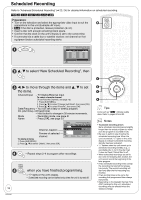
Getting Started The types of transmission: e, r to select "Antenna" or "Cable", then Automatic Clock and Channel Settings Please select the wire connected to RF IN. Antenna Cable OK to start automatic channel/ clock setting. 8 Confirm the time, then - DST (Daylight Saving Time) shows the summertime setting. - Time Zone shows the time difference from Greenwich Mean Time (GMT). Set Clock Automatically Clock Setting completed successfully. 4/4/2007 11:15 AM DST----------- On Time Zone---- EST See "Notes" (➔ right) OK Tips • If the unit displays "No channels were found.", turn off the unit and confirm the cable or antenna input is connected to the RF IN terminal. Restart the set up again (➔ below). • If "Auto Clock Setting is incomplete." is displayed, press [OK] and set the clock manually (➔ right). • If the clock is not correct, set the clock with "Adjust Time Zone" (➔ 49) or "Set Clock Manually" (➔ 49). • You can delete channels you don't need after completing Auto Channel Setting (➔ 46). Restarting the Auto-Setup (after relocation, for example) 1. When the unit is on and stopped, press and hold [CH 2] and [CH 1] on the main unit at the same time for about 5 seconds. The unit turns off. 2. Press [^ DVD POWER] to turn the unit on. (The signal source and channel captions revert to their default values. All scheduled recordings are cleared.) To cancel in the middle Press [RETURN]. Notes Conditions of the received channel may cause automatic channel/ clock setting to take extra time. Manual Clock Setting Perform steps 1-5 on page 12. w, q to select the item you want to change. Set Clock Manually Month Day Year 1 / 1 / 2000 SAT Hour Minute 12 : 00 AM DST Time Zone Off EST e, r to change the setting. - Repeat steps 6-7 to change other items. 8 to confirm new date and time. - The clock starts. Notes • The automatic clock setting can take a few minutes. • Time Zone EST (Eastern Standard Time) = GMT -5 CST (Central Standard Time) = GMT -6 MST (Mountain Standard Time) = GMT -7 PST (Pacific Standard Time) = GMT -8 AST (Alaska Standard Time) = GMT -9 HST (Hawaii Standard Time) = GMT -10 For other areas: xx hr • DST (Daylight Saving Time) If you select "On", the clock is advanced one hour beginning at 2 a.m. on the second Sunday in March and ending at 2 a.m. on the first Sunday in November. Set the DST period manually when it varies according to regions (➔ below). To set the DST period manually 1. Press [SETUP]. 2. Press [e, r] to select "Setup" then press [q]. 3. Press [e, r] to select "Clock Settings" then press [OK]. 4. Press [e, r] to select "Set the time change dates for DST" then press [OK]. 5. Press [e, r, w, q] to set the "Month", "Day", "Hour", and "Minute" then press [OK]. Setup Channel Setup Disc Video Audio Display TV Screen Set the time change dates for DST Beginning Month Day Hour Minute 3 2nd SUN 2 : 00 AM End Month 11 Day 1st SUN Hour Minute 2 : 00 AM OK Restore Default Reinitializes the settings. 13 RQT9046
-
 1
1 -
2
-
3
-
4
-
5
-
6
-
7
-
 8
8 -
 9
9 -
 10
10 -
 11
11 -
 12
12 -
 13
13 -
 14
14 -
 15
15 -
 16
16 -
 17
17 -
 18
18 -
19
-
20
-
21
-
22
-
23
-
24
-
25
-
26
-
27
-
28
-
29
-
30
-
31
-
32
-
33
-
34
-
35
-
36
-
37
-
38
-
39
-
40
-
41
-
42
-
43
-
44
-
45
-
46
-
47
-
48
-
49
-
50
-
51
-
52
-
53
-
54
-
55
-
56
-
57
-
58
-
59
-
60
-
61
-
62
-
63
-
64
-
65
-
66
-
67
-
68
-
69
-
70
-
71
-
72
-
73
-
74
-
75
-
76
-
77
-
78
-
79
-
80
-
81
-
82
-
83
-
84
 |
 |
