Panasonic DMREZ28 Dvd Recorder - English / Spanish - Page 55
to select HDMI RGB Output
 |
View all Panasonic DMREZ28 manuals
Add to My Manuals
Save this manual to your list of manuals |
Page 55 highlights
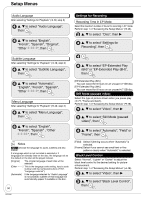
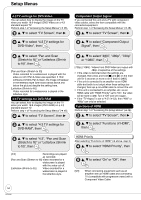
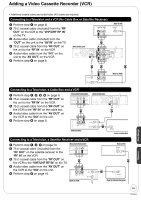
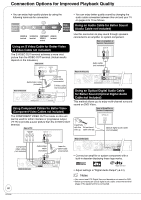
HDMI Resolution* You can only select items compatible with the connected equipment. This setting normally does not need to be changed. However if you are concerned about output picture quality, it may be improved by changing the setting. • To enjoy High Quality Video up-converted to 1080p, you need to connect the unit directly to a 1080p-compatible HDTV. If this unit is connected to an HDTV through other equipment, it must also be 1080p compatible. After selecting "Functions of HDMI" (➔ 54, step 3) e, r to select "HDMI Resolution", then e, r to select the item, then e, r to select "Full" or "Normal", then [Full] Video output is enlarged to match the screen size. [Normal] Video is output as 4:3 aspect. Side panels (black bars on the left and right) will appear on the screen. HDMI RGB Output Range* Effective when connected to a device that only supports RGB output. After selecting "Functions of HDMI" (➔ 54, step 3) e, r to select "HDMI RGB Output Range", then [Auto] [480i] [480p] [720p] [1080i] [1080p] Automatically selects the output resolution best suited to the connected television (1080p, 1080i, 720p or 480p). When setting video output to "1080p", we recommend using a Panasonic HIGH SPEED HDMI cable to prevent video distortion. 24p Output for DVD-Video* Can be set when you make the HDMI connection with a TV supporting 24p When this unit is connected to a TV supporting 1080/24p output via an HDMI cable, this unit displays each frame at 1/24 second intervals - the same interval originally shot with the film camera. After selecting "Functions of HDMI" (➔ 54, step 3) e, r to select "24p Output for DVDVideo", then e, r to select "On" or "Off", then e, r to select "Standard" or "Enhanced", then [Enhanced] When the black and white images are not distinct. HDMI Audio Output After selecting "Functions of HDMI" (➔ 54, step 3) e, r to select "HDMI Audio Output", then e, r to select "On" or "Off", then [Off] Audio is output from an amplifier when using the DIGITAL AUDIO OUT terminal (➔ 60). VIERA Link* After selecting "Functions of HDMI" (➔ 54, step 3) e, r to select "VIERA Link", then Setting Menus [On] Set to "On" and then set "Progressive/24p" in the Video Menu in the On-Screen Menu (➔ 43) to "24p". When the video is being output in 24 frames per second, no video is output from a video terminal other than the HDMI terminal. HDMI Output Display Aspect* Settings used when 4:3 aspect video is output on the television as 16:9 aspect. After selecting "Functions of HDMI" (➔ 54, step 3) e, r to select "HDMI Output Display Aspect", then e, r to select "On" or "Off", then [On] When "On" is selected, you can operate other "HDAVI Control" compatible devices using "HDAVI Control". Notes Depending on the equipment to connect, some items may be shaded in gray on the display and cannot be selected, or changing settings may be unavailable. *Above items can be set when you set "HDMI Priority" to "On". 55 RQT9046
-
 1
1 -
2
-
3
-
4
-
5
-
6
-
7
-
8
-
9
-
10
-
11
-
12
-
13
-
14
-
15
-
16
-
17
-
18
-
19
-
20
-
21
-
22
-
23
-
24
-
25
-
26
-
27
-
28
-
29
-
30
-
31
-
32
-
33
-
34
-
35
-
36
-
37
-
38
-
39
-
40
-
41
-
42
-
43
-
44
-
45
-
46
-
47
-
48
-
49
-
 50
50 -
 51
51 -
 52
52 -
 53
53 -
 54
54 -
 55
55 -
 56
56 -
 57
57 -
 58
58 -
 59
59 -
 60
60 -
61
-
62
-
63
-
64
-
65
-
66
-
67
-
68
-
69
-
70
-
71
-
72
-
73
-
74
-
75
-
76
-
77
-
78
-
79
-
80
-
81
-
82
-
83
-
84
 |
 |
