Panasonic DMREZ28 Dvd Recorder - English / Spanish - Page 6

Control Reference Guide, Main Unit, Remote Control - recorder

Page 6 highlights

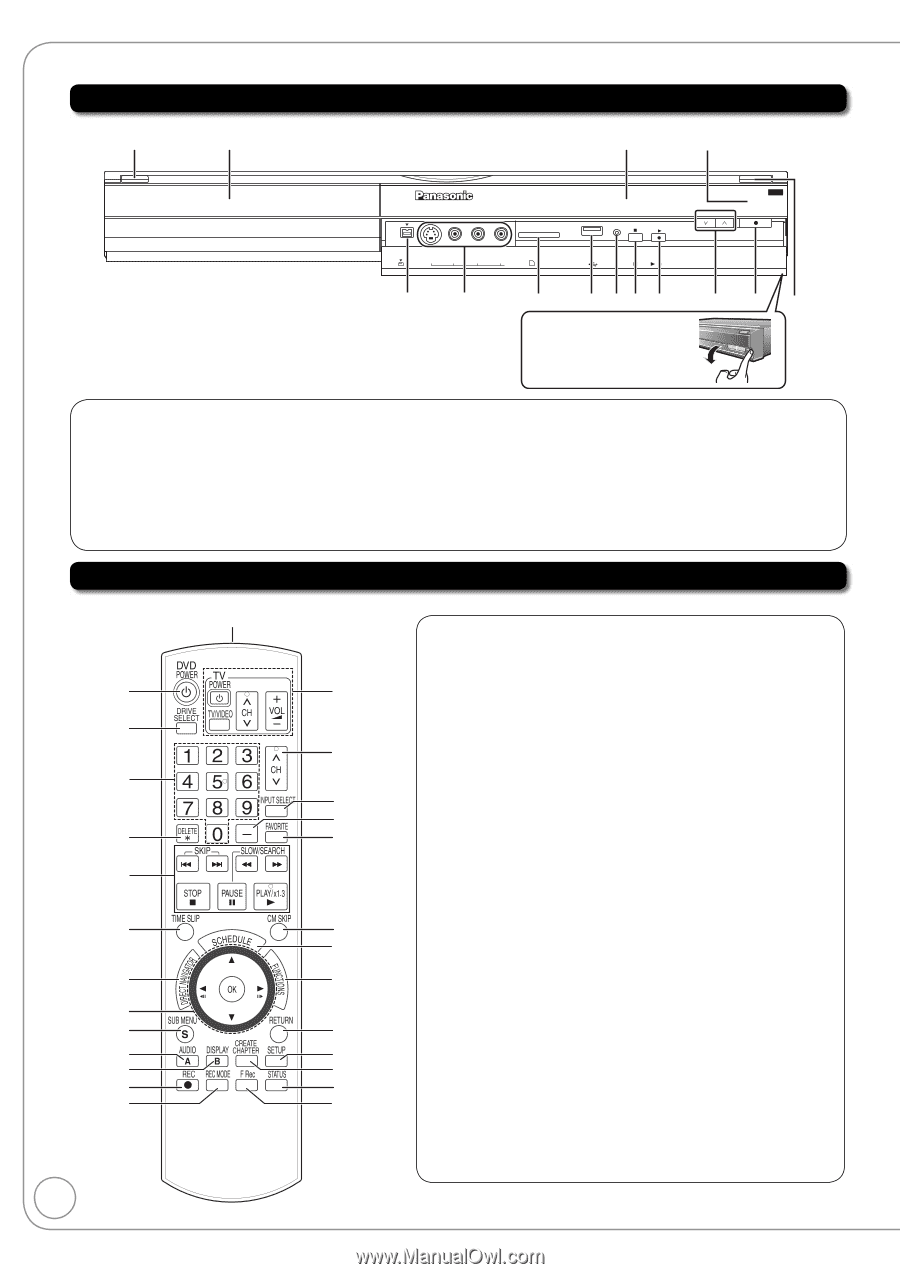
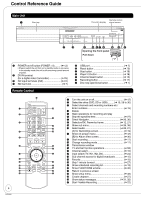
Control Reference Guide Main Unit 1 Disc tray Remote control The unit's display signal sensor USB CH REC DV IN S VIDEO VIDEO L/MONO-AUDIO-R IN2 SD CARD RESET / 1.3 23 4 5 67 8 9 bk bl Opening the front panel Pull down 1 POWER on/off button (POWER ^/I 12) • Press to switch the unit from on to standby mode or vice versa. In the standby mode, the unit is still consuming a small amount of power. 2 DV IN terminal (for a digital video Camcorder 25) 3 IN2 input terminals (IN2 24) 4 SD Card slot 7) 5 USB port 7) 6 Reset button 70) 7 Stop button 16) 8 Play/x1.3 button 16) 9 Channel Select button 15) bk Recording button 17) bl Disc tray open/close button 7) Remote Control bo 1 Turn the unit on or off 12) 2 Select the drive (DVD, SD or USB 19, 28 to 30) 3 Select channels and recording numbers etc./ 1 bp Enter numbers 15) 4 Delete 2 5 Basic operations for recording and play bq 6 Skip the specified time 27) 7 Direct Navigator 26, 36) 3 8 Selection/OK, Frame-by-frame 12, 27) br 9 Show sub menu 26, 36) bs bk Select audio 22, 27) 4 bt [A] for Recordings screen 19) bl Show on-screen menu 42) 5 [B] for Album View screen 30) bm Start recording 17) bn Change recording mode 17) 6 ck bo Transmission window cl bp TV and Set Top Box operations 56) bq Channel select 15) 7 cm br Input select (TV, IN1, IN2, DV 24) bs Sub channel access for digital broadcasts 15) 8 bt Favorite 15) 9 cn ck Skip 1 minute forward 27) bk co cl Show scheduled recording list 18) bl cp cm Show FUNCTIONS window 33) bm cq cn Return to previous screen bn cr co Show setup menu 46) cp Create chapters 27) cq Show status messages 31, 32) cr Start Flexible Recording 22) 6 RQT9046

  • 1
  • 2
  • 3
  • 4
  • 5
  • 6
  • 7
  • 8
  • 9
  • 10
  • 11
  • 12
  • 13
  • 14
  • 15
  • 16
  • 17
  • 18
  • 19
  • 20
  • 21
  • 22
  • 23
  • 24
  • 25
  • 26
  • 27
  • 28
  • 29
  • 30
  • 31
  • 32
  • 33
  • 34
  • 35
  • 36
  • 37
  • 38
  • 39
  • 40
  • 41
  • 42
  • 43
  • 44
  • 45
  • 46
  • 47
  • 48
  • 49
  • 50
  • 51
  • 52
  • 53
  • 54
  • 55
  • 56
  • 57
  • 58
  • 59
  • 60
  • 61
  • 62
  • 63
  • 64
  • 65
  • 66
  • 67
  • 68
  • 69
  • 70
  • 71
  • 72
  • 73
  • 74
  • 75
  • 76
  • 77
  • 78
  • 79
  • 80
  • 81
  • 82
  • 83
  • 84

6
RQT9046
Main Unit
Opening the front panel
Pull down
USB
CH
REC
/
1.3
RESET
SD CARD
IN2
DV IN
S VIDEO
VIDEO
L/MONO-AUDIO-R
2
4
5 67 8
9
bk
The unit’s display
Remote control
signal sensor
1
Disc tray
3
bl
1
POWER on/off button (POWER
^
/I)
.........
(
12)
Press to switch the unit from on to standby mode or vice versa.
In the standby mode, the unit is still consuming a small amount
of power.
2
DV IN terminal
(for a digital video Camcorder)
.................
(
25)
3
IN2 input terminals (IN2)
..........................
(
24)
4
SD Card slot
...............................................
(
7)
5
USB port
.....................................................
(
7)
6
Reset button
.............................................
(
70)
7
Stop button
...............................................
(
16)
8
Play/x1.3 button
........................................
(
16)
9
Channel Select button
..............................
(
15)
bk
Recording button
......................................
(
17)
bl
Disc tray open/close button
........................
(
7)
Remote Control
1
4
5
7
6
3
9
bp
bq
bt
ck
cl
cm
8
bo
br
bs
bk
bl
bm
bn
cp
cq
cn
co
cr
2
1
Turn the unit on or off
..............................................
(
12)
2
Select the drive (DVD, SD or USB)
.........
(
19, 28 to 30)
3
Select channels and recording numbers etc./
Enter numbers
........................................................
(
15)
4
Delete
5
Basic operations for recording and play
6
Skip the specified time
............................................
(
27)
7
Direct Navigator
................................................
(
26, 36)
8
Selection/OK, Frame-by-frame
.........................
(
12, 27)
9
Show sub menu
................................................
(
26, 36)
bk
Select audio
......................................................
(
22, 27)
[A] for Recordings screen
.......................................
(
19)
bl
Show on-screen menu
............................................
(
42)
[B] for Album View screen
.......................................
(
30)
bm
Start recording
........................................................
(
17)
bn
Change recording mode
.........................................
(
17)
bo
Transmission window
bp
TV and Set Top Box operations
..............................
(
56)
bq
Channel select
........................................................
(
15)
br
Input select (TV, IN1, IN2, DV)
................................
(
24)
bs
Sub channel access for digital broadcasts
.............
(
15)
bt
Favorite
...................................................................
(
15)
ck
Skip 1 minute forward
.............................................
(
27)
cl
Show scheduled recording list
................................
(
18)
cm
Show FUNCTIONS window
...................................
(
33)
cn
Return to previous screen
co
Show setup menu
...................................................
(
46)
cp
Create chapters
......................................................
(
27)
cq
Show status messages
.....................................
(
31, 32)
cr
Start Flexible Recording
.........................................
(
22)
Control Reference Guide