Panasonic DMREZ28 Dvd Recorder - English / Spanish - Page 52
Select Audio Channel For DV Input, Status Messages, On-screen Language, Black Background Analog
 |
View all Panasonic DMREZ28 manuals
Add to My Manuals
Save this manual to your list of manuals |
Page 52 highlights
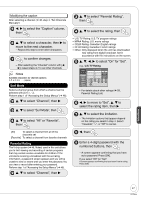
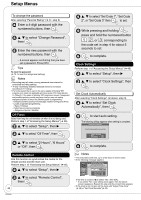
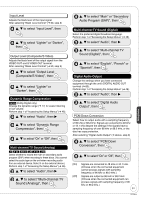
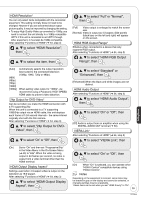
Setup Menus Dolby Digital* Choose whether to output by "Bitstream", which processes Dolby Digital signals on other connected equipment, or to convert the signals to "PCM" (2ch) on the unit before output. After selecting "Digital Audio Output" (➔ 51, step 3) e, r to select "Dolby Digital", then Status Messages Choose whether to show status messages automatically or not. Perform step 1 of "Accessing the Setup Menus" (➔ 46). e, r to select "Display", then q e, r to select "Status Messages", then e, r to select "Bitstream" or "PCM", then [Bitstream] When you have connected the unit to equipment displaying the Dolby Digital logo. [PCM] When you have connected the unit to equipment that doesn't have Dolby Digital logo. DTS* Choose whether to output by "Bitstream", which processes DTS signals on other connected equipment, or to convert the signals to "PCM" (2ch) on the unit before output. e, r to select "Automatic" or "Off", then On-screen Language Choose the language for these menus and the onscreen messages. Perform step 1 of "Accessing the Setup Menus" (➔ 46). e, r to select "Display", then q After selecting "Digital Audio Output" (➔ 51, step 3) e, r to select "DTS", then e, r to select "Bitstream" or "PCM", then [Bitstream] When you have connected the unit to equipment displaying the DTS logo. [PCM] When you have connected the unit to equipment that doesn't have DTS logo. * Incorrect settings can cause noise to be output which can be harmful to your ears and speakers, and audio will not be recorded properly on media such as mini discs. Select Audio Channel For DV Input You can select the kind of audio when recording from the unit's DV IN terminal (➔ 25). Perform step 1 of "Accessing the Setup Menus" (➔ 46). e, r to select "Audio", then q e, r to select "Select Audio Channel For DV Input", then e, r to select "On-screen Language", then e, r to select "English", "Español" or "Français", then Black Background (Analog) Select whether to show the black (gray) background, normally shown when TV reception is poor. Perform step 1 of "Accessing the Setup Menus" (➔ 46). e, r to select "Display", then q e, r to select "Black Background (Analog)", then e, r to select "On" or "Off", then e, r to select "Stereo 1", "Stereo 2" or "Mix", then [Stereo 1] Records audio (L1, R1) [Stereo 2] Records added audio such as narration 52 (L2, R2) subsequent to original recording. [Mix] Records both Stereo 1 and Stereo 2. RQT9046 Front Display Changes the brightness of the unit's display. Perform step 1 of "Accessing the Setup Menus" (➔ 46). e, r to select "Display", then q
-
 1
1 -
2
-
3
-
4
-
5
-
6
-
7
-
8
-
9
-
10
-
11
-
12
-
13
-
14
-
15
-
16
-
17
-
18
-
19
-
20
-
21
-
22
-
23
-
24
-
25
-
26
-
27
-
28
-
29
-
30
-
31
-
32
-
33
-
34
-
35
-
36
-
37
-
38
-
39
-
40
-
41
-
42
-
43
-
44
-
45
-
46
-
 47
47 -
 48
48 -
 49
49 -
 50
50 -
 51
51 -
 52
52 -
 53
53 -
 54
54 -
 55
55 -
 56
56 -
 57
57 -
58
-
59
-
60
-
61
-
62
-
63
-
64
-
65
-
66
-
67
-
68
-
69
-
70
-
71
-
72
-
73
-
74
-
75
-
76
-
77
-
78
-
79
-
80
-
81
-
82
-
83
-
84
 |
 |
