Panasonic DMREZ28 Dvd Recorder - English / Spanish - Page 49
Quick Start, DivX Registration, Restore Default Settings, Settings for Playback
 |
View all Panasonic DMREZ28 manuals
Add to My Manuals
Save this manual to your list of manuals |
Page 49 highlights
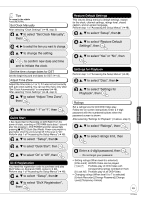
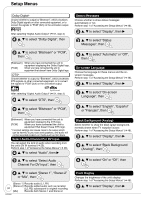
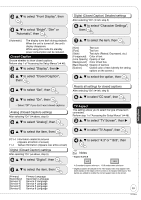
Tips To cancel in the middle Press [RETURN]. Set Clock Manually After selecting "Clock Settings" (➔ 48, step 3) e, r to select "Set Clock Manually", then w, q to select the item you want to change. e, r to change the setting. to confirm new date and time and to initiate the clock. Set the time change dates for DST Set the beginning and end dates for DST (➔ 13). Adjust Time Zone Adjust the time zone (-1 or 1) if it was not set correctly with auto clock setting. You can set this menu only after "Set Clock Automatically" is completed (➔ 48). After selecting "Clock Settings" (➔ 48, step 3) e, r to select "Adjust Time Zone", then e, r to select "-1" or "1", then Quick Start 1 Sec. Quick Start for Recording on DVD-RAM. From the power off state, recording on DVD-RAM starts about 1 second after first pressing [^ DVD POWER] and then sequentially pressing [* REC] (Quick Start Mode). Power consumption is also higher when the unit is turned off if this is set to "On". Perform step 1 of "Accessing the Setup Menus" (➔ 46). e, r to select "Setup", then q e, r to select "Quick Start", then e, r to select "On" or "Off", then DivX Registration You need this registration code to purchase and play DivX Video-on-Demand (VOD) content (➔ 29). Perform step 1 of "Accessing the Setup Menus" (➔ 46). e, r to select "Setup", then q e, r to select "DivX Registration", then Restore Default Settings This returns Setup menus to default settings, except for the clock, channel settings, ratings level, closed caption, and on-screen language. Perform step 1 of "Accessing the Setup Menus" (➔ 46). e, r to select "Setup", then q e, r to select "Restore Default Settings", then e, r to select "Yes" or "No", then Settings for Playback Perform step 1 of "Accessing the Setup Menus" (➔ 46). e, r to select "Disc", then q e, r to select "Settings for Playback", then Ratings Set a ratings level to limit DVD-Video play. Follow the on-screen instructions. Enter a 4-digit password with the numbered buttons when the password screen is shown. After selecting "Settings for Playback" (➔ above, step 3) e, r to select "Ratings", then e, r to select ratings limit, then Enter a 4-digit password, then - Do not forget your password. • Setting ratings (When level 8 is selected) [8 No Limit] All DVD-Video can be played. [1] to [7] Prohibits play of DVD-Video with corresponding ratings recorded on them. [0 Lock All] Prohibits play of all DVD-Video. • Changing ratings (When level 0 to 7 is selected) [Unlock Recorder] [Change Password] [Change Level] [Temporary Unlock] 49 RQT9046 Setting Menus
-
 1
1 -
2
-
3
-
4
-
5
-
6
-
7
-
8
-
9
-
10
-
11
-
12
-
13
-
14
-
15
-
16
-
17
-
18
-
19
-
20
-
21
-
22
-
23
-
24
-
25
-
26
-
27
-
28
-
29
-
30
-
31
-
32
-
33
-
34
-
35
-
36
-
37
-
38
-
39
-
40
-
41
-
42
-
43
-
 44
44 -
 45
45 -
 46
46 -
 47
47 -
 48
48 -
 49
49 -
 50
50 -
 51
51 -
 52
52 -
 53
53 -
 54
54 -
55
-
56
-
57
-
58
-
59
-
60
-
61
-
62
-
63
-
64
-
65
-
66
-
67
-
68
-
69
-
70
-
71
-
72
-
73
-
74
-
75
-
76
-
77
-
78
-
79
-
80
-
81
-
82
-
83
-
84
 |
 |