Panasonic DMREZ28 Dvd Recorder - English / Spanish - Page 54
TV settings for DVD-Video, Component Output Signal, Functions of HDMI, to fit, then
 |
View all Panasonic DMREZ28 manuals
Add to My Manuals
Save this manual to your list of manuals |
Page 54 highlights
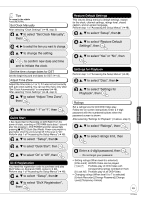
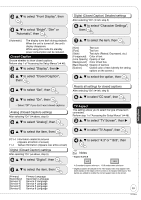
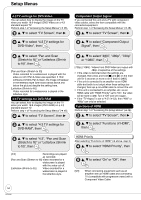
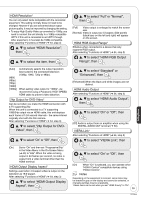
Setup Menus 4:3 TV settings for DVD-Video You can select how to display the image on the TV when you watch 16:9 images (DVD-Video) on a 4:3 standard aspect TV. Perform step 1 of "Accessing the Setup Menus" (➔ 46). e, r to select "TV Screen", then q Component Output Signal If you connected this unit and a TV with component video cables, select the item compatible with the connected equipment. Perform step 1 of "Accessing the Setup Menus" (➔ 46). e, r to select "TV Screen", then q e, r to select "4:3 TV settings for DVD-Video", then e, r to select "Component Output Signal", then e, r to select "Pan and Scan (Stretch to fit)" or "Letterbox (Shrink to fit)", then [Pan and Scan (Stretch to fit)] Video recorded for a widescreen is played with the sides cut off if Pan & Scan was specified. If 16:9 software prohibits Pan & Scan, the image will appear in the letterbox style (with black bands above and below the picture) despite the setting here. [Letterbox (Shrink to fit)] Video recorded for a widescreen is played in the letterbox style. 4:3 TV settings for DVD-RAM You can select how to display the image on the TV when you watch 16:9 images (DVD-RAM) on a 4:3 standard aspect TV. Perform step 1 of "Accessing the Setup Menus" (➔ 46). e, r to select "TV Screen", then q e, r to select "4:3 TV settings for DVD-RAM", then e, r to select "480i", "480p", "720p" or "1080i", then [720p], [1080i]: Videos from DVD-Video are output with 480p, irrespective of the settings. • If the video is distorted when the settings are changed, then press and hold [g] and [q] on the main unit for 5 seconds or more to set it back to [480i]. • If this unit is connected to an amplifier via an HDMI cable and audio is not output when these settings are changed, then use a non-HDMI cable to connect the unit. • If this unit is connected to an amplifier, etc. via an HDMI cable with "HDMI Priority" set to "On", the video will be fixed to 480i. Turn it "Off" and set it again. • If the "TV Aspect" is set to "4:3" (➔ 53), then "480i" or "480p" can only be selected. Functions of HDMI Perform step 1 of "Accessing the Setup Menus" (➔ 46). e, r to select "TV Screen", then q e, r to select "Functions of HDMI", then e, r to select "4:3", "Pan and Scan (Stretch to fit)" or "Letterbox (Shrink to fit)", then HDMI Priority After selecting "Functions of HDMI" (➔ above, step 3) e, r to select "HDMI Priority", then [4:3] Recordings are played as recorded. [Pan and Scan (Stretch to fit)] Video recorded for a widescreen is played with the sides cut off. [Letterbox (Shrink to fit)] Video recorded for a widescreen is played in the letterbox style. e, r to select "On" or "Off", then [Off] When connecting equipment such as an amplifier with an HDMI cable and connecting TV (compatible with progressive video) with a Component Video Cable 54 RQT9046
-
 1
1 -
2
-
3
-
4
-
5
-
6
-
7
-
8
-
9
-
10
-
11
-
12
-
13
-
14
-
15
-
16
-
17
-
18
-
19
-
20
-
21
-
22
-
23
-
24
-
25
-
26
-
27
-
28
-
29
-
30
-
31
-
32
-
33
-
34
-
35
-
36
-
37
-
38
-
39
-
40
-
41
-
42
-
43
-
44
-
45
-
46
-
47
-
48
-
 49
49 -
 50
50 -
 51
51 -
 52
52 -
 53
53 -
 54
54 -
 55
55 -
 56
56 -
 57
57 -
 58
58 -
 59
59 -
60
-
61
-
62
-
63
-
64
-
65
-
66
-
67
-
68
-
69
-
70
-
71
-
72
-
73
-
74
-
75
-
76
-
77
-
78
-
79
-
80
-
81
-
82
-
83
-
84
 |
 |
